| Previous
Page |
PCLinuxOS
Magazine |
PCLinuxOS |
Article List |
Disclaimer |
Next Page |
GIMP Tutorial: Adding A Person To A Group Photo |
|
by Meemaw Several years ago (2010), I went to a meeting with some fellow secretaries. Towards the end of the meeting, we went to supper at a local restaurant, and decided to have someone take a group photo. Unfortunately, one of the girls had not eaten with us, so they asked if I could put her in the photo with the rest of us. I was able to do it, but with my limited GIMP experience, it didn't turn out as well as I would have liked. With a tutorial from Davies Media Design, I'm learning how to do it. I'll use a couple of photos I downloaded from Wikimedia Commons before I go back to my own photo. Use larger photos to give yourself room to work. Photos can always be sized down later, but not made bigger. 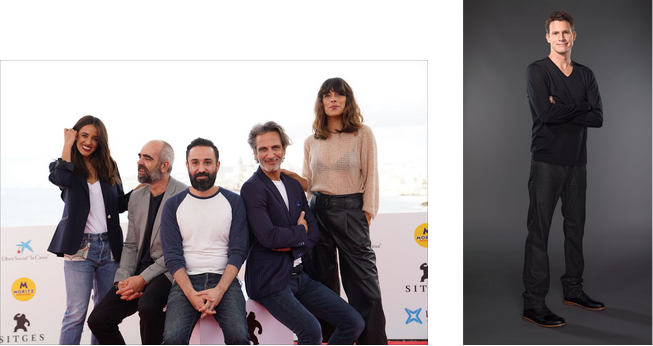 The group photo is from a film festival. I want to add the single man to the group photo. After loading them into GIMP, let's concentrate on the single person. Obviously, we'll have to cut him away from the background to insert him into the group photo, so let's do that first. In this tutorial, Davies uses the Paths tool to draw around the person. Since his clothes are close in color to the background, we should do something to emphasize his clothes while we outline it. First, make a copy of the layer, and we'll work with that. Choosing the copy, go to Colors > Levels, and slide the slider until your picture is much lighter. Depending on the photo, you'll have a small change or a big one.  You can see there's now a bigger difference between the background and the clothes. Choose your Paths Tool, zoom in, and start outlining. You can get a better cutout if you zoom in a lot. 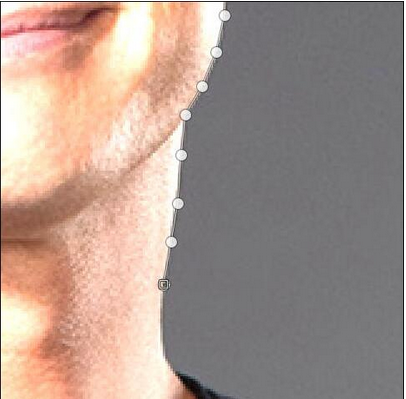 When you've gone all the way around (it might take a while, depending on how far in you have zoomed), press <Enter>. You'll get an outline with a bunch of nodes. 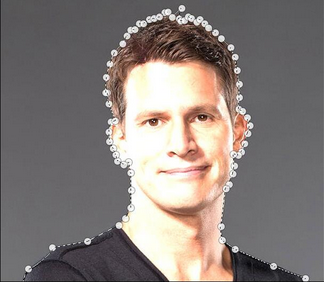 While your path tool is still selected, there is a tool menu showing. Choose Selection from path. 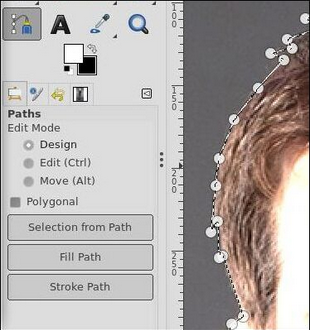 Now, choose the original layer, right click and add an Alpha Channel to it. Reminder: if your photo already has an alpha channel (transparency), the Add Alpha Channel is greyed out. Next, right click the original layer again, and choose Add Layer Mask. When the window comes up, choose Selection rather than black or white. 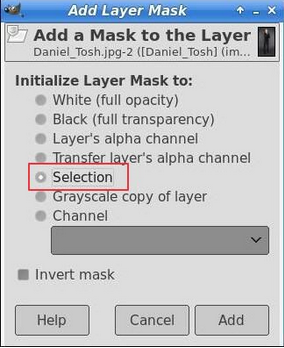 And your drawing will be only the person you want. 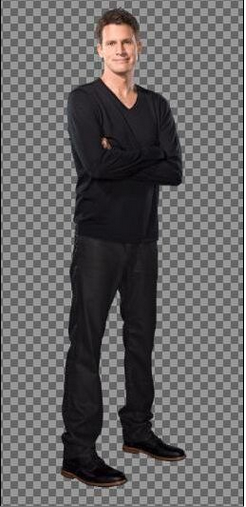 Now we have an image we can put into the group photo! You should have the photo still open in GIMP. Click the layer (in the Layers dialog) and drag it to the tab at the top with the other photo. When you do that, GIMP will switch to that photo and your layer will be hovering above the photo. Drag it to the approximate location where you want to add the person, then release your mouse button. DO NOT anchor the layer. You'll notice that the layer mask came as well. When I did that, the person was smaller than the people in the group! Now, I need to scale the insert so he will appear to be the same size as the rest of the people. Click on your Scale tool, then click on your person. Drag the corner of the box (making sure that the aspect ratio of your photo stays the same). 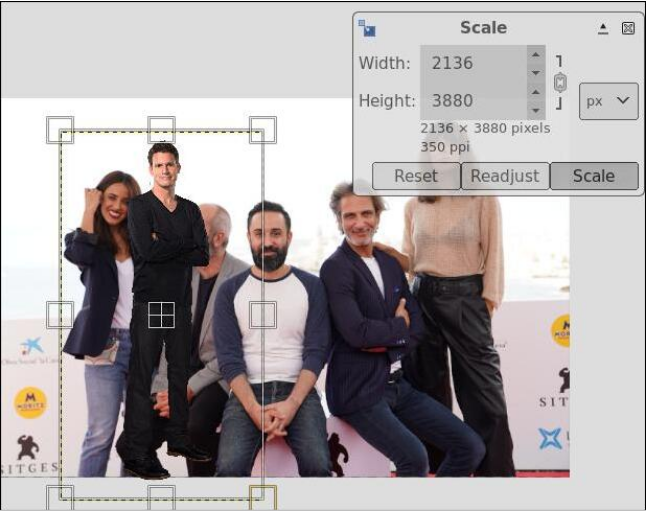 If you need to edit the colors in your photos, now is the time to do it. You can use Colors > Levels or Colors > Curves to adjust the color on one of the photos to make them match a little closer. Mine was already pretty close so I didn't have much to do. One thing Davies suggests if they are different is to duplicate this image and work on the duplicate. You can go into Image > Mode and change the drawing to RGB instead of color, and work on that. Once you use Curves or something to edit it, change to the original and go to Filters > Redo Curves, and those same settings will be applied to the original. 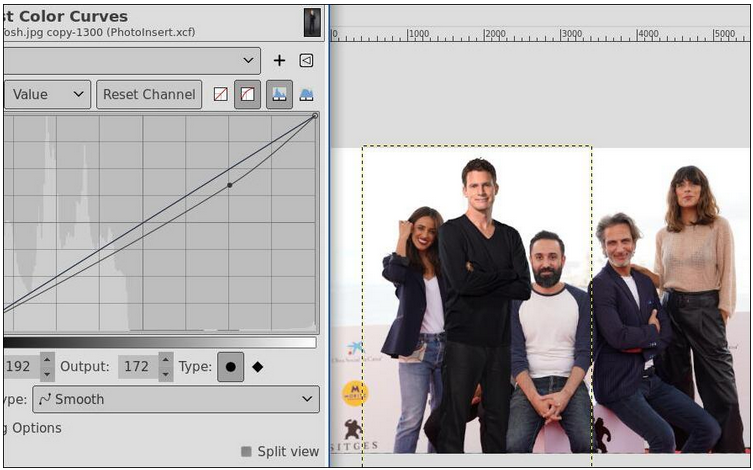 OK, you have the colors edited, and the person inserted, even though it doesn't look right yet. Now you have to get your person in correctly. You can see above where I want the person to be, but I want him behind the others (and there's another guy sitting there, but we can't see him). We're going to use the Paths tool again. First, right click on your person layer and add a layer group. Click and drag the person layer into the group. We're doing this so we can add another layer mask. The first mask was to mask out the photo background ... this one will mask out that part of the person we don't want to see. Right click on the layer group and select Add Layer Mask. When you do that, your person will disappear, but you can go back & forth by right clicking and checking the box in front of Disable Layer Mask. Now, we want to use the paths tool to outline an area where we want the person to show up. Since he's going to be behind the others, we need to outline the space between the people where we want him to show. 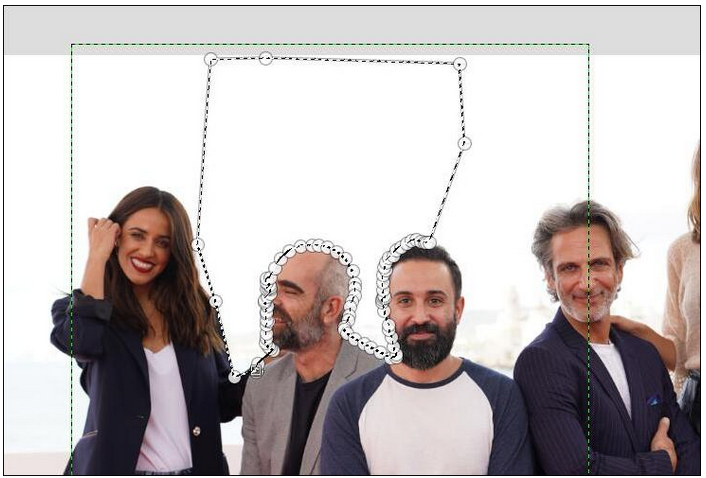 Notice that the outline is where he's going to be, and I went around the people that should show, wide enough that his shoulders are there. Go back and uncheck Disable Layer Mask. 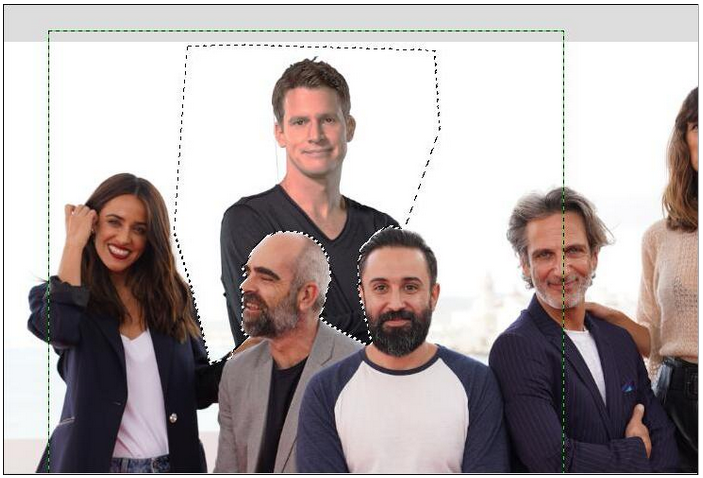 You can always tweak this photo by editing colors, or moving the person a tiny bit. See the finished product below. The guys in front are sitting on something, so my inserted person shows correctly now. Davies has more procedures for getting the colors sharper and the shadows added, if needed. Most of his methods are done at the end. One thing that might make the photo look better is the use of the Unsharp Mask, which actually sharpens the image. We've looked at this before. Feel free to use whatever finishing method you want to improve your photo. 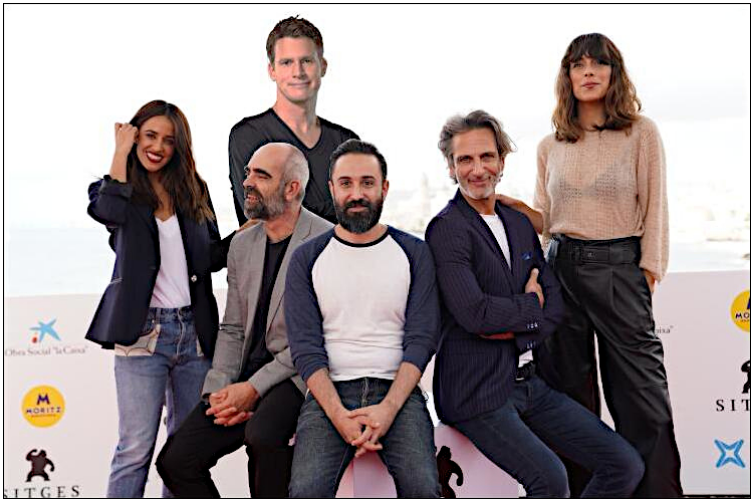 |