| Previous
Page |
PCLinuxOS
Magazine |
PCLinuxOS |
Article List |
Disclaimer |
Next Page |
Resizing Images, Revisited |
|
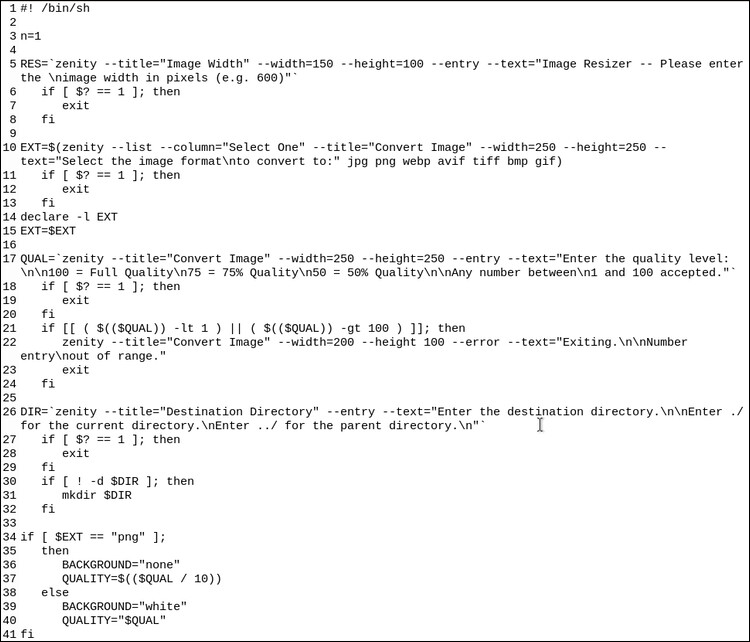
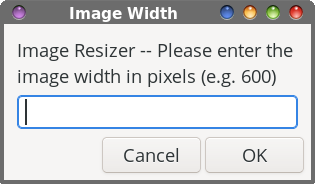
by Paul Arnote (parnote) As you might imagine, I work A LOT with graphic files in my position as the Chief Editor of The PCLinuxOS Magazine. So, I’m always looking for things that will “make my life easier” when working with graphic files. After all, why should I have to open up GIMP (or any other graphic file editor, for that matter) just to convert or resize an image when I can do it so much quicker from a custom bash script? Plus, the custom bash script allows me to perform the tasks on multiple images at once. Eleven months ago, I updated a previous script that I use to convert between various graphic formats. In doing so, I added “protection” to prevent overwriting the original graphic file, as well as ensuring that the compression value of the image is between 0 and 100. I often use my custom bash script to convert between different graphic formats. But, I probably use a different custom bash script to resize images even more. Like, almost daily. So, I figured why not give that custom bash script an update to prevent the overwriting of original graphic files, and to ensure that the compression value of the image stays within the range of 0 and 100. As with all of my “other” custom bash scripts, this one can be run by anyone from the command line, or it can be used as a Thunar Custom Action. Since I pretty much use the Xfce desktop exclusively, that latter point is huge for me. It makes my life easier, and fits in with the way that I prefer to work perfectly. The script takes graphic files/file names as its parameter. It can be one file, or a whole slew of files. Users of KDE or Mate desktops should also be able to use this script in a similar manner, but how to configure Dolphin or Caja as a service menu item is beyond the scope of this article. A little later on in the article, I’ll illustrate a version of the script that does, with a few changes, work as a standalone program. This will allow those who fear (or avoid) the command line to create a launcher on a panel or on their desktop to create a wholly standalone program. This will also allow users of ANY Linux desktop to use this script, without having to delve into the in’s-and-out’s of configuring it for use in a file manager other than Thunar. While I’m definitely NOT a command line “commando,” I was able to figure out how to add the file selection dialog, and then use that information and method to select and to resize images, in bulk. There is NO reason to fear overwriting any of your original files, because I’ve eliminated that risk. The ONLY time you have to worry about overwriting ANY of your images is if you use the original image, and enter the same dimensions and compression ratio, and then it will overwrite the OLD version of the image with the same dimensions and compression ratio. However, your original file(s) are safe from being overwritten. The “New” Script I originally wrote about the “original” version (scroll down to the “Resizing” section of that article) of the image resizing script a little over 10 years ago (Egads! … It’s hard to believe it has been THAT long ago!). Over the years, I’ve tweaked it, and then tweaked it some more, and then tweaked it some more again. You get the idea. This new version of the script is called Img-resize4.sh. You can download it from the magazine’s website, or type it in if you prefer. If you choose to download it from the magazine website, be sure to remove the “.txt” file extension from the downloaded file, store it where you typically store your bash scripts, and make the file executable. I store all of my bash scripts in my ~/bin directory, which is in my system’s path statement. That way, I don’t have to specify a path to my bash scripts. So, below is the new script for resizing your images. In the image, I’ve included the line numbers from my text editor, to make it easier for you to follow along.
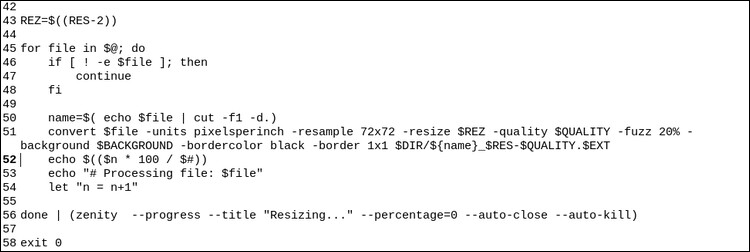
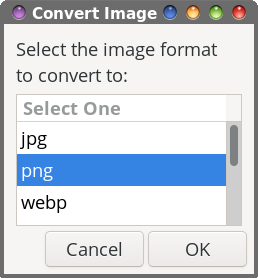 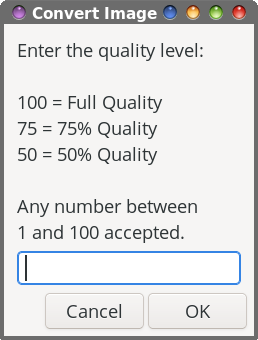 Lines 10 through 15 allow you to choose the file format that you want to convert your image(s) to. Lines 17 through 24 allow you to specify the image quality setting. The higher the number, the higher the quality, and the larger the file size.
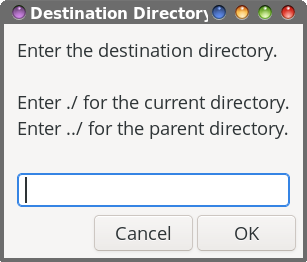
Lines 26 through 32 allow you to choose what directory you want to store your resized images in. If you want to store them in the same directory as the original file, just enter ./ as the directory. Similarly, entering ../ as the destination directory will place the resized images in the parent directory of whatever directory your original images are currently stored in. Lines 34 through 41 make some changes to the image background value, depending on whether you’re converting to PNG or JPG files. Line 43 adjusts the resolution (width) of your images to accommodate the one pixel black border that the script puts around the edge of the resized image. Lines 45 through 54 is where the “magic” happens. The list of images sent to the script as command line arguments are cycled through in a “for” loop, and each one is assigned a new filename, with the resolution and quality level, and with the new file extension. The heavy lifting for the script is done by ImageMagick’s convert command. That variable we declared at the very beginning, in Line 3, is incremented to allow the progress bar to be updated properly. 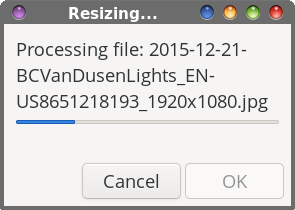 Line 56 is what’s responsible for displaying the progress bar and dialog box that appears while the script is processing the images you “fed” it. If you’re only doing a small number of images, you might never even notice the progress dialog box appears. However, you will appreciate the progress bar when processing a large number of files. Line 58 exits the script cleanly, after all of the images have been processed. Like I mentioned earlier, the script is designed from the outset to work either from the command line, or from a Thunar Custom Action. To set up the Thunar Custom Action, your custom action windows will most likely look like one of these shown below. 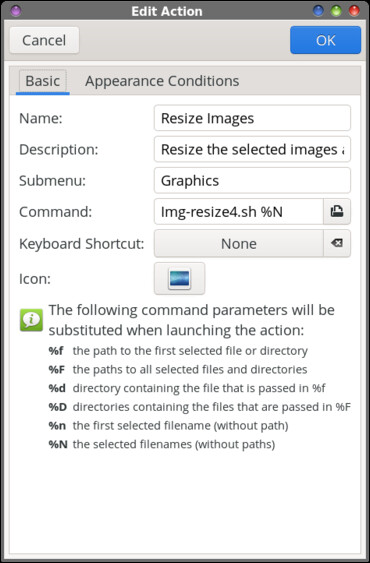 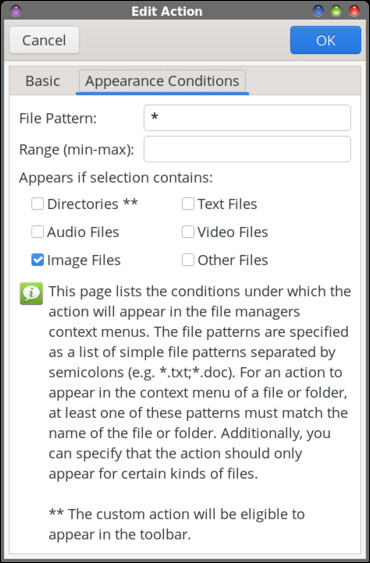 Everything works with this version of the script exactly as I intended for it to. The script is small, and it is F-A-S-T. The “Standalone” Script In the process of updating my image resizing script, I decided to try making a standalone script that can be run from a launcher on a panel or from the desktop. Virtually ALL of the functionality of the previous version is maintained, but there are some slight differences, which I’ll reveal as we go through the script. After all, the previous version has all of the data it needs passed to it by way of the command line. This standalone version has to be “fed” the data it needs, entirely from GUI elements. As with the previous script, you can download it from the magazine’s website. And, as with the previous script, delete the “.txt” file extension, save the script where you usually save your bash scripts, and make the file executable. This version of the script is named Img-resizer5b. A lot of the script remains the same as with the previous version, with some notable differences. First, here’s the script that works as a standalone program. 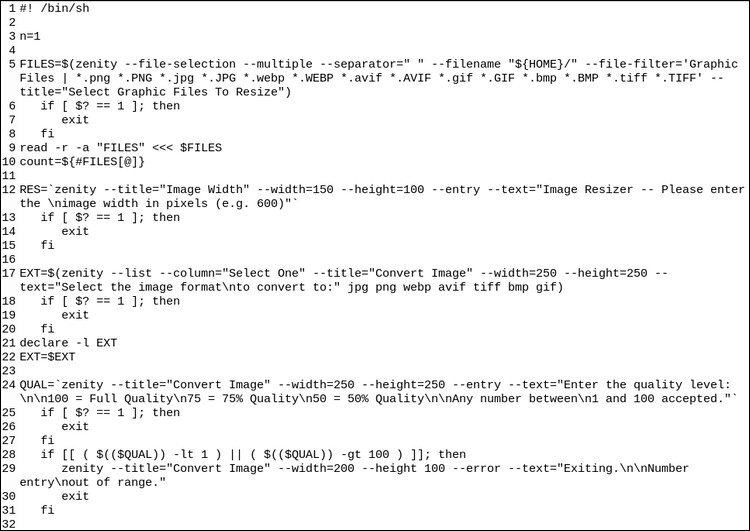 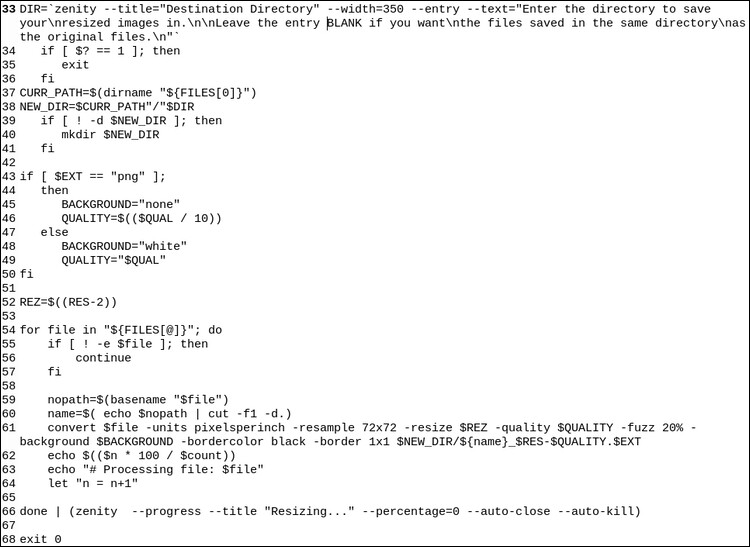 So, instead of rehashing everything I’ve already told you about the previous script, I’ll just talk about what is different. ;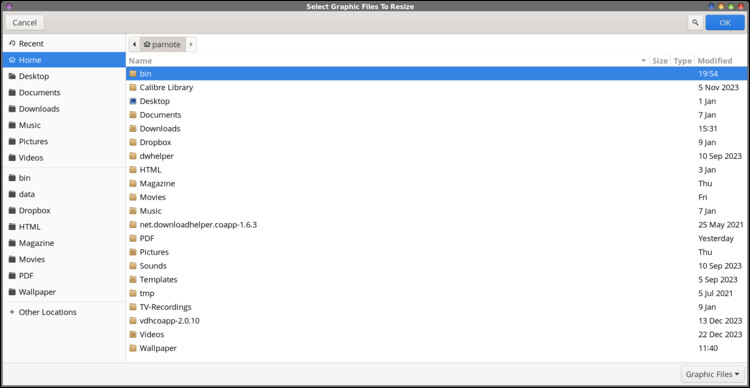 In Lines 5 through 9, the Zenity file selection dialog is displayed. The Zenity command is restricted to displaying ONLY those files which match the file extensions listed: PNG, JPG, WEBP, AVIF, GIF, BMP and TIFF (and directories). I’ve also made it so that it will function with images that use all lowercase letters in the file extension, or with images that use all uppercase letters in the file extension. It also allows the selection of multiple files for resizing. The separator is set to a blank space between files. Without specifying the separator, it defaults to a “|” pipe symbol as a separator. By default, the read command uses a blank space as its delimiter, so setting the separator to a blank space accommodates the use of the read command to create the array. In Line 9, the selected files are put into an array for later processing. 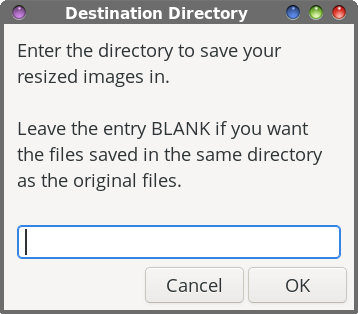 From Lines 33 through 41, we have to alter a few things. First, we have to alter the appearance of the “Destination Directory” dialog box. Second, we also have to construct a proper path for the new image, and create the destination directory, if it doesn’t already exist. With this standalone version of the script, you cannot specify the parent directory (../) as the destination directory. However, if you want to save your resized images in the same directory as your original image files (remember, your original files are safe from being overwritten), just leave the text entry field empty or blank. When we selected files in the Zenity file selection dialog box, the returned file names were in the form of a full path to the specified file(s). So, to both properly create the new directory, and to specify a proper path for the destination file, we have to deconstruct and then reconstruct a proper path for that destination file. The CURR_PATH variable grabs the path from the first file selected in the array (${FILES[0]}) using the “dirname” command. Remember we put all of the information for the selected files in an array. So all we’re doing here is copying the path information for that first file in the array into the variable CURR_PATH. Then, we construct a proper path for the destination file by adding $CURR_PATH and $DIR (the directory name we specified in the Destination Directory dialog box) to one another, properly formatted, and save it in the variable $NEW_DIR. We’ll use the $NEW_DIR variable later on, when the ImageMagick “convert” command is outputting the new file. Jump forward to Line 54, and we have to change the for loop so that it pulls the filenames from the array we set up in Line 9. As part of our “construction” efforts to reconstruct a proper file name, the path information is stripped (basename) from each file in the FILES array as they are processed. Then, we combine the $NEW_PATH information, with the filename currently being processed, along with the other file name descriptors to prevent overwriting the original files, to create a fully valid and proper path to the new file output by the ImageMagick “convert” command. Nearly all of the remaining lines of the script are exactly as they are in the previous version. The script does work well for resizing images. I’ve tried and tried and tried to “trip it up,” and have been unsuccessful in those attempts. In every case or situation I threw at it, it performed flawlessly. You don’t even have to specify a destination directory, if you don’t want to. I just thought this might be a nice “feature” that some users might like to have. Your resized image files will be placed in the same directory that contains your original graphic files. Since your original files are safe from being overwritten, this isn’t that big of a problem. Later, if you change your mind, you’ll just have to go into that directory that contains your original and resized graphics, and move the resized image files to another directory manually, if that’s what you desire. But the ability to create a new destination directory for your resized images eliminates having to manually move your resized graphic files at a later date, saving some time later on. Plus, it also helps keep things nice and tidy. Caveats In all honesty, I can only list ONE caveat for using either one of these scripts, to the best of my knowledge. That one caveat is that your graphic file names should NOT have a space in them. Remove or replace spaces in the file names you submit to these scripts to process, or they could cause the script to not complete. Of course, “this ain’t Windows, ya’ know,” so you shouldn’t be using spaces in your file names anyway. If you do, you may get away with it for a while, but eventually, it WILL come back to bite you on your hind side. That is because in so many cases, a space acts as a delimiter to so many tools Linux users commonly use. So, it’s best practice to avoid using spaces in your file names, if at all possible. It’s especially unlikely that graphic file names with spaces in them will not properly populate the array used in the standalone version of the script. The “read” command that sets up the array uses the space as a delimiter, so the array may not have the true path or file name as some of its array members. Most likely, the array will not point to a fully qualified path and file name. It might not be a bad idea to add a line near the beginning of the script (after Line 4, but before any other dialogs are displayed) to the script to warn users about NOT using files with spaces in the file name. It might look something like this: zenity --warning --title=”WARNING!” --timeout=15 --text=”DO NOT run the script\non files containing spaces\nin the file name!” This will cause the warning dialog box to appear with the defined text, and then automatically disappear after 15 seconds. Of course, you could always hit the “OK” button before the 15 seconds is up, dismissing the dialog box warning message earlier than 15 seconds. If you feel so inclined, you could put in a function or command to remove or replace spaces from the file names. I’ll leave that as an exercise for you to undertake, if you want. Since I avoid spaces in file names like the proverbial plague, it’s a non-issue for me, and I won’t be undertaking any such task. I also want to keep the script lean, and making the script “behave” with file names containing spaces isn’t exactly going to make the script be as lean as it needs to be, or that I want it to be. “More” is not always better. Summary I hope you find these scripts as useful as I do. In my position as the magazine’s Chief Editor, there’s hardly a day that goes by that I don’t use one of these image resizing scripts. I mean, I really use them a LOT. Rest assured that they do their intended job perfectly. I don’t have time to waste on scripts that don’t work properly or perfectly, and I suspect it’s the same for the rest of you, as well. |