| Previous
Page |
PCLinuxOS
Magazine |
PCLinuxOS |
Article List |
Disclaimer |
Next Page |
Organize Thunar Custom Actions In Submenus |
|
by Paul Arnote (parnote)
The nice thing about Linux is all of the choices Linux users have. One is the choice of which desktop environment to use. For me, Xfce is my desktop environment of choice. One of those reasons I prefer Xfce is because of Thunar, the file manager for Xfce. It's not flashy. It lets me get my file tasks done with a minimum of fuss. But what I like most of all is how easy it is to add custom actions to Thunar to create various custom tools to perform bulk file operations (which I do quite frequently). I have several custom actions that I use frequently with the production of The PCLinuxOS Magazine, and they are REAL timesavers. Those Thunar Custom Actions can be one-liners, or can invoke a custom bash script. I have custom actions that use both methods. Obviously, more complex actions require the use of a custom bash script, but there are quite a few one-liners that wield a LOT of power. Typically, my one-liners and my custom bash scripts run command line programs on either a single file, or on a group of files. When I find a task that needs to be accomplished on some files on a regular basis, my mind starts brainstorming on how I might be able to create a Thunar Custom Action to streamline the process. By creating a custom action, I can guarantee consistent results, all while saving tremendous amounts of time. When "we're" on deadline and getting the magazine ready each month, the quicker I can get certain tasks done with consistent results is important. As you might imagine (or just take my word for it), I have a literal TON of Thunar Custom Actions. In fact, I have so many custom actions defined that the list of custom actions required scrolling to see them all. Yes, there were more custom actions than could be displayed on the height of my screen. Thus, I would have to continually scroll through the list, especially if the menu item I needed was at the bottom of the list. Now, if you need to review Thunar Custom Actions, I'll refer you to the various articles I've written over the years about them. In fact, to make it easier, just click here to search the magazine website for the articles I've written regarding custom actions. Many of the bash scripts I've written and published in the magazine are created to work either as a standalone bash script from the command line, or to function as a Thunar Custom Action. Thankfully, the Xfce and Thunar developers came to my rescue. 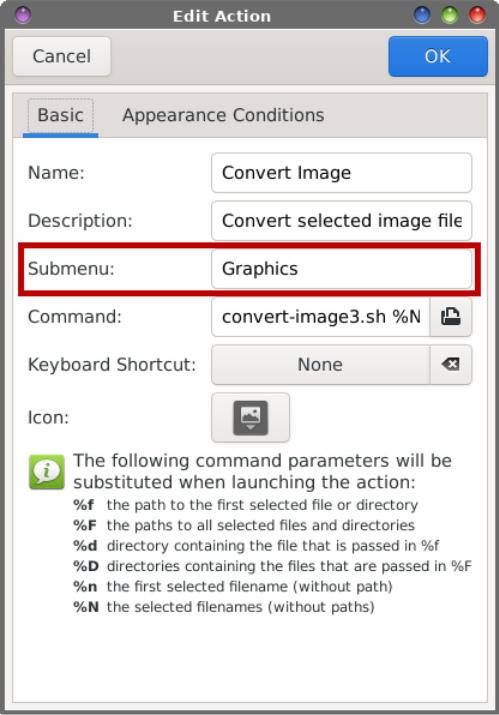 Starting with Thunar 4.17.0, Thunar users have had the ability to organize their custom actions by placing them in submenus. The red box in the image above shows the new option. I hadn't really explored this new option (Thunar is currently at version 4.18.6) until now. I was more of the mind of not fixing something that wasn't broken. Plus, I was worried about the possibility of royally "screwing up" my Thunar Custom Actions items, which I rely on ... a LOT. But, seeing how unwieldy my list of custom actions had become, I thought I'd finally "give it a shot." The "solution" couldn't possibly work easier than the way it has been programmed into Thunar. If you want a custom action to appear in the "top tier" of custom actions, simply leave the "Submenu" field empty. This is what I've done with my custom actions that I use very frequently. But for others that I don't use as often, I've grouped them into "common" submenus. To place a submenu in the custom action context menu, simply type the name of the menu in the "Submenu" entry box. Repeat the process for each custom action you want to place in that menu by typing in the same name in the "Submenu" text entry box. 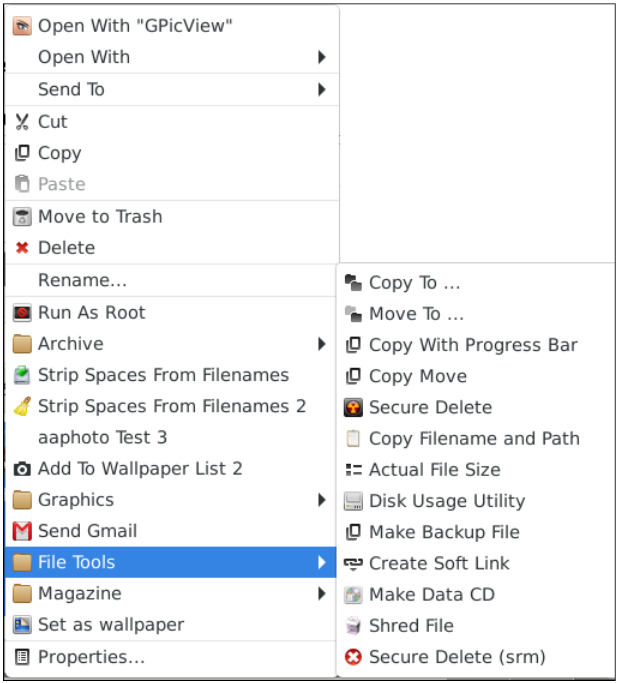 I've set up submenus called Graphics, Printing, Magazine, Sound, Video, Office, Archiving, and File Tools. What you call them is up to you. In the image above, you can see the items I've placed in the "File Tools" submenu. Now, my right-click context menu in Thunar fits on my computer screen, and is fully viewable WITHOUT having to scroll through a miles-long list of custom actions. Using the submenus should help speed up (even more) my use of custom actions by eliminating the endless scrolling through all of the custom actions defined in my copy of Thunar. Oh, and here's a "bonus tip" for working with Thunar Custom Actions across multiple computers. The custom actions are "defined" in ~/.config/Thunar/uca.xml. The individual entries look something like this: 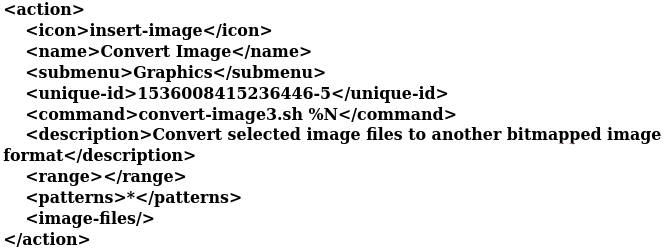 Now, if you have multiple computers, it's a good idea to have things configured (more or less) the same across the computers you routinely use. So, make a COPY of your uca.xml file. Go through the file and completely DELETE every line that starts with <unique-id> and save the COPY of the uca.xml file. I store a copy of my uca.xml file, with the <unique-id> line removed, in Dropbox. The <unique-id> makes the uca.xml file specific to one computer/user. Removing it allows you to "transport" the uca.xml file across multiple computers without having to completely redo all of your custom actions. Whenever you install Xfce on a new computer, go to ~/.config/Thunar and rename the uca.xml file that is in the folder. Now, copy YOUR COPY of your uca.xml file (without the <unique-id> line) into that directory. Be certain that your copy of the uca.xml file is named precisely uca.xml. Close Thunar, and then reopen it, or just reboot your computer. Thunar should have recreated (and re-inserted) the <unique-id> ... </unique-id> line for each item in the list. If you've done everything correctly, your custom actions should appear the same on the new computer as they do/did on another computer. This allows you to tailor your custom actions to how you work across multiple computers.  Note that if your custom actions rely on custom bash scripts, you will also have to copy those scripts to your /home/[username]/bin directory, and ensure that directory is defined in your $PATH statement. The easiest way to check is to type echo $PATH at a command line prompt in a terminal session. Check the output to be sure ~/bin is listed. On my computer, it's the very first entry, shown in the image above. If you don't have a similar entry, you can refer to this "how to" from HowToGeek to add it. |