| Previous
Page |
PCLinuxOS
Magazine |
PCLinuxOS |
Article List |
Disclaimer |
Next Page |
Xfce Power User Tips, Tricks & Tweaks: Miscellaneous
|
|
by Paul Arnote (parnote) Over the previous six months, I've been presenting a series of articles that I've called "Xfce Power User Tips, Tricks & Tweaks." My plan was to wrap up the series with this, the seventh article in the series, but I've found another "power user" tip, which I'll present next month. I toyed with adding it to this article, but decided that a tip this good needed its own article, and it would make this article too long. This month's article is a collection of miscellaneous tips, tricks and tweaks. Some of these were ones that got inadvertently left out of previous discussions. Some are ones I discovered after the related article had already run. Others are ones that didn't fit into the other discussions, for one reason or another. Multi-Level Launchers Like a lot of Linux users, I really hate my desktop being littered with a lot of icons. Personally, it reminds me of when I ran Windows, and every program you installed wanted to place an icon on your desktop -- some of them whether you wanted an icon there or not. Still, I do like to have easy and quick access to some of my more frequently used programs. This is where this Xfce tip comes in handy. 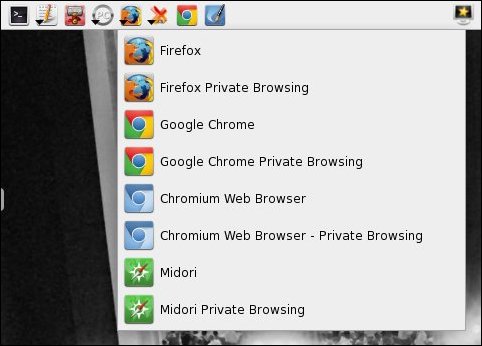 Above is pictured a portion of my panel, showing my grouping of launchers, along the top panel of my screen. Take notice that four of the launchers show a small downward pointing arrow at the left bottom corner of the icon. The arrow serves as a visual cue that there are other choices. My launcher for web browsers is shown open above. Yes, I really do have four web browsers installed. Here's how to create a multi-level launcher. 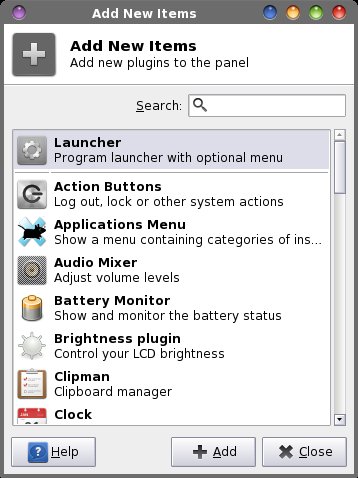 First, add a new launcher to your panel. The easiest way to do this is to right click your mouse on the panel you want to add the launcher to, then choose Panel > Add New Items... from the context menu that appears. Select "Launcher" from the dialog box, then the "Add" button. The new launcher will be placed at the far right edge of the selected panel. Right click on the new launcher, and select "Move" from the context menu. Drag your mouse to where you want your new launcher to appear. Then, right click on the new launcher icon again, and select "Properties" from the context menu. 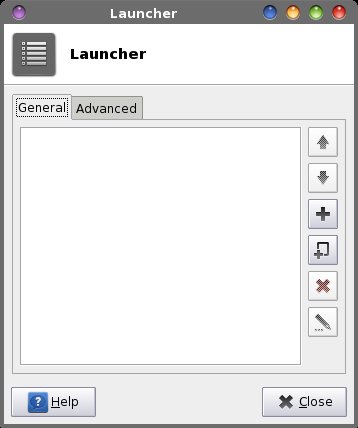 Click on the "+" button along the right edge of the dialog box. 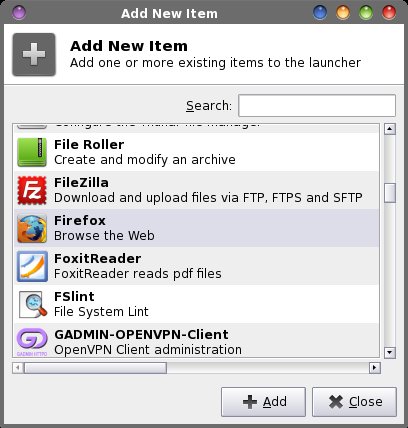 A dialog box with all of your installed programs (that use a GUI) will be displayed in a list. Find the program you want to add to your launcher, and select the "Add" button. Once back to the Launcher properties dialog box, click on the "+" icon again, and select the next program you want to appear. Repeat this process for every program you want to include in your multilevel launcher. By default, the first program in the list of launchers will dictate the icon used for your multilevel launcher. Once you're finished adding programs to your multilevel launcher, select the "Advanced" tab of the Launcher properties dialog box. 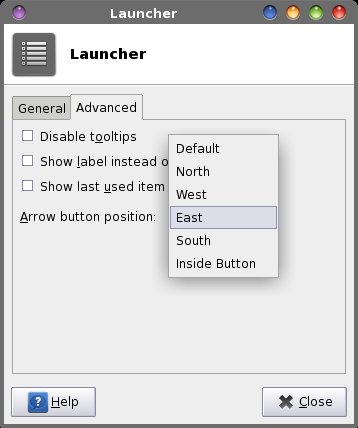 Select the "Arrow button position" drop down list box. It is labeled "Default" -- by default. The default value places the arrow position to the right of the icon of the icon used to display your multilevel launcher. I change this to "Inside Button" to reduce the footprint of the launcher on my panel. This tells Xfce to "paint" the arrow over the bottom left corner of the icon on the panel. Right above the drop down list box is another item, called "Show last item used in panel." If you check this, the icon for your multilevel launcher will change to depict the last item you used from the multilevel launcher. I leave this unchecked. I prefer to have a static icon displayed. Now, here is a tip within a tip. You might have noticed that I have separate icons for "regular" Firefox, Chrome and Chromium, as well as the private browsing option for each. The private browsing option isn't installed by default, and is typically only available either from a menu inside each browser, or via a command line switch. It's the latter that allows you to set up a launcher for starting the browser in private browsing mode. 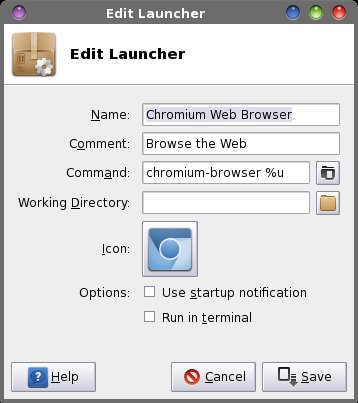 First, add in a duplicate icon for each of the browsers that you want to enable a launcher for the private browsing option. Double click on the duplicate, which will bring up a dialog box similar to the one above. In the example above, at the end of the "Command" line add --incognito to the command to launch Chromium (be sure to leave a space between the %u and the command line option). The same command line switch also works for Google Chrome. For Firefox private browsing, change the command to firefox -private %u. Midori comes with a private browsing option already set up, so all you have to do is select it from the list of the "Add New Item" dialog box when adding the program to your multilevel launcher. Then, so you can differentiate between the icons, change the name to include "Private" and select "Save." Auto Adjust Photos X 2 Back when we talked about working with Graphics files, I gave you (the readers) the challenge of making a Thunar Custom Action for correcting photos with aaphoto (installable via Synaptic). I covered using aaphoto in the October 2012 issue of The PCLinuxOS Magazine. When you install aaphoto, an entry is automatically added to the "Open With..." context menu in Thunar. However, that menu item only applies the default values of aaphoto to the selected photos. A lot of times, the default values work just fine. But by creating your own custom action using aaphoto gives you the opportunity to further customize what aaphoto does to enhance your photos. So why do I call this part of the article "Auto Adjust Photos X 2?" Well, it's because I have two slightly different Thunar Custom Actions. They both basically do the same thing, but each gives a slightly different feedback to the user. One displays the output from aaphoto in an informational text dialog box. The other displays a pulsating progress bar while aaphoto completes its task. To "mix things up" a bit, the output display version uses Zenity to display the dialog boxes on the screen, while the progress bar version uses Yad. 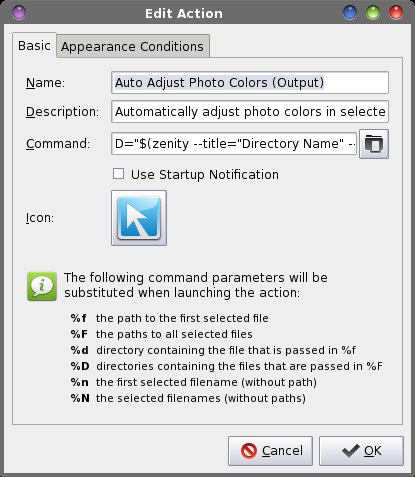 Enter either "Auto Adjust Photo Colors (Output)" or "Auto Adjust Photo Colors (Progress)," depending on which one you prefer. If you prefer only one of the custom actions, you can leave out the text in parenthesis. Since I have both custom actions defined on my Xfce installation, I use the text in parenthesis to differentiate which one is which. Enter "Automatically adjust colors in selected photos" as the description. Next, we need to enter the command to be executed with the custom action. For the custom action that displays the aaphoto output, the command to enter is shown below. We are able to view the output by piping the output from aaphoto (with the verbose flag) to a Zenity informational text dialog. D="$(zenity --title="Directory Name" --entry --text="Please enter the directory name")"; if [ ! -d $D ]; then mkdir -p $D; fi && Q="$(zenity --title="Quality Level" --entry --text="Please enter the quality level")" && aaphoto -a -o $D -q$Q -V %N | zenity --text-info --title="aaphoto Progress" --width=300 --height=300  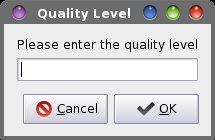 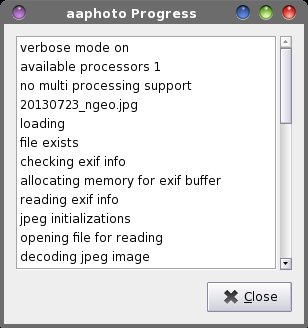 For the custom action that displays the progress bar, here is the command to enter: D="$(yad --title="Directory Name" --entry --entry-label="Please enter the directory name")"; if [ ! -d $D ]; then mkdir -p $D; fi && Q="$(yad --title="Quality Level" --entry --entry-label="Please enter the quality level")" && aaphoto -a -o $D -q$Q %N | yad --progress --pulsate --progress-text="Please wait ... images being processed" --title="aaphoto Progress" --auto-close --auto-kill 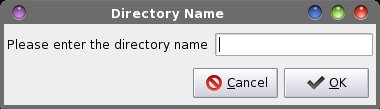 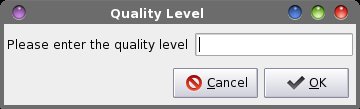 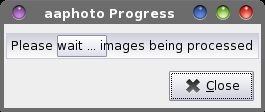 Besides the difference of using Zenity and Yad, there is one other difference. The progress bar version turns off the verbose output from aaphoto, by omitting the -V command line switch. The verbose output from aaphoto was proving to be problematic, and causing the command to behave inconsistently. Removal of the verbose output command line switch seems to have eliminated the problem. You can just as easily add in commands and dialog boxes to rotate the image and/or resize the images. The aaphoto command line switch to resize images is -r or --resize, followed by either the percentage (with the % sign) or the pixels of the long side of an image. The resize command can only make images smaller. To rotate images, aaphoto takes the command line switches of --rotate90, --rotate180 and --rotate270. The --rotate90 switch is the same as rotating an image 90 degrees to the right, or clockwise. The --rotate270 switch is the same as rotating an image 90 degrees to the left, or counterclockwise. So, let's take a look at a couple of other incarnations of the aaphoto command that you might find useful.
To rotate images: D="$(zenity --title="Directory Name" --entry --text="Please enter the directory name")"; if [ ! -d $D ]; then mkdir -p $D; fi && Q="$(zenity --title="Quality Level" --entry --text="Please enter the quality level")" && R="$(zenity --title="Rotation Degrees" --entry --text="Please enter degrees rotation\n90 = Right, 270 = Left")" && aaphoto -a -o $D -q$Q --rotate$R -V %N | zenity --text-info --title="aaphoto Progress" --width=300 --height=300 To resize images: D="$(zenity --title="Directory Name" --entry --text="Please enter the directory name")"; if [ ! -d $D ]; then mkdir -p $D; fi && Q="$(zenity --title="Quality Level" --entry --text="Please enter the quality level")" && S="$(zenity --title="Resize Pixels" --entry --text="Please enter new size in pixels, based\non the long edge of the image.\n\nYou may only reduce an image.\nYou may not enlarge an image.")" && aaphoto -a -o $D -q$Q -r$S -V %N | zenity --text-info --title="aaphoto Progress" --width=300 --height=300 As you can see, you can chain together Zenity entry dialogs for many of the aaphoto command line switch values. There is nothing to prevent you from moving all of this to a custom bash script, either. Doing so will give you easy access to every variable for aaphoto, without having to repeat "code" in multiple Thunar Custom Actions. View JPEG Exif Information The JPEG graphic format has something special that separates it from other graphic formats. That something special is the storage of all kinds of extra information about the image. It is called Exif, which is an abbreviation for Exchangeable image file format. Here is the Exif information for one of the National Geographic wallpapers that I've downloaded: File name : japanese-white-eye_68766_990x742.jpg File size : 673948 bytes File date : 2013:07:22 23:40:37 Camera make : Canon Camera model : Canon EOS REBEL T3i Date/Time : 2012:10:24 08:19:42 Resolution : 990 x 742 Flash used : No Focal length : 400.0mm (35mm equivalent: 3280mm) CCD width : 4.39mm Exposure time: 0.0025 s (1/400) Aperture : f/5.6 ISO equiv. : 200 Whitebalance : Manual Metering Mode: pattern Exposure : Manual Exposure Mode: Manual ======= IPTC data: ======= Record vers. : 2 Caption : The Japanese White-eye (Zosterops japonicus), also known as the mejiro ( , ), is a small passerine bird in the white-eye family. The specific epithet is occasionally written japonica, but this is incorrect due to the gender of the genus. Its native range includes much of east Asia, including Jap Headline : Intense colors Byline : Boris S. DateCreated : 20121024 City : Tainan State : Taiwan Country : Taiwan SuplementalCategories: Animals SuplementalCategories: Nature Keywords : bird Keywords : japanesewhiteeye Keywords : taiwan The JPEG Exif data is derived from the Exif data used with TIFF image files. There is a 64 KB size limit on the amount of Exif data that can be saved within the JPEG file format. If you think about it, that is a lot of data. The text of this article is less than 15 KB. You can read more about the Exif format here. The Exif data displayed above from the National Geographic wallpaper image is quite a bit more than most images will contain. Fortunately, it's quite easy to make a Thunar Custom Action to read and display the Exif information from JPEG image files stored on your hard drive. This Thunar Custom Action got inadvertently left out of the discussion on working with graphic files, in the March 2013 issue of The PCLinuxOS Magazine. To do this, you will first need to install jhead from the PCLinuxOS repository, via Synaptic.  Enter "View JPG Exif Info" in the "Name" field, and "View the Exif info of the selected JPG file" in the "Description" field. Then, enter the following in the "Command" field: jhead %n | zenity --text-info --title="Exif Info" --width=400 --height=250 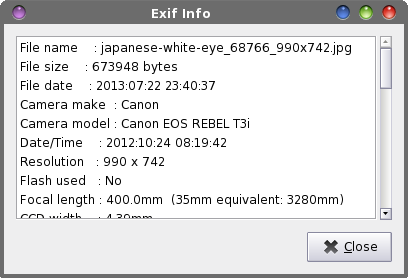 Under the "Appearance Conditions" tab, enter *.jpg,*.JPG as the file pattern, and place a checkmark in front of "Image files" ONLY. Now, when you right click on a JPG file, select "View JPG Exif Info" from Thunar's context menu. You should see something similar to the dialog box shown above, filled with the Exif information from the selected JPG file. We can only view the Exif information for one file at a time. If you want to view the Exif information for multiple files, you will need to view them one at a time. Directory Playlist This next Thunar Custom Action got inadvertently left out of our discussion in the May 2013 issue about working with multimedia files. This is what happens sometimes due to my testing new Thunar Custom Actions on more than one computer. I create the custom action on one computer, move my work to another computer, and forget to transfer the new custom action to the second computer. Mea culpa. Nonetheless, this Thunar Custom Action can take an entire directory filled with your favorite music and automatically create a *.m3u playlist file with the same name as that directory. What's great is that the playlist is placed inside the directory that contains the music files. You will need to install the unix2dos command line utility, via Synaptic. This utility will convert the text-based *.m3u playlist file from Linux/Unix format, with a return character only at the end of each line, to a DOS format, with a return and carriage return character at the end of each line. Unfortunately, some MP3 players may depend on the *.m3u file being in the DOS format. Those that don't will most likely ignore it. So, we'll include it, just to be sure that we have maximum compatibility with as many MP3 players as possible.  Enter "Directory Playlist" in the "Name" field, and "Make a playlist from the files in a directory" in the "Description" field. Then, enter the following in the "Command" field: ls -w 1 -R %n/ |egrep *.'[fF][lL][aA][cC]|[aA][pP][eE]|[wW][vV]|[wW][aA][vV]|[mM][pP][3]|[aA][aA][cC]|[oO][gG][gG]|[oO][gG][aA]|[wW][mM][aA]|[mM][pP][cC]|[mM][4][aA]' >%n/%n.m3u && unix2dos %n/%n.m3u This command lists the contents of the selected directory, and writes the filename of each audio file (*.flac, *.ape, *.wv, *.wav, *.mp3, *.aac, *.ogg, *.oga, *.wma, *.mpc and *.m4a) that it finds to the file with a *.m3u file extension and the same name as the directory. It then converts the file to DOS text file format, with the unix2dos command. For example, let's suppose you have a directory full of your favorite tunes from The Moody Blues, named MoodyBlues. Right click on the directory and select "Directory Playlist" from Thunar's context menu. Every audio file you have in that directory will be written to a file named MoodyBlues.m3u, written inside your MoodyBlues directory. That file is then converted to a text file format that adheres to the DOS specifications, with a CR + LF at the end of each line. Here is an example of the *.m3u output from a folder I have from a rip of Toby Keith's Greatest Hits, Volume 2 CD:
01_how_do_you_like_me_now.mp3 Take note that if you have a subfolder that you don't want included (say that you converted all of your MP3 files into OGG files, stored in a subfolder ... I've been known to do this very thing), this command is recursive, which is just another way of saying that it'll list all the audio files it finds. You can either remove the -R command line switch from the ls command, or you can manually edit the *.m3u file to remove the duplicates. Of course, this is very handy if, using our previous example with The Moody Blues, you have each of their albums in their own special subfolder. Each subfolder will be read and the files it finds placed into the MoodyBlues.m3u file into the order they are listed/found. Extract MP3 Audio From Video This Thunar Custom Action makes it easy to "extract" the audio from your favorite video files. This is another "left behind" custom action, like the Directory Playlist custom action above. The ability to extract audio from a video can be an excellent way to build your music collection. If you have a favorite music video, you can download it from your favorite video streaming site, then extract the audio from that video. Or, if you have a favorite comedy show, you can download the video and extract the audio from it to playback on your MP3 player.  Enter "Extract MP3 Audio From Video" in the "Name" field, and "Extract the audio track from the selected video file" in the "Description" field. Next, enter the following into the "Command" field: ffmpeg -i %f -vn -ar 44100 -ac 2 -ab 128 -f mp3 %f.mp3 | yad --progress --percentage=40 --progress-text="Please wait ... file being processed" --title="Audio Extraction" --auto-close --auto-kill 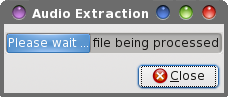 When you right click on a video file stored on your hard drive, select "Extract MP3 Audio From Video" from the Thunar context menu. You will see the progress dialog box displayed above while the Thunar Custom Action completes the task. Depending on how big the video file is, it could take a few minutes to complete the audio extraction. Thunar's "Send To" Menu Thunar's "Send To" menu has always been a huge mystery to me. Very useful, but very mysterious. It wasn't until just recently that I've been able to figure it out. 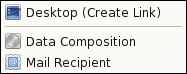 You will notice that there are several items already populating the Send To menu. From the Send To menu, you can create a link on your desktop, add files to a data composition, or send an email (provided you have your preferred email client setup in Xfce Settings Manager > Preferred Applications). 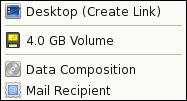 Once you connect a removable drive -- a USB hard drive, a USB flash drive, or an SD card in a card reader -- it will also be listed among the choices. In the image above, I simply inserted an empty 4 GB SD card into the built-in card reader of one of my laptops. It automatically appears as the second entry in the Send To menu. The nice thing about using the Send To menu to send items to a removable drive is that you don't have to mount it first. Thunar takes care of automatically mounting the removable drive when you send items to it. So far, not too much mystery. That comes in when you try to figure out how to extend or customize the Send To menu. Information isn't nearly as plentiful as it is for other aspects of Thunar. However, it's much easier than you might think. For our exercise, we'll add a Picasa Upload item to Thunar's Send To menu. First, you will need to install googlecl from the PCLinuxOS repository. You will also need to log into your Picasa account and create an empty album, named "Uploads" (or make it with the googlecl command from the command line, like this: google picasa --create --title "Uploads"). You can later log into your Picasa account (via a web browser) and move your uploaded images into their own album. (Hint: open the "Uploads" album in your favorite web browser, then select the "Organize" button. Multi-select the images you want to move, select the Move button, then provide the name of the new album). Next, we need to create a .desktop file in ~/.local/share/Thunar/sendto directory. If the directory (directories) doesn't (don't) exist, create them. Now, create the following picasa.desktop file in that directory. # picasa.desktop - Integrate picasa into # the "Send To" menu. # # Requires the installation of googlecl # and the prior creation of an album # named "Uploads" (without quotes) # [Desktop Entry] Type=Application Version=1.0 Encoding=UTF-8 TryExec=google Exec=google picasa post --title "Uploads" %F Icon=picasa Name=Picasa Upload MimeType=image/jpeg;image/png 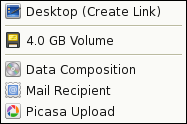 Because we added the MimeType entry into the picasa.desktop file, the new addition to the Send To menu will only appear for JPG or PNG files. If you right click on any other file types, you will not see the Picasa Upload item in the Send To menu. If you omit the MimeType line, then the new Send To menu item will be available for all file types. One drawback to this particular Send To menu item is that there is no visual feedback to know when the task has been completed. This could easily be remedied by creating a bash script that will also display a Zenity progress dialog box, then calling that script from the Exec= line of the picasa.desktop file. The other thing you can do is add StartupNotify=true as the last line in the picasa.desktop file. That way, you'll get the "busy" cursor until the Picasa Upload task is completed. However, that could be rather annoying if you are wanting/trying to do other things while you wait for the image uploads to complete. Also, the additions to the Thunar Send To menu are exclusive to each user. If you want multiple users to have the same functionality on each of their user accounts, you will need to repeat this entire process for each user on the system (or copy the necessary files to each user's ~/.local/share/Thunar/sendto directory). Summary One thing that makes Xfce so appealing to me is the foresight of the Thunar development team to include a relatively easy way to extend its functionality. For me, Thunar is the epitome of what a file manager should be, and exemplifies the Linux approach to applications -- do one thing, and do it well. It doesn't try to be all things to all users, but it does allow each user to personalize their experience using Thunar. It does this by extending that functionality with tasks that aid that user's particular tasks and needs. I have to honestly say that my personal "wish list" for Thunar is short; I can only think of two things I would like to see implemented. One of those items is something that we've already covered -- the accurate reporting of file sizes. But that one isn't going to happen any time soon, if at all. The other is the ability to create submenu categories for the Thunar Custom Actions. This ability would go a long way in relieving the "clutter" for users who have a lot of custom actions, and allow users to categorize and organize their custom actions in logical groups. Next month, I'll present the last article in this series (or at least, what I think is going to be the last). This upcoming article will explore how to leverage and tweak Xfce's built-in desktop wallpaper slideshow. |