KDE 4: Panel Keeps Pace & Place
by Paul Arnote (parnote)
Windows users call it the "taskbar." To Linux users, it's called the "panel." The panel has been around for a long time. Many of us are accustomed to how the panel worked under previous versions of KDE, such as KDE 3.5.x. Most of the functionality we had become used to in previous versions of KDE is still there, with some new features added in to improve functionality.
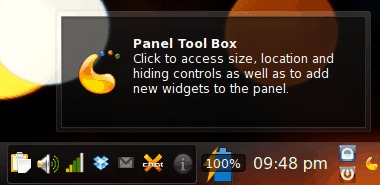
Under the previous versions of KDE, the panel was under control of a separate module that ran in the background and managed the panel. Under KDE 4, the panel is simply another widget/plasmoid running on the KDE 4 Plasma desktop. Since it is a widget, you must first unlock the widgets, by selecting the cashew in the upper right corner of the screen, and selecting "Unlock Widgets" from the cashew's menu that pops up.
Once your desktop widgets are unlocked, you will then see the cashew on the panel, in the lower right corner of your screen (provided your panel occupies the default position, at the bottom of the screen). Clicking on the cashew on the panel (below, right lower corner) will reveal the more common settings for the panel widget, and allow you to change the way the panel is laid out.
Before we start changing things around, it's probably a good idea to learn where things are placed, by default.

Starting with the first one-third of the panel, the first item (from the left) is the KMenu, which as in previous versions of KDE, gives you access to the GUI versions of the programs installed on your system. The next seven icons represent launchers and other widgets installed on your copy of KDE 4. The first of those is the Device Notifier, which provides access to the various storage devices you may choose to use with your computer. These may be USB Flash Drives, USB External Hard Disk Drives, or even blank, recordable optical media. The next icon, from left to right, is the "Show Desktop" widget. Clicking on this will cause any and all open windows on your workspace to be minimized to the panel. The larger wrench and screwdriver icon represents "Configure Your Desktop" (previously known as KDE Control Center, or KCC), where you would go to make changes in the behavior of your desktop. The next icon, with the wrench and screwdriver in the blue circle, brings up PCLinuxOS Control Center, a.k.a. PCC, which is where you would go to configure various things related to your computer's configuration, and how PCLinuxOS runs. The box, CD and floppy disk icon launches Synaptic, for installing/removing items from your installation of PCLinuxOS. The "file cabinet" will launch the Dolphin, the default file manager for KDE 4. The last icon launches Firefox, and is not there by default. I added it to the panel, since I use it so often.
Lastly, at the far right of the first one third of the panel, is the pager widget. This represents the various workspaces, or desktops, available on your installation of KDE 4.

The middle one third of the panel holds the icons of your currently running programs. Here, I have Dolphin, Firefox and XChat running. The icons are arranged alphabetically on the panel, making it easier to find the program you want to switch to.

The last one third of the panel holds, first, the system notification area. This area is where you will find the Klipper Clipboard Tool, your KMix volume control, net applet notification of your network connection, and notifications from select other programs you may have running. Here, I have Dropbox, checkgmail and XChat running in the system notification area. The icon with the lower case "i" in it will inform you of system messages as they occur.
The next item in the last one third of the default panel is the battery monitor widget, so I can monitor the charge status of the battery in my laptop. To the right, is the clock display. To the right of the clock, is the Lock/Logout widget. The top (blue) button allows you to lock your screen, while the bottom (red) button provides all the options for shutting down your system, when selected. Finally, at the far right is the cashew that, when selected, will pop up the common configuration options for the panel widget.
The first configuration option (from the left) is which screen edge you want your panel displayed on. Simply click on "Screen Edge," and while holding down the mouse button, drag the panel to the screen edge you want it on.
Clicking on the "Height" button allows you to change the height of the panel. Just click on "Height" and drag your mouse (while still holding down the mouse button) to set the height of the panel.

If you would like to add some widgets to either the desktop or the panel, click on the "Add Widgets…" button. When you do, all the currently installed widgets will be listed in a horizontally-scrolling list, just above the panel. Double click your mouse on the widget you would like to install, and that widget will be added to either your desktop or panel. We'll talk more about widgets in greater detail in another article that deals only with widgets.
The "Add Spacer" button will add space between elements that are placed on the panel. The "Lock Widgets" button will, lock the widgets to their current position, and not allow the addition or deletion of those widgets until widgets are (again) unlocked, as mentioned near the beginning of this article.

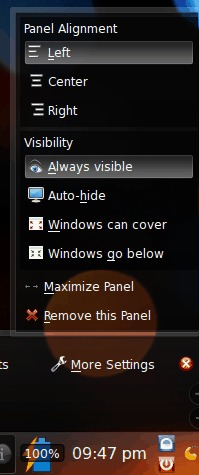
When you click on the "More Settings" button, you will get a pop-up menu. From this menu, you can tune the appearance of your panel. At the top of this menu, you can determine if the panel is aligned with the left or right side of your screen, or if it is centered between the left and right borders of the screen. You can also select the visibility options. This includes if the panel is "Always visible," set to "Auto-hide," if "Windows can cover" the panel, or if "Windows go below" the panel. If you select the "Maximize Panel" option, then the panel will expand to fill the entire border that you have assigned to it. It is here, under the "More Settings" option, that you can also remove the particular panel that is associated with the "More Settings" menu item.
Fine Tuning The Appearance Of Your Panel
The things that we have covered so far involve the appearance of your panel as it exists on a full installation of PCLinuxOS 2010. There are other options available to help fine tune the appearance of your panel.
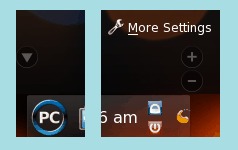
Not everyone cares to have the panel maximized to fill the border assigned to it. It is while you have the panel options activated that you can set the width of the panel. At the far left of the panel, just above the "PC" KMenu icon, is a down arrow. Clicking and dragging this arrow with your mouse will set where you want the edge of the panel to be. At the far right side of the panel, just above the cashew, you will see a "+" and a "-" sign. Click and drag the minus sign to set the minimum size of the panel, and click and drag the plus sign to set the maximum size of the panel. You can again quickly make the panel fill the entire border edge assigned to it, simply by selecting the "More Settings > Maximize Panel" option.

Just as everyone has differing views on how wide to make their panel, not everyone wants to have the panel arranged the same way. When the panel is unlocked and in the panel options mode of display, simply place your cursor over any item or element of the panel. You will see the cursor change to one with four opposing arrows. By clicking and dragging your mouse, the item under the cursor will be moved to whatever position you choose. Simply release the mouse button when you have the item placed where you want it. For example, we can place the "move" cursor over the pager widget, and move it from its default position after the launchers, all the way to the right side of the panel, between the clock and Lock/Logout widgets.
As I mentioned earlier, the Firefox icon is not present, by default, on the panel. I added that, since I use Firefox so often, and since I want quick, easy, one-click access to launching Firefox when I need it. You can do this with any program icon that appears in your KMenu. Simply right-click your mouse on the item (as it appears in the KMenu), and select "Add To Panel" from the pop-up menu. This will place a launcher on your panel, although not necessarily where you might want it. If it isn't inserted where you want it (my Firefox icon initially was added next to the System Notification widget), simply use the previous instructions on how to move it where you want it. In my case (with the Firefox icon), I moved it to the right of the icon for Dolphin.
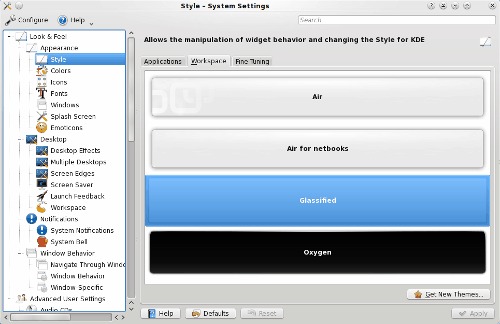
You can further tailor your panel's appearance to suit your tastes by going into "Configure Your Desktop" (a.k.a., KDE Control Center). Under "Look & Feel > Appearance > Style," go to the "Workspace" tab. From there, you can set the KDE style. The default style on the PCLinuxOS 2010 installation is "Glassified." You can also choose from "Air," "Air for netbooks" or "Oxygen." You can also download additional themes from http://www.kde-look.org, and install them for your use. Just go to the Themes/Styles section, and be sure you are in the KDE 4 section.
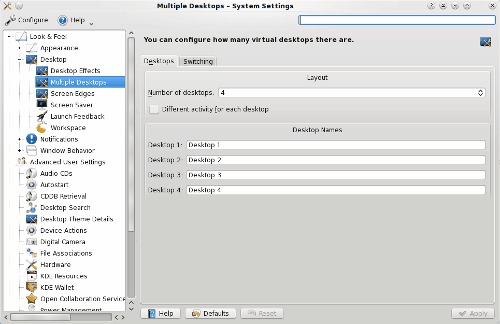
There is yet another customization you can make. Although it isn't directly related to configuring your panel, it is worthy of including here. The default installation of PCLinuxOS 2010 comes with 4 multiple desktops (a.k.a "virtual desktops" and "workspaces") pre-configured. But some users want to have more workspaces. Some users are known to have as many as 20 (yes, twenty) workspaces. Some users are at the other end of that spectrum, and use only two. By going into "Configure Your Desktop," and moving to "Look & Feel," "Desktop" and "Multiple Desktops," you can select the number of desktops you want to have available to you, and displayed in the pager widget.
Some users like to have different wallpapers displayed on each different desktop. It is here where you can select to have a "Different activity for each desktop." Under Plasma in KDE 4, you apply "activities" to your desktop. The wallpaper is but one component of that activity. Other components include the various widgets. As such, by selecting to display a different activity for each desktop, each desktop activity becomes a stand-alone activity that is applied to the assigned desktop. This means that if there is a widget that you wish to be displayed on every desktop, and you have KDE 4 set to display a different activity on each desktop, you will have to re-add that widget to each desktop activity, and run that widget as many times as you have number of desktops. Currently, there is no way to separate the wallpaper from the desktop activity, and have a different wallpaper on each desktop, while running a common set of widgets across all desktops. Numerous pleas to the KDE 4 development team for this feature have gone mostly ignored.
It is also here, in "Configure Your Desktop," that you can (if you wish) assign names to your desktops. For example, instead of the default "Desktop 1," "Desktop 2," and so on, you may want to call your four default desktops "Earth, Wind, Fire, and Air," respectively.
Conclusion
As you can see, there are quite a few configuration options for the new panel widget in KDE 4. Let your imagination run wild. Play with the configuration options, and come up with a custom panel configuration that's exclusive to you and best fits how you work and interact with KDE 4.