| Previous
Page |
PCLinuxOS
Magazine |
PCLinuxOS |
Article List |
Disclaimer |
Next Page |
Repo Review: VokoscreenNG |
|
By Cg_boy VokoscreenNG is an advanced, yet easy to use screen recording application with many features. It provides multiscreen recording support, webcam integration, time scheduled recording, a built-in video player and more. It is a new and rewritten version of an older screen recording application known simply as Vokoscreen, and seems to provide much improved performance. The interface is reasonably easy to use, although perhaps a little confusing at first to navigate. From the left side panel, you can access the main screen recording page, camera options, mouse cursor options, screenshot page, keyboard shortcuts, and video player page. You can navigate through the tabs at the top to access different settings on the current page. The controls at the bottom of the screen allow you to start, stop, and pause recording, play back the last recorded video, take a screenshot, and open the output folder. VokoscreenNG also provides a system tray icon from which you can easily start and stop recording, and enable a few other options. 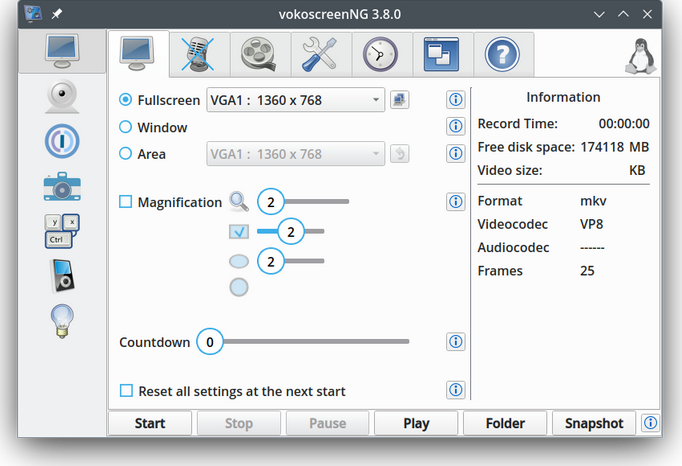 From the main tab on the screen recording page, you can set the capture area to be fullscreen, a selected window, or a custom defined area. You can also select which monitor to record, if you have multiple. There are also screen magnification options available, as well as a recording countdown timer. An information panel on the right shows you how long you've been recording for, and how much disk space is being consumed. The next tab allows you to choose the audio inputs (microphones or built-in audio), along with the audio codec you wish to use. At the video settings tab, you can set the frame rate, output format and codec, and compression setting. VokoscreenNG supports x264 and VP8 for codecs, and numerous different video formats. You can also set the mouse cursor to be invisible in videos. 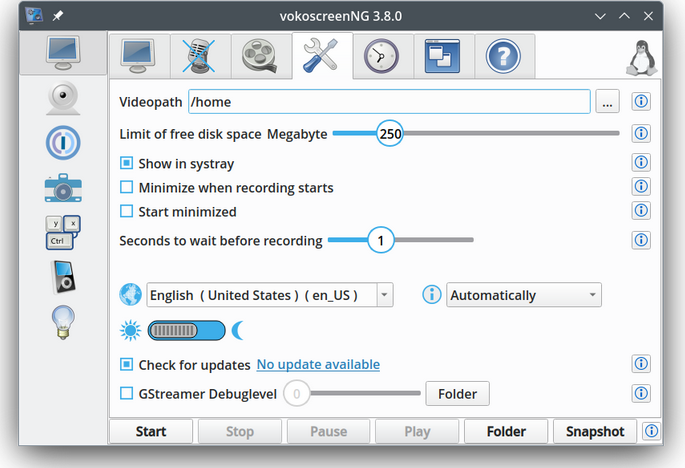 From the fourth tab, you can access various settings, such as the default video output directory path, set a free disk space limit, choose to minimize the application when recording starts, and even enable a dark mode. VokoscreenNG also allows you to change all the application keyboard shortcuts. The default keyboard shortcut to start and stop recording is CTRL+SHIFT+F10. VokoscreenNG gives you the ability to enable a timer to start recording at a specified time, and also stop recording after a certain time has elapsed. Once you've set the time at which you want it to start recording, you need to check the Start the timer checkbox to begin. On the camera page you'll find options for enabling webcam support. You can select your webcam from the dropdown box, and the resolution for the camera window to display. This will open a small separate window in the corner of the screen displaying the live webcam output, allowing you to include yourself in screen recordings. You can adjust the size and magnification of the camera box if necessary. There are also a few options to let you remove the window frame, flip the camera video, and change some color settings. 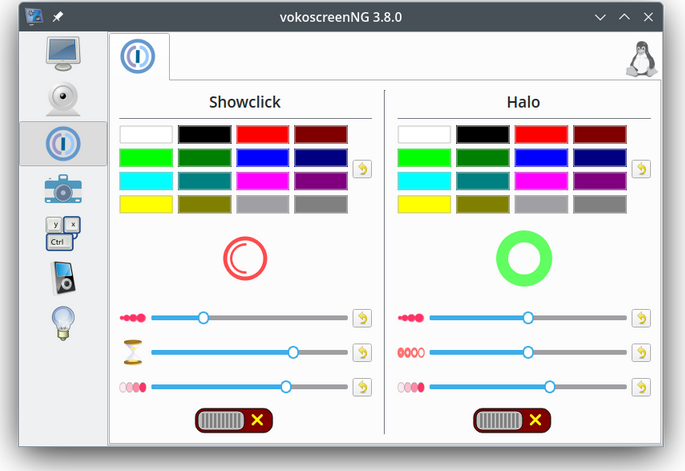 VokoscreenNG also gives you the option to enable a colored halo around the mouse cursor and to highlight mouse clicks while screen recording – a useful feature perhaps for those creating tutorial videos. You can change the color of the halo, as well as the size and opacity. VokoscreenNG has a built-in video player as well, allowing you to instantly playback screen recordings you've just made. Summary All in all, I found using VokoscreenNG to be a pleasant experience, with no real bugs or problems evident. Screen recording performance was quite good, providing smooth video without stuttering. If you need a simple to use, yet feature rich screen recorder, VokoscreenNG is an excellent choice. |