
| Previous
Page |
PCLinuxOS
Magazine |
PCLinuxOS |
Article List |
Disclaimer |
Next Page |
OpenVPN File Manager: |
|
by Bill Dawson (BillDjr) While I originally created this app for my own use, I was advised that others may find it useful as well. In my travels in Google-town, I noticed there are a vast number of people who need help setting up and configuring their OpenVPN connections. So I expanded and refined this app (referred to as OFM in this article) to help with that, making adding/editing/managing the files involved in using OpenVPN easier, without a lot of file/folder browsing. You still need to use OpenVPN's built-in connection manager to set up your own VPN provider's connection(s). Sorry, but helping with that part is beyond the scope of OFM. However, you will only ever need to do that job once, unless you change VPN providers. OFM provides full backup/restore functionality so that (if the need should arise), you can just restore the required OpenVPN and OFM files and you're set to go ... no need to re-configure. Conventions used in this article and OFM itself CONF files: These are the files created automatically when you set up a new connection using the OpenVPN Manager by right-clicking on your panel network icon and selecting "VPN Connection/Manage Connections". They will have a ".conf" file extension, and are created somewhere inside the /etc folder. Your desired CONF connection file will need to be edited for auto-login. If you have trouble locating the appropriate folder the first time, try running a search of your system for "openvpn"...that's how I found mine. Backup/restore is available for CONF files, along with their associated auto-login auth files (ie: auth.txt"). OVPN Files: These are the files you download that tell OpenVPN how to connect to various servers. They have an ".ovpn" file extension. For the purposes of this app, you must have these files in a folder inside your user folder (ie: /home/bill/openvpn). Your desired OVPN connection file will need to be edited for auto-login. Backup/restore is available for OVPN files, along with their associated auto-login auth files (ie: auth.txt). PATH Files: OFM saves the folder locations you input, (See screenshot at the top of this article, "Folders" section), as well as a few others and a "notes.txt" file for, well, any notes you may feel you require. The PATH files are saved with a ".conf" file extension, but are really just one-line text files. You have no reason to, but if you wish to edit these files manually, you can. It's for that reason that I didn't opt for storing your user-data in a database. Backup/restore is available for PATH files and notes.txt rc.local: This is a script your system uses during startup. It's the last thing your system will run when it boots up, and is located in /etc/rc.d It is permissible to add your own commands to this file for things you want to automatically run. "rc.local" is not to be edited foolishly and is not to be treated lightly. OFM can/will safely and correctly edit "rc.local" to include an OpenVPN startup command which points to your desired VPN provider's connection file as well as your corresponding authorization file (ie: auth.txt), causing that connection to be established when you boot/reboot your computer. This can be changed and removed completely if you so desire. Please note that since "rc.local" contains the last set of commands to be run at startup, your connection will take a few seconds to activate. Using this function has 2 interesting side-effects: 1. You will no longer be prompted for authentication from either the system or your VPN provider for login...OpenVPN will just go ahead and connect. 2. When you right-click your panel network icon for selecting a connection, your auto-connected one will not be marked as active (no colored mark beside its name). Not to worry, your connection is active, and your panel network icon should have changed to indicate this. If you wish to verify the connection, try the link provided below. It should show your location as being that of the VPN provider's server you are connected to. 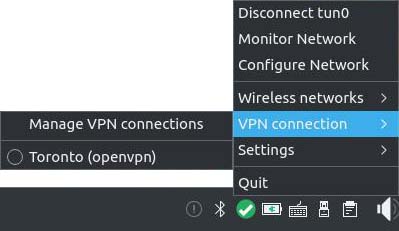 It should be noted that if you choose not to set up auto-connect, even with auto-login properly set up, you may still be prompted for your VPN username/password when you actually connect. Just click "Cancel". It's an odd quirk. https://dnsleaktest.com The first step in using OFM is a critical one. In the top-left corner of the main window, there is a section titled "Folders", with two text fields and corresponding buttons. These are asking you for two specific folder paths on your system, and once filled, will be saved for future use. You will never have to browse for these paths again. The result of setting these paths is that in every other function, your default file manager (i.e., Dolphin) will open already located at the place you need to be, meaning you can just go ahead and select/work with the file of your choice. DO NOT enter/edit these fields manually. 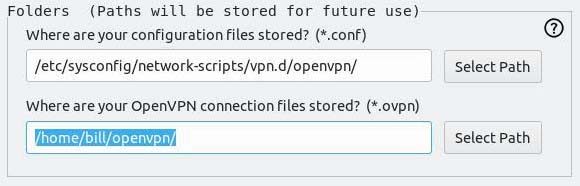 Help windows are available in all sections where they might be required. To access this help, just click the question mark icon in the appropriate section. I have tried to be as informative and as clear as possible. OFM does not currently have an installer. It is delivered as a simple zip file, and when extracted, will create its own folder named "OpenVPN File Manager". Make sure it's extracted inside your user folder (ie: /home/bill). Shortcut icons can be found inside the folder. Using OFM, you'll detect a noticeable lack of confirmation dialogs. You won't be told your file was saved. The editing window will just close. Why did I do this? I prefer to just get on with using an app, not click a bunch of message boxes for everything I do. Trust me, the functions work (if they fail, you'll see a system error message). I've tested every little detail to death while creating each one, and well after the project was complete. For better or worse, that's how it is. If people ever actually use OFM and want those dialogs in place, I'll add them if a reasonable amount of demand is present. OFM requires superuser access for some of its functions, and needs to use terminal commands for those functions (although you will never see a terminal window). Since the IDE (Xojo) I used to create this app does not allow such access, I was forced find a workaround. This means you will need a tiny package from the repo called "gksu". All this package does is allow commands to run as superuser. You will, of course, be prompted to grant this access on OFM startup. If you are not comfortable with installing gksu, then OFM will lose half of its functions, and will also ask you to install it as it won't be detected on your system. Most of the functions are aimed at creating/editing the files needed for connection auto-login and auto-connecting at boot-time, but if for some reason you wish to make edits to default OpenVPN files for other reasons, that is possible as well. Do so at your own peril. There are two displays that show you the files located in the folders OpenVPN requires (as defined by you in the "Folders" section). From these displays, you may delete files you don't want or need. Just select the desired file and click "Delete" (see screenshot below). 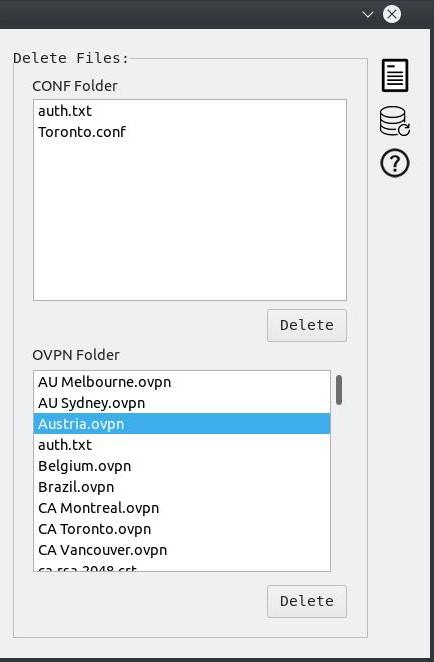 I have also included the ability to backup all related files to a folder on your desktop named "OpenVPN File Manager Backups". Each file type (there are 4) will be saved into its own folder within "OpenVPN File Manager Backups", and will include the current date in the folder name. You can also restore these files. When restoring, it would be beneficial to place your backup folder on your desktop, since OFM will open your file manager (ie: Dolphin) at your desktop location for easy selection.  "And now for something completely different." (any Monty Python fans out there?) 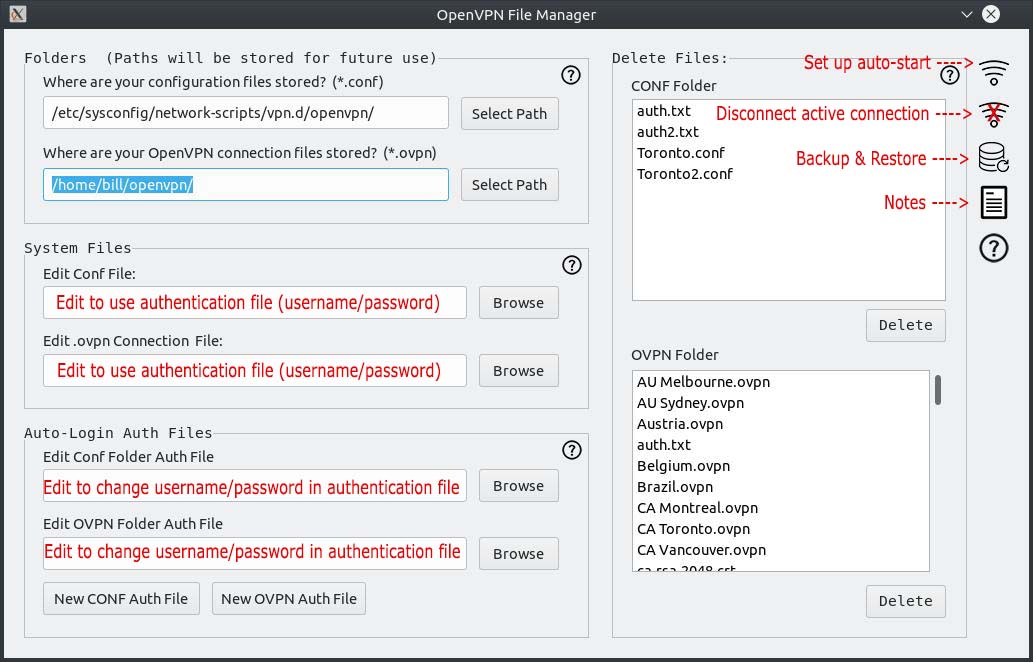 This is the main window you will see when you open the app. As stated above, the first thing you need to do is look at the Folders section (top-left). Click "Select Path" for both fields and select the appropriate folders. Configuration files are CONF files, OpenVPN connection files are OVPN files. These paths will be saved as described above, and you will not need to re-select these paths in the future. The "System Files" section deals with editing the two respective OpenVPN file types. As stated above, this is primarily for editing the line pertaining to auto-login, but other edits you deem necessary can also be made. To edit for auto-login, open the desired .ovpn and/or .conf file. Find the line (14) that says : auth-user-pass Change it to: auth-user-pass your_authfile.txt Where "your_authfile" is the actual name of your auth text file. Do not include quotes, and take note of the single space between "auth-user-pass" and your file name. NOTE: You should name your auth file so it clearly belongs with your CONF file. For example, if your connection CONF file is "Toronto.conf", then name your auth file something like "Toronto.txt" or "Toronto_auth.txt". This takes us to the "Auto-Login" section. Here you can create/edit your auth files required for auto-login. These files are related to the above text pertaining to the "System Files" section (ie: your_authfile.txt). When you click the "Browse" button to edit either the CONF or OVPN auth files, your file manager will open in the right place. Just select the desired file and click "Open". A new window will open with an editor in it. Your selected file name will be shown as well as the current text content of the file. Edit as needed and save. The "New CONF Auth" and "New OVPN Auth" buttons will open the same editor window, but this time you will need to enter your desired file name (MUST be a .txt file extension), plus your username (line 1) and password (line 2) in the text area below the file name. If you are editing an auth file, don't bother trying to change the file name, as that change will not be saved. Instead, make a new auth file and then delete the one you don't want (Delete Files section). See screenshots below: 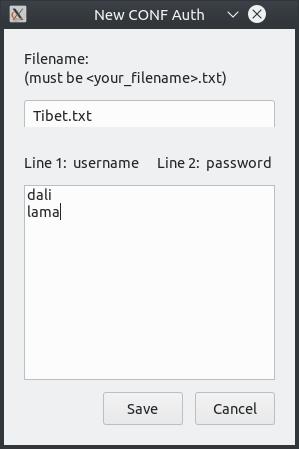 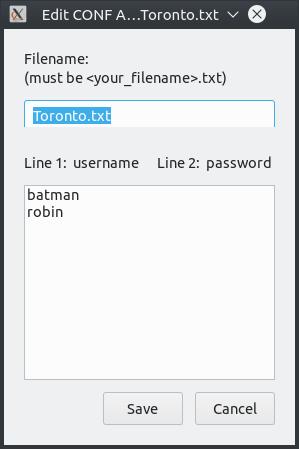 If you create a new auth file, the new file name will appear in the "Delete Files" section's relevant file listing. NOTE: The items in the "Delete Files" section's file listings also include all of your auth files, and can they can be deleted just the same as CONF or OVPN files. Backup & Restore 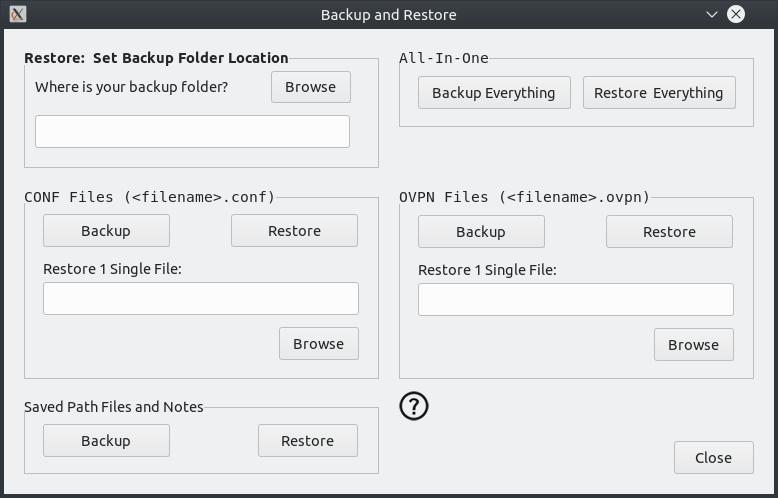 As you can see in the screenshot above, there are five sections, three of which are devoted to the backup & restore of the two OpenVPN file types (CONF & OVPN) as well as the saved path & notes.txt files created by OFM ("Saved Path Files and Notes" section). I chose to backup all files in each section to make things as simple as possible. No matter which section you use (or all of them), a single folder will be created on your desktop named "OpenVPN File Manager Backups". Inside this folder, each section's files will be saved into that section's own sub-folder, named appropriately with the current date included in the folder name (see screenshot below). To make things easy for yourself when restoring files, place your backup folder ("OpenVPN File Manager Backups") on your desktop, as that is where OFM will open your file manager. 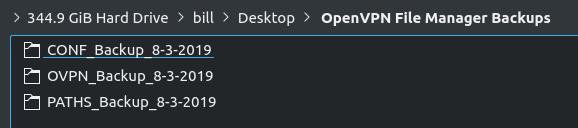 NOTE: With the exception of restoring one single file, all other "Restore" buttons, including the "Restore Everything" button, require that you first select your "OpenVPN File Manager Backups" location. This is done is the first section (titled in bold), named "Restore: Set Backup Folder Location". Your file manager will open at your desktop. You will also notice in the "Backup and Restore" screenshot above that you can choose to restore just one single file in either the CONF or OVPN sections. By clicking "Browse" under "Restore 1 single file", you will select the file to be restored and have it restored all in one operation. Be sure to go into the appropriate backup sub-folder to find the right file (see screenshot above). Auto-Connect at boot-time: 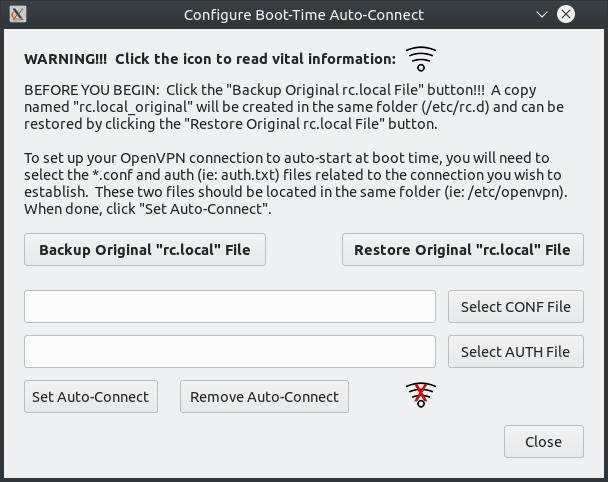 The screenshot above shows the window used for setting up/editing/removing the OpenVPN command line added to "/etc/rc.d/rc.local" to enable your desired VPN connection during boot/reboot. Clicking the "Select CONF File" or "Select AUTH File" buttons will open your file manager in the correct folder, based on the paths you selected in the "Folders" section of the main window (Remember step 1 at the start of this article?). When you click "Set Auto-Connect", OFM will look to see if you already have an auto-connect command in your /etc/rc.d/rc.local file. If not, one will be added based on your selected CONF and AUTH files. If there is already a command present, then it will be edited to reflect your choices. Conclusion This project has been the biggest challenge I've ever had in my relatively short programming experience, but it was worth all the effort. Appearances are very deceiving. OFM looks so simple and basic, yet the code that drives it is unbelievably complex ... at least to me. I learned a great deal with this project, not the least of which is that I really NEED to learn python. The IDE I used to create this app has so many shortcomings that don't exist in the Windows version. Lesson learned! I hope somebody someday finds this app useful. If not, well, it sure makes my life easier.
|