| Previous
Page |
PCLinuxOS
Magazine |
PCLinuxOS |
Article List |
Disclaimer |
Next Page |
Casual Python, Part 1 |
|
by Peter Kelly (critter) Introduction Learning to use a programming language can be a long, difficult and at times frustrating process. Most of the books and documentation are written by expert programmers and computer scientists describing each aspect of the language in great detail. If you want to become a professional programmer then I am afraid that is the way to go. But what about the rest of us? The casual users and hobbyists who simply want to be able to create small, useful applications with a graphical interface for their own or limited use. I am not an expert and I am certainly not qualified to tell people how to program in python but I may be able to help you get a little more satisfaction from your first steps into the language. I am one of the casual users mentioned above, and hence the title of this document. The traditional way of introducing a new programming language is to start with the hello_world program, which simply prints 'Hello world!" in the terminal. In python3 this would be: print("Hello world!") Not very helpful for our cause. Then you have to learn all of the boring and unfamiliar terms and syntax, type some code into an editor and then execute it in a terminal. Also, usually, it fails to run and you have to peer at it trying to find what went wrong. Eventually you get it running and for all your work you get to see some new text appear in a terminal -- bummer! Is this it? "No" you are told, "But you have to master this before you can start writing real, graphical applications," This, not surprisingly, puts off a lot of people. Our problem is that we want to produce graphical applications now, but to produce them we need to know a lot of the language and some rather sophisticated and advanced programming techniques. It seems that we have a chicken and egg scenario here. Happily, there is a way around this, but you will, eventually, have to learn a fair bit of python, and it will help if you know just a little of the python language. An excellent introduction to the language is a free book written by C. H. Swaroop, titled "A Byte of Python". This is a whirlwind tour of the language aimed at beginners, and can be read in a couple of evenings. It's just enough to whet your appetite. Read it. It will not be time wasted. I shall also be introducing and demonstrating elements of the python language as we encounter them in the example applications. When learning to program, one of the methods often taught is something called "top down design." How this works is to start with the end result and then work backwards, adding statements that lead to the result. For example: New price = $21 The result that we want Now the new price must be the old price plus the increase/decrease so:
New price = Old price + Price change The old price we can look up but the price change must be some percentage of the old price:
Old price = $20 And so the program structure is worked out. This was not written in any real programming language, but in something called pseudo code, which means that it can be done without having to first learn the language. Simply write down anything that makes sense and describes the actions to take. When starting a new project, I not only have no idea how the program will be constructed, but often also don't know how to write code that will do what I want to do, or how to get the data/text to do it to. Breaking down the program like this gives me a start point, and I can fill in the gaps as I go. The internet is a great place to find out how to do things. Whatever you want to do, you can bet that someone else has wanted to do something at least similar and that their questions have been answered on sites such as stack exchange. If nobody else has tried what you are doing, ask yourself if there is perhaps another, easier way to achieve your goal. Another breakthrough in making programming more accessible to 'ordinary' people was the introduction in the 'nineties of 'Rapid Application Development' in the form of Microsoft Visual Basic and Borland Delphi. These systems allowed the user to create a graphical interface by dragging and dropping buttons and things on to a form and then adding some code to get them to perform as required. As far as I am aware there is no such thing (yet) as "Visual Python," but we can get close. The easiest graphical system to use with python is called "tkinter," but Qt5 has a lot more to offer and so I am going to use that. Qt5 forms the basis of the current KDE/Plasma desktop. Also, Qt5 comes with a very useful utility called "Designer," which takes care of the drag'n drop part for us. Using this, I am going to create a very simple application which has no real practical use but works. It will have its own window, some buttons and an area into which you can type text. You will also be able to resize it, minimise it and do all of the usual things graphical applications do. All of this without having to learn any of the programming language. This will be our template application, and we can add functionality as we learn the language. Getting started The first thing that you need is the program language itself -- python. There are currently two versions of python available: python2 and python3. They are very similar, but not entirely compatible. Python2 reaches "end of life" in 2020, so I will use python3 here (which I believe is superior, anyway). Python3 is installed by default in PCLinuxOS. The next thing we need are the python bindings to a graphical tool-kits' libraries. If you don't know what that means, don't worry. Just follow along. From synaptic install
python-qt5 Qt5 is currently the latest version of the Qt toolkit. We also need an editor. Any plain text editor will do, but I am going to use geany, which again is in the repositories and may need to be installed. If you use geany, you can more easily follow along. Finally, create a file named pyuic5 with the following contents:
#!/bin/sh
exec /usr/bin/python3 -m PyQt5.uic.pyuic ${1+"$@"}
And another named pyrcc5 with contents:
#!/bin/sh
exec /usr/bin/python3 -m PyQt5.pyrcc_main ${1+"$@"}
As root copy them both to /usr/bin OK. If you are using KDE Plasma, we are good to go. If you are using one of the other desktops, or the lighter darkstar edition, then you may need to install more. The error messages from python should tell what is missing. The template The template application that we start with is very simple (and pretty much useless) but it works and will be the foundation for more ambitious projects. It looks like this. 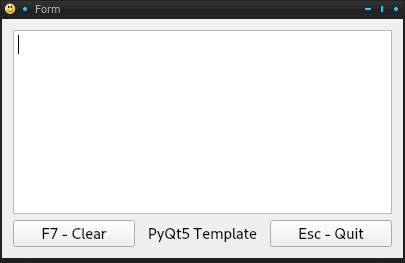 It's not much to look at, and it only allows you to type into the box and to clear the box using the Clear button, or by pressing the F7 key. The application can be closed by pressing the escape key, clicking the Quit button or the close button on the top right of the window. Built into this is the ability to maximise, minimise and move the window around by dragging and to resize it by dragging a side or corner of the window and all of the things inside, buttons etc, are automatically repositioned. It even has its own icon. This means that the application already does a lot of what all 'proper' applications can do. All we have to do to this template is to make it useful. Create a directory somewhere in your home directory named py_template. Change to that directory and add a suitable icon. Mine is a smiley face. Creating the interface The Qt toolkit is a complicated affair and the documentation is - well! Have a look here. That's enough to discourage even the hardiest of us. However, Qt5 comes with a nice graphical tool called "Qt Designer," which you installed earlier and should now find in your menu, probably under development or similar. This will create the actual graphical interface that appears on the screen. We will also need a few lines of python code to use the interface, and there are a couple of other little steps required to tie everything together. This next section may seem like a lot of work for such a simple application, but we are making a template here that can be copied and re-used to make many more applications. Start the designer and you will get something like this. Yours may look slightly different, depending on the theme you use and on whether you use kde or some other environment. You may also have to resize the side bars, which you can do by dragging the edges. 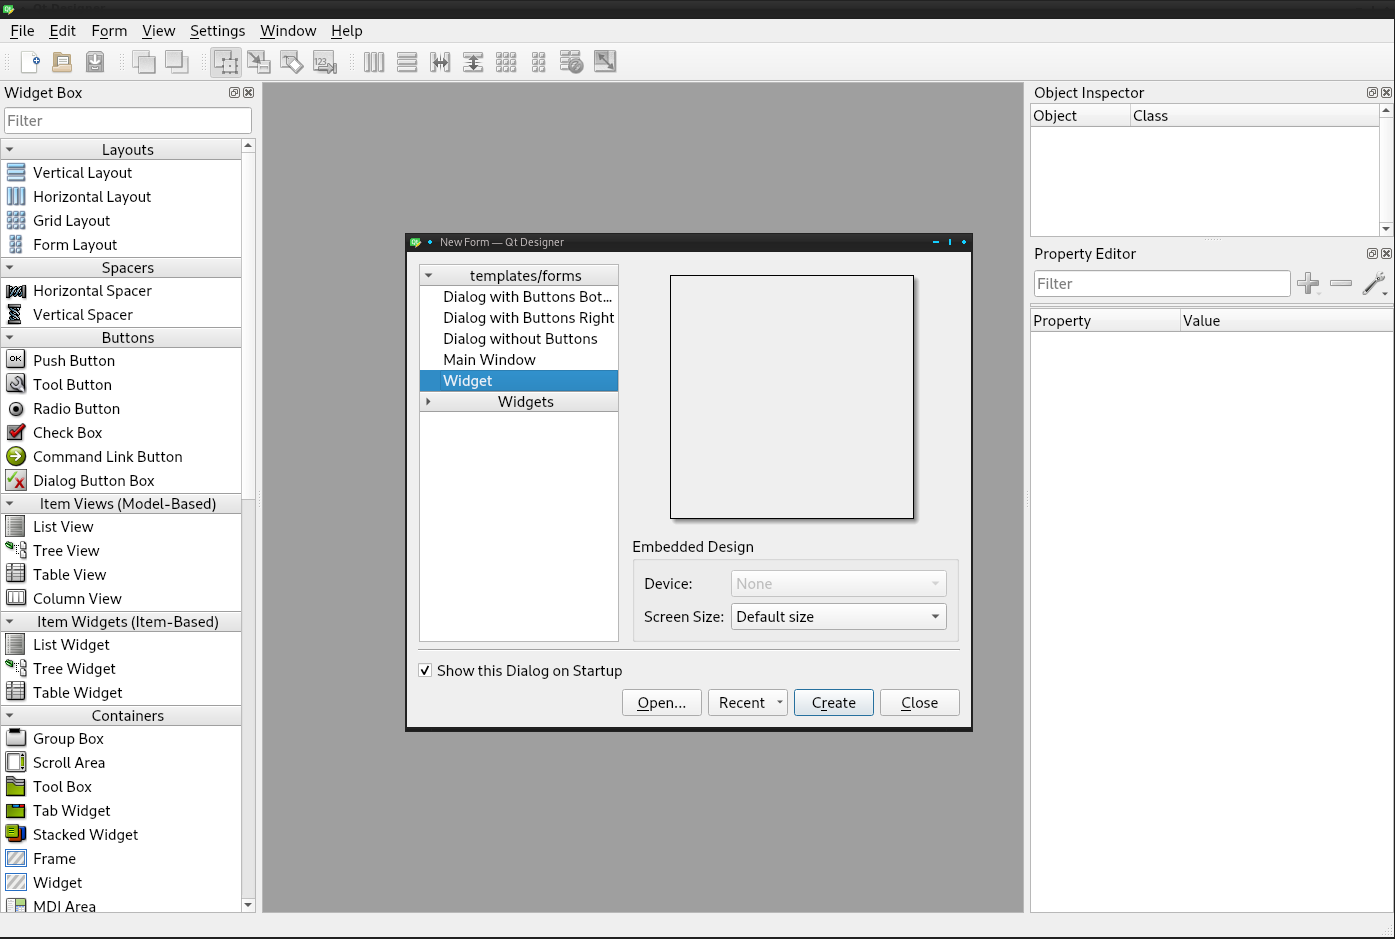 Select Widget and click the Create button. A new, blank form is created that looks like this: From the Widget box on the left drag and drop a textEdit Widget from the Input widgets section, a Label from Display Widgets and two Push Buttons from Buttons. Move them around and resize them until they look approximately like this: 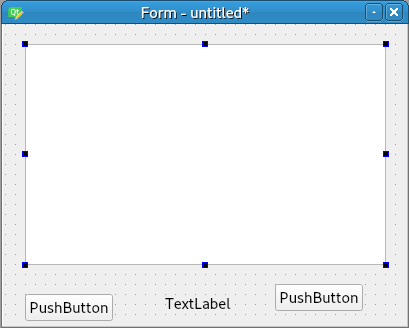 Right click on the background of the form, that's the part with dots on it, and at the bottom of the menu that pops up select Lay Out and then Lay Out in a Grid. The Widgets will then be reorganised into a more symmetric layout like this: 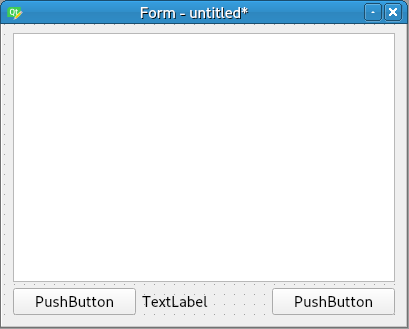 On the right of the designer application, locate the Property Editor. If it is not there, select View from the menu and make sure that it is checked. Select the left pushbutton, and in the property editor change the objectName to clearButton. Scroll down the property editor to text and change this to 'F7 - Clear'. Select the other pushbutton and change its properties to quitButton and 'Esc - Quit'. Spelling is critical in the objectName section, as this is the name that will be used in the python code. Select the main form, and in the property editor, find 'window icon', and click in the space on the right. Expand the drop down box, select 'choose file', navigate to your new directory, and select the icon you put there. 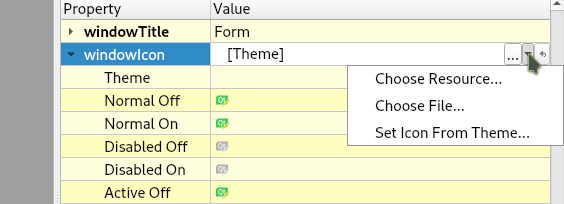 Finally, select the label and change its text to PyQt5 template. Scroll down to Alignment, Horizontal and click in the right hand column. Select AlignHCenter. Your form should now look like the finished application above. Press Control + R, and you will be presented with a preview that you can resize. Notice that the contents are automatically re-positioned as you change it. None of the widgets do anything yet as we need to create some python code for that. Use the close button on the top right of the preview. Go to File - Save and navigate to your template directory and save the file there as template.ui (the .ui suffix denotes a user interface file). Your directory should now look like this:
qt5_template/ The template.ui file was created by the designer but is not yet readable by python. This is something that we shall fix now. Create a new file with the following contents: #!/usr/bin/env bash pyuic5 template.ui > template_ui.py Save it as update_res.sh. This will convert the template.ui file generated by designer to code that python can understand. Make update_res.sh executable. In Dolphin, this means right click on the file, select Properties, and the on the permissions tab of the dialog that opens, check 'Is executable'. If you now execute update_res.sh (double click in dolphin) another file will be created named template_ui.py. This is the python code version of the file created by designer. The python code First we need to set up geany to use python code. Open geany and go to Edit - Preferences - Editor. Open the Indentation tab and make sure that Width: is set to 4 and type is set to spaces. Under the Display tab, check Show line numbers. Click apply and close the dialog.The python language uses indentation to format its code, and the convention is to use four spaces. The settings you just did ensure that this is always the case, and that pressing the tab key inserts four spaces, and not a tab character that looks the same but may be set differently in another editor. Stick to the conventions and life will be easier. Enter the following code exactly as shown - without the line numbers but including the blank lines. The code is case sensitive. Copy and pasting is not recommended, as typesetting often includes invisible formatting that corrupts the code. Note: The first character of all unindented lines is flush against the left of the page, line 10 is indented 4 spaces, line 11 a further 4 spaces, line 19 a further 4 spaces. The long lines that appear on lines 10,11 and 32 are actually two underscore characters "__" so that is what you should type. 1 #!/usr/bin/env python3 2 3 import sys 4 from PyQt5.QtCore import * 5 from PyQt5.QtWidgets import * 6 import template_ui 7 8 9 class Template(QWidget, template_ui.Ui_Form): 10 def __init__(self): 11 super(self.__class__, self).__init__() 12 self.setupUi(self) 13 self.textEdit.setFocus() 14 self.clearButton.clicked.connect(self.clearText) 15 self.quitButton.clicked.connect(self.exitApplication) 16 17 def keyPressEvent(self, e): 18 if e.key() == Qt.Key_Escape: 19 self.exitApplication() 20 if e.key() == Qt.Key_F7: 21 self.clearText() 22 23 def clearText(self): 24 self.textEdit.clear() 25 self.textEdit.setFocus() 26 27 def exitApplication(self): 28 self.close() 29 sys.exit() 30 31 32 if __name__ == '__main__': 33 app = QApplication(sys.argv) 34 form = Template() 35 form.show() 36 app.exec_() Save it as qt5_template.py. That's it. 28 lines of code if you don't count the blank lines. Before I explain any of the code, let's see if we can get it to run. Once it is running, we have our template application. Your directory should now look like this:
qt5_template/ A side effect of running this code is that python makes another directory named __pycache__ and fills it with some files. This we can, and should, ignore. Understanding the code Almost all of this code is specific to Qt5. It is python code but quite advanced python code. However, it is not necessary to understand it to make use of it. Eventually, as it becomes more familiar, some of it will begin to make sense and you will be able to add to, modify and improve it to make your own applications. The code may seem complicated at first, especially if you haven't done much programming, so don't expect to understand it. I would suggest skimming through the explanation, and then coming back to it later when you have done a little more python/Qt programming. We began knowing nothing about programming in python and Qt, and already we have made a fully working, graphical application. As we progress to more useful applications, you will see how more and more of the pieces fit together, and then you can start assembling your own applications. A brief explanation: Line 1: Python is an interpreted language and the system needs to know which interpreter to use to execute the code. This line tells it to use python3. If you look at the update_res.sh file, it has a similar first line telling the system that for this program it should use bash as the interpreter. If we didn't include this line, we could get python to execute the code directly by typing in a terminal python3 qt_template.py from within our qt5_template directory. Having the line in the code makes this automatic. Lines 3 to 6: These are import statements which means that python 'imports' or reads code that has already been written for us.
Line 9: Creates a 'class' on which the application will be based. The class name is Template with a capital 'T' but template_iu has a lower case 't'. This distinguishes between the class and the file we are importing. This is a biggy! You can safely skip this explanation for now. Understanding classes is the core of understanding object oriented programming. A class is a kind of blueprint for an object, just as in nature a fish, bird or dog are classes of animal, and duck is a type of bird with some distinctive features, but is still an animal. Here, we are creating a class named Template, and our application will be an instance of this Template object. This class is based on the QWidget class, which we started within designer, but then we added buttons, a label and a textedit to the form provided and these changes were saved out to a file named template.ui which in turn was converted to a python file. This line constructs a class based firstly on QWidget, and then adds in the changes we incorporated on the form. This was the reason for the import in line 6. This is known as inheritance. Our class inherits everything coded into a QWidget object. It also gets all of the changes that we made in our user interface file. The class definition calls up the QWidget and Form definitions. Lines 10 to 15: Initialise or set up things.
Lines 17 to 21: Get key presses and connect to code in a similar manner to the button clicks. Lines 23 to 25: Clear the textedit box and reset the focus to the textEdit object. this focus was lost when the clearButton object was pressed. Lines 27 to 29: Shut things down. Line 32: This is where execution of our code really starts. Just accept the format of the line as shown for now. Line 33: Makes an application object. This is done by the Qt code we imported. Line 34: uses the Template class 'blueprint' to create a form named, imaginatively, form. This naming is actually an assignment, it assigns an instance of the class that we made to the variable 'form'. The name does not have to be form it could be almost anything but for now, as 'form' works, keep to it. Line 35: Prepares the form for display. Line 36: Executes the application!
Learning to use the python language There are two parts to learning to program Qt graphical applications. One part is the mechanics of the actual user interface, and the special code needed for python to interface with it. This code is specific to the Qt system, but is still python code. The second part is the standard python code needed to perform the function that the application serves. This type of code does not need to know about the graphics side of things, and could be executed in a terminal or in the python interpreter. In these texts, I give an example application that uses some of each type but have separated out the explanation of the standard code so that it can be learned alongside the building and coding of the user interface. Python is quite friendly to new users, but is also extremely powerful once you get familiar with its many features. First, it is necessary to learn about the basics. Open a terminal (yes, a command line terminal that we are trying hard to avoid. This time however it is extremely useful). Type the command python, press return and the interactive python interpreter is launched. Here you can type in anything 'pythonesque' and get immediate results. This is a great way to try things out without writing a program. python Python 3.7.1 (default, Oct 22 2018, 10:41:28) [GCC 8.2.1 20180831] on linux Type "help", "copyright", "credits" or "license" for more information. >>> The >>> is the interpreters prompt which is waiting for something to be typed. When you want to leave the interpreter type quit() or press Control-d. In python if you want to make a comment in your code use the # character. Anything that follows this character is ignored by python. Comments are a good way of explaining some part of the code that may not be obvious. Use comments, and when you come back to the code in a few months time, you will be glad that you did. Python uses several core type 'objects', each of which I will discuss as we progress. The first of these types of objects I want to describe are numbers. Python is good with numbers. I will start with integer (whole numbers) and floating point numbers (those with a decimal point) also known as floats.
Python is a very capable calculator and the following arithmetic operators are available:
The first three are straight forward: >>> 7 + 4 11 >>> 2 + -3 -1 >>> 3.7 - 1.5 2.2 >>> 3.14 * 5.726 17.97964 Division is mildly complicated as there are two forms, true division and floor division. >>> 9 / 3 # True division 3.0 # always a floating point result >>> 7 / 3 2.3333333333333335 # floating point numbers often have small errors # notice the 5 at the end. This nothing to do with # python but is caused by the way floating point # numbers are stored by the system. >>> 7 // 3 # Floor division 2 # two integers return an integer >>> 7.0 // 3 2.0 # float in expression returns a float. >>> -5 // 2 -3 # rounds down ... -3 -2 -1 0 1 2 3 ... ← % (modulus) gives the remainder after division >>> 14 % 3 2 >>> 14 % 3.0 2.0 >>> 14 % -3 -1 # This might not be obvious but it is correct. ** exponentiation >>> 4 ** 2 # 4² 16 >>> 4 ** -2 # 1 / 4² 0.0625 >>> 4 ** 0.5 # √4 2.0 An extremely useful addition to these are the 'augmented assignment' operators: +=, -=, *=, /= and lots more, these are the most common. >>> n = 3 >>> n += 2 >>> n 5 >>> n /= 2 >>> n 2.5 The following numeric functions are implemented:
abs(x)                  Returns the absolute value of x

divmod(x, y)         Returns the quotient and remainder of
                          dividing x by y as a tuple of two
                          integers

pow(x, y)             Raises x to the power of y; the same as
                          the ** operator

pow(x, y, z)          An alternative to (x ** y) % z

round(x, n)           Returns x rounded to n integral digits
                          if n is a negative integer or x rounded
                          to n decimal places if n is a positive
                          integer
In addition to these basic features complex numbers are available with real and imaginary parts >>> c = 4 + 2j >>> c (4+2j) >>> c.real 4.0 >>> c.imag 2.0 Numbers may also be entered in binary, hexadecimal and octal and converted between formats using the bin(), hex(), oct() and int(functions. >>> bin(42) '0b101010' >>> hex(42) '0x2a' >>> oct(42) '0o52' >>>> int(0x2a) 42 There are also bitwise, logical and comparator operators. Operator precedence follows an extended version of the PEMDAS rule (parentheses, exponentiation, multiplication, division, addition and subtraction) with equal precedences following the left - right rule:
10 + 8 / 2 * 4            >>>26 # not 11, 36, 56, 36 or 2.25.

Operators:
()                       Parentheses
**                      Exponentiation
+x, -x, ~x           Unary plus, Unary minus,
                         Bitwise NOT
*, /, //, %           Multiplication, Division,
                         Floor division, Modulus
+, -                    Addition, Subtraction
<<, >>               Bitwise shift operators
&                        Bitwise AND
^                       Bitwise XOR
|                        Bitwise OR
==, !=, >, >=, <, <=,
is, is not, in, not in    Comparison, Identity and
                          Membership operators
not                      Logical NOT
and                      Logical AND
or                        Logical OR

Often it is clearer to use parentheses to force the correct order.

>>> 10 + (8 / 2) * 4
26.0

>>> (10 + 8 / 2) * 4
56.0

>>> (10 + 8) / (2 * 4)
2.25
If this is not enough you can import various modules or packages that extend the capabilities. The math module gives you everything you would expect of a scientific calculator, the decimal module provides variable precision floating point math and the fraction module lets you work with fractions. There are also some serious packages such as numpy, which are used by such institutions as CERN and NASA. You should get familiar with basic math and the augmented operators as these are used frequently. The rest can wait until you need them or we encounter them in one of the examples. |