| Previous
Page |
PCLinuxOS
Magazine |
PCLinuxOS |
Article List |
Disclaimer |
Next Page |
Secure File Deletion: Going, Going, Gone ... You Hope! |
|
by Paul Arnote (parnote) Last month, we talked about how to recover files that you might have mistakenly deleted. But what if you want to delete a file, and make sure that no one -- you and no one else -- is able to recover those files? What if you are donating one of your computers to your local computer user group, or if you are selling it/giving it away? Most assuredly, you don't want your private information in the hands of others. You need a way to securely delete those files. As you might recall from last month's article, I was literally SHOCKED by how many of my "deleted" files were recoverable, in some cases months after I deleted them using normal deletion methods. I thought those files were long gone, never to be seen again. Boy, oh boy, was I ever wrong! The data was rather benign in nature, but should I sell, give away or otherwise dispose of this laptop (or any of my computers), other subsequent "owners" of it don't need to know what I'm up to or what I use my computer(s) for. In short, it is MY data, and they are not entitled to it. Before I get too far into this, I need to give a shout out to Not_yet_16, Jonesy, Linadian and a few other PCLinuxOS forum users. Their work in helping to spread the word about how to securely delete files and how to securely wipe disks laid the groundwork and basis for this article. I coupled my own research with the message they delivered in the PCLinuxOS forum. You can view Not_yet_16's post on this topic here, Jonesy's post here, and Linadian's post here. There are others, but these are the ones that started me on my journey to write this article. I also have to admit that as I dug deeper and deeper into this matter, several alternative headlines for this article came to mind. Some of those were "Secure File Deletion: Rotsa Ruck!", "Secure File Deletion: Don't Count On It", "Secure File Deletion: Fuhgeddaboudit", and "Secure File Deletion: Not Easy For Linux Users". There are a couple of things we also need to keep in mind. First, we need to divide the tools into two categories: secure file deletion, and securely wiping magnetic hard drives. Second, make a backup of your files and data if you're tempted to try these methods. Short of a forensic computer lab with very expensive computers, tools, a knowledgeable technician or operator, and a LOT of time -- there will be no way to recover your files or data. At the very least, your data should be safe from the prying eyes of the user level recovery tools we discussed in last month's column. In fact, there is an exceptionally miniscule chance of your data being recovered, especially if you use the tools discussed here for securely wiping your magnetic media. It might be worth noting, too, that this information ONLY applies to magnetic media, like traditional hard drives. Solid state drives (SSDs) are a whole other animal, and trim (in the PCLinuxOS repository) will -- or should -- take care of any lingering data. You are using trim with your SSDs, right? Never mind. That's another article for another time. Also, if you're a user who avoids the command line like forgotten three week old leftovers in the refrigerator, all but two of these utilities -- for secure file deletion and for securely wiping drive -- are command line only. Even then, installing one of the GUI versions also installs the command line version of the very same utility. To add insult to injury, the GUI version of this tool works imperfectly at times, so always double check to insure the file(s) you wanted to be gone really are gone. The other GUI tool should be already installed on PCLinuxOS users' computers, provided that you installed a full version, as opposed to a "Mini" version. If you are a member of the latter club, this other tool is easily installed, via Synaptic. If you've been around the command line much, then you probably already know this next bit of wisdom, but I repeat it here for those who don't use the command line much. If the filename and/or path has spaces in it, you will need to place the filename/path in double quotes. Linux uses spaces as delimiters to separate different command line switches and the different parts of the command, so the spaces in filenames/paths will confuse the command line tools. Just be sure to place the entire filename/path in quotes. Alternatively, you can escape the spaces with a backslash ("\"), but it's way easier to just place the filename/path in double quotes -- and much more readable. If you avoid using spaces in your filenames and paths (I'm totally anal about avoiding them, since they can cause so many problems), then you avoid this problem entirely. I've even created a short bash script that I can call from a custom action in Thunar that will convert spaces in a filename to dashes. I use it promptly and religiously for files that I've downloaded that contain spaces in the filename. Historical Foundation Much of the basis for understanding secure deletion of files and media comes from a 1996 paper by Dr. Peter Gutmann, called "Secure Deletion of Data from Magnetic Media and Solid-State Memory." His paper was first published in the Sixth USENIX Security Symposium Proceedings, San Jose, California, July 22-25, 1996. It is published under the Creative Commons license. There were some key differences 20 years ago. First, the hard drives in existence were smaller, and they operated a bit differently. Second, journaled file systems were not yet in widespread use, like they are today. Dr. Gutmann has added three epilogues to his original paper over the years, mostly in an attempt to set the record straight, and to address advances that magnetic storage media has made in the past 20 years. If you want to know more information about securely deleting magnetic media, I recommend reading over his paper. It's not as "dry" as you might expect. Plus, if you're a charter member of the local paranoia club, or if you have a real need (or desire) to prevent sensitive data from falling into the wrong hands, Dr. Gutmann's paper should be high on your "must read" list. In security circles, it's almost as if Dr. Gutmann has been elevated to godlike status, with even secure deletion "routines" named after him. Secure File Deletion Most of the tools for secure file deletion were written and created before the journaled file systems we use today came about, namely EXT3 and EXT4. In fact, I'm betting that the vast majority of PCLinuxOS users are using the EXT4 file system. Therein lies the problem. The journaled file systems are a tough nut to crack. You may be able to eliminate the actual data, but information about the file(s) may still exist in the file system's journal entry. That information could include block IDs for the data, aiding a forensic lab in retrieving the information that you'd rather not be retrieved. That data may or may not have been overwritten, and if not, is easily retrieved. It can also go the other way, too, where the journal entry in the file system is deleted, but the data remains intact. In fact, the latter is the most likely case, from what I can decipher about the whole matter. If you are using EXT3 as your file system, there is a good chance that the secure file deletion utilities will work as described, provided you haven't changed the "data=something" flag for your drive in your /etc/fstab line (or someone else hasn't changed it). EXT3 defaults to the "data=ordered" setting, which allows most of the secure file deletion utilities to work as they should. EXT3 will use the default setting if no other setting is specified. The other settings for the data flag are journal and writeback. If you are using EXT4, Btrfs, ReiserFS (now known as Reiser4), or some other journaled file system, things won't be as certain. Use of the secure file deletion utilities MAY leave sensitive data on your drive, or stored in the filesystem's journal. According to Wikipedia's page about the EXT4 file system, "the ext4 file system does not honor the "secure deletion" file attribute, which is supposed to cause overwriting of files upon deletion. A patch to implement secure deletion was proposed in 2011, but did not solve the problem of sensitive data ending up in the file system journal." The EXT4 wiki entry about "new features" shows that this feature appears to be stalled and is not currently being worked on -- unfortunately. Still, most secure file deletion utilities work well enough to prevent others with access to and knowledgeable use of user level file recovery tools from gaining access to your data. If you are paranoid about the possibility of others gaining access to your data, then securely wiping the magnetic media will be your best bet, short of physical destruction of the drive. That doesn't mean, though, that the secure file deletion utilities are without merit or use. They definitely deserve your consideration. There may be times when you want or need to securely delete only a few files. If it's just a few files you're needing to securely delete, wiping the hard drive, then having to reinstall your operating system and the other data you want to keep is just a LOT of work. With all of the secure file deletion utilities below, I have tested them. The yardstick I used to determine success or failure was if I could see the file(s) with testdisk, which we discussed in last month's article on how to undelete files, after performing the file deletion with each utility. In every case, none of the file(s) were visible using testdisk after using the secure file deletion utility. If testdisk could no longer see the file, then the secure file deletion was considered to be a success. While it's not the most scientific test and is far from perfect, I feel that if the user level file recovery utilities cannot see them, then you have had at least some degree of success. Short of securely wiping the drive contents, I think this is the best we can do, given what we have to work with. Will their use protect you from the prying eyes of a forensic computer lab? Probably not, but it's better than nothing. The only two things that have any level of success against the probing by a forensic computer lab are securely wiping the drive (probably multiple times, just to be sure), and physical destruction of the drive. srm The name srm is short for Secure ReMove. Its use is very much like the use of the remove (rm) command. Currently, at the time I wrote this article, srm is NOT in the PCLinuxOS repository. Still, it is easily installed and is a self contained, benign addition to your PCLinuxOS installation. I am mostly including it here because of the rather large number of references to it when you search the internet for information about securely deleting files. While I have made a package request for the addition of srm to the PCLinuxOS repository, there is no guarantee that it will be added (just as with any package request). If you want to install srm yourself from the source code, it's relatively easy to do. First, download the source code, and extract the tar.gz archive file to a folder somewhere in your /home directory. The current version is 1.2.15. Then, as the root user, navigate to the folder where you extracted the tar.gz file, and enter the following commands, one at a time on the command line:
./configure
Your terminal window will whirl and purr at each stage of the installation. When all three commands have been executed, srm will be sitting in the /usr/local/bin directory, ready to use. It really is that simple. Using srm is fairly straightforward. Executing the command srm --help at the command line will give you this: [parnote-toshiba@parnote-toshiba srm-1.2.15]$ srm --help Usage: srm [OPTION]... [FILE]... Overwrite and remove (unlink) the files. By default use the 35-pass Gutmann method to overwrite files. -d, --directory ignored (for compatibility with rm(1)) -f, --force ignore nonexistent files, never prompt -i, --interactive prompt before any removal -x, --one-file-system do not cross filesystem boundaries -s, --simple overwrite with single pass using 0x00 (default) -P, --openbsd overwrite with three passes like OpenBSD rm -D, --dod overwrite with 7 US DoD compliant passes -E, --doe overwrite with 3 US DoE compliant passes -G, --gutmann overwrite with 35-pass Gutmann method -C, --rcmp overwrite with Royal Canadian Mounted Police passes -r, -R, --recursive remove the contents of directories -v, --verbose explain what is being done -h, --help display this help and exit -V, --version display version information and exit By default, srm uses the Gutmann method to overwrite data in a series of 35 passes. But, if you want to vary that default setting, then use one of the other methods. Those are known as the simple method, the OpenBSD method, the DoD method, the DoE method, and the RCMP method. Contrary to what the on screen help information says, the simple method is NOT the default setting. Just keep in mind that the more passes a method uses, the slower the file deletion will be. The simple method is the fastest, since it overwrites the data just once with zeros. The Gutmann method is the slowest, since it overwrites the data 35 times. Minimally, the command for srm looks like this: srm path/to/file Or, if you are already in the directory where the file you want to delete resides: srm filename Of course, it's nice to have a little feedback from the program about what it's doing, so something like this will most likely be the best implementation: srm -v -s filename This turns on verbose output and uses the simple method. If you want to securely delete entire directories, their subdirectories, and all the files contained therein, add the -r command line switch. It might look something like this: srm -v -s -r path/to/directory/ There is a lot of information about srm out there on the internet, including its man page. Most Linux distributions have it available to install from their repos. But do keep in mind that srm works best with non-journaled file systems (e.g., FAT16, FAT32, exFAT, EXT2, etc.). Dr. Gutmann acknowledges this, and makes the suggestion to use the simple method of file deletion with srm, rather than any of the other methods. Is it perfect? Nope. Does it work? Mostly. It's certainly far better than just using the standard rm command. Does it securely delete your files? Maybe. Maybe not. Will your files still be recoverable in a forensic computer lab? Most likely, since there's no guarantee that the file contents are obfuscated or overwritten on a journaled file system.wipe This is another utility that isn't in the PCLinuxOS repository -- and probably for good reason. The wipe program hasn't been updated since 2009, and is most likely being abandoned. I include it here because there are numerous references to it when you seek information on the internet about securely deleting files on Linux. Just as with srm, wipe is reported to not work well with journaled file systems. Also, just like with srm, you can download the source code and compile it yourself. The steps are the same as for downloading and compiling the srm source code. So, instead of repeating all of that again here, refer to the earlier directions when we were talking about srm. It is also a self-contained and benign program, just like srm. Once you have it installed, enter wipe -h at the command line. You should see this information in your terminal session:
When you look at the command line switches, it's hard to not notice that a lot of them are the same as with srm -- so much so, that wipe looks like srm on steroids with all the extra options. The command for wipe will most likely look like this: wipe filename If you want to change up any of the default values (see at the beginning of the list of command line parameters in the help listing above), your command might look like this: wipe -v -z -p 7 filename Just as with srm, add the -r command line switch to recurse directories and delete all subdirectories, along with the files in them. Your results using wipe will be similar to the results using srm. Definitely no guarantees, but it's better than the standard rm command, and definitely better than nothing. shred and shred_GUI Shred and shred_GUI are in the PCLinuxOS repository. You will only find shred_GUI listed, as the command line version is installed along with the GUI version. So, if you're looking to install just the command line tool, you will have to install the GUI version just to get the command line version. Here's what Synaptic says about Shred_GUI:
Let's take a look at the help text for the shred command line utility.
Hmmm ... yet another secure file deletion utility that doesn't play well with journaled file systems. As a result, the previous warnings about sensitive data being left behind do apply. The emphasis with the red text is mine, by the way. Stringing together all the necessary command line options, you might use shred like this: shred -v -u -z -n 1 path/to/some.file The -v switch turns on verbose output, so you have some indication of progress. The -u switch truncates and removes the file after overwriting. The -z switch performs a final overwrite of the file with zeros. The -n 1 switch tells shred to overwrite the data with random data in one pass. If you want more passes, change the "1" to the number of passes you want to perform. Finally, there is the path and filename of the file you want to securely delete. Contrary to the popular belief in some paranoia filled circles that more passes equals greater security, one pass is generally sufficient to obfuscate files. After making one pass with random data and then overwriting that data with zeros, your data will not be recoverable on a modern hard drive. Multiple passes, however, will increase wear and tear on your hard drive, and it will take longer to complete the process. Remember ... we're talking about magnetic media here, not SSDs, which are a whole different creature.  When you launch Shred_GUI, you should see something like the image above. You would do well to read the text in the program's main window. By default, the checkboxes are unchecked, so you will need to check the relevant boxes that pertain to what you are wanting to delete. You will also need to select how many times to "shred" each file. Shredding them once should be sufficient, but you can select to shred each file up to 50 times, which is probably way beyond overkill. Next, select the "Select Files/Folders" button, and you can select the files and folders (directories) you want to shred. 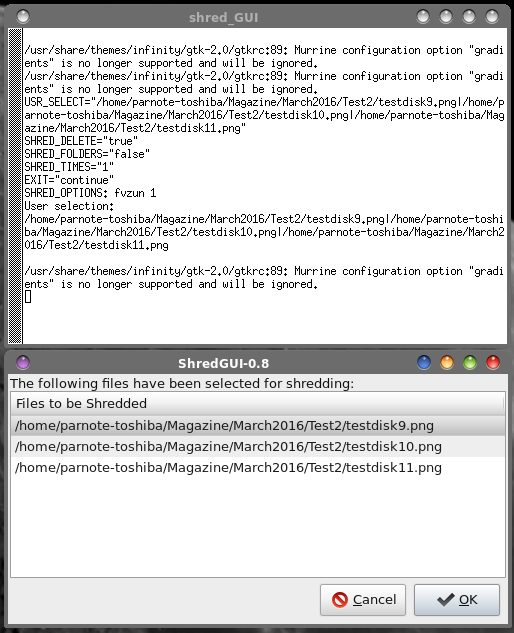 In the above image is a window that shows the three files I asked Shred_GUI to delete. The Xterm window typically opens behind the Shred_GUI window, but I repositioned the windows so you can see them in one screenshot. Shred_GUI simply runs the shred command line utility. Notice in the Xterm window that the SHRED_OPTIONS parameter (about halfway down the Xterm window) shows "fvzun 1" being passed to the shred command line program. These options are the command line switches that are then used by the shred command line program to delete your files. 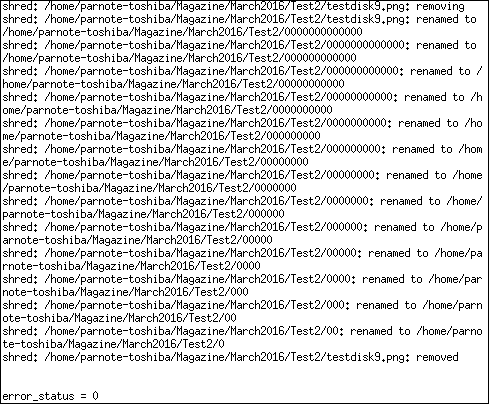 The image above shows the output from the shred command line tool running in Xterm. Shred_GUI will show you the output so that you can follow the progress of the file deletion.  Finally, Shred_GUI will give you a confirmation dialog box when the operation is complete. If there were problems or errors, a slightly different dialog box will be displayed that details any problems that were encountered. Also, the green icon at the left of the confirmation dialog box is changed to a red "X" icon, if problems or errors were encountered. Like with the other secure file deletion utilities we've discussed, your results using shred or Shred_GUI with a journaled filesystem (e.g., EXT4, Reiser4, etc.) won't be a guarantee, but it's better than the basic rm command, and definitely better than nothing. bcwipe This utility definitely is in the PCLinuxOS repository. So, installing it on your system is as simple as installing any other program from the repository onto your computer, via Synaptic. BCwipe is a command line program, and (as far as I know or can discern) there is no GUI front end for the free version in the repository. There is indication that the paid, commercial version (available for just under $40 (USD) from http://www.jetico.com) does have a GUI. Here's the description for bcwipe from Synaptic:
So, that's not much to go on. Let's see if the help text for bcwipe helps.
The bcwipe man page at FreeBSD is somewhat helpful, but really doesn't shed much more light on things than the online help text. I didn't find a typical Linux man page, but was able to track this one down. Jetico also has an online command line reference page here. I actually have this one set up as a custom action in Thunar to securely delete files from my hard drive. From what I've been able to ascertain from the scattered commentary and documentation about bcwipe is that it doesn't care much about the file system that it is scanning. Rather, it goes after the actual data itself. Most commentary and documentation is positive about bcwipe. By default (without specifying otherwise), bcwipe uses the "Gutmann" method of wiping files, by overwriting the data 35 times. You can speed things up considerably by specifying the use of the U.S. DoD 5220-22M 7-pass extended character rotation wiping scheme,… with the -md command line switch. Hey, it's only seven passes of random characters, but if it's good enough for the U.S. DoD and their sensitive data, then it ought to be good enough for the rest of us. Your bcwipe command line might look something like this: bcwipe -md -r -v -I path/to/some.file The -md command line switch tells bcwipe to use the U.S. DoD seven pass method. The -r command line switch tells bcwipe to recurse directories, deleting all files and subdirectories, along with all the content of those subdirectories. The -v turns on verbose mode, so you have some feedback and progress notification. The -I turns off interactive mode, and just goes straight after the data. If "path/to/some.file" is a directory, instead of a file, then that directory and all of its contents, including subdirectories and their contents, will be wiped from your hard drive. If I were going to choose just one secure file deletion program to install on my computer, bcwipe would be it. Not only is it easy to use, especially after I've set it up as a custom action in Thunar (KDE users can do something similar by setting it up as a service menu in Dolphin and Konqueror ... refer to here for how to set up a KDE service menu), but it has a fairly good reputation. Plus, Jetico has a pretty impressive list of clients (U.S. DoD, U.S. DoE, etc.) who rely on being able to cover their tracks completely and be able to wipe magnetic media of very sensitive material. If it meets their needs, it ought to be able to meet yours and mine. BleachBit If this one sounds familiar, it should. It has been a staple of every full PCLinuxOS installation for nearly as long as I can remember. Most users use BleachBit to periodically clean their computers of old browser cookies, old log files, and a whole host of remnant files that are no longer necessary. Believe it or not, many users may not be aware that BleachBit also has the ability to securely delete files and directories from your computer. 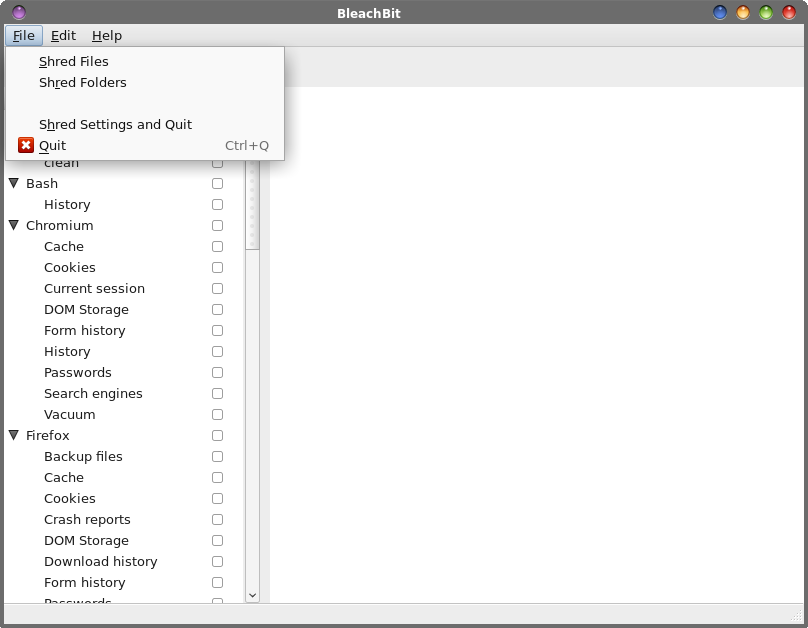 Just take a look at the first two items listed in the "File" menu: Shred Files and Shred Folders. I wasn't even aware that BleachBit offered these "services" until I found a couple of passing comments about using BleachBit to securely delete files, while I was searching out more information for this article. Lo and behold, there those features are, hiding right under my nose all this time. I suspect I'm not the only user who simply went down the list of option in the left pane, selecting the things I wanted cleaned from my computer, and never paying any mind or attention to the menu options. 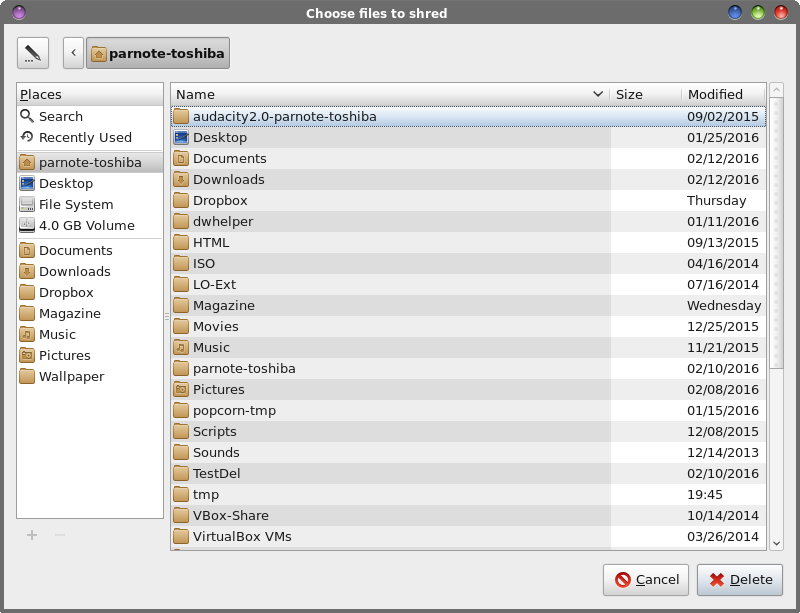 Selecting the "Shred Files" option opens up a file selection dialog box to allow you to select which files you want to get rid of. The same file selection dialog box opens when you select the "Shred Folders" option, allowing you to delete entire directories. It's really that simple. 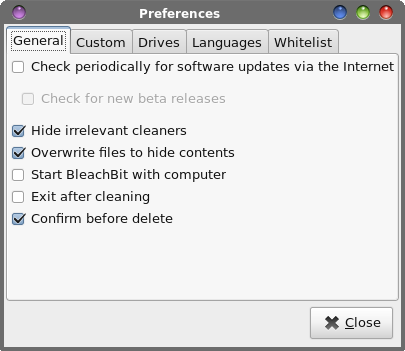 When you select the Edit > Preferences menu option, you should see the window shown above. You will want to select the second and fifth option under the "General" tab to insure secure deletion of your files and directories. On my Xfce installation of PCLinuxOS, these options were already selected (I had never changed or even checked them before). However, you will want to insure they are selected prior to using BleachBit to securely delete files and directories on your computer. I never knew that I already had a secure file deletion option installed this whole time. I wonder how many others don't realize it, either. Secure File Deletion Summary At this point in time, secure file deletion that can be relied on is an unrealized dream for those of us who use journaled file systems. There simply are no guarantees that sensitive data cannot be recovered. Believe me when I say that I'm not faulting the use of journaled file systems. They are a natural and necessary evolution that needed to happen. Before they came along, data loss was a very real risk, especially if the computer crashed or lost power in the middle of writing a file. I can remember the computer crashing in the middle of saving a file years ago (when I was using Windows, and it happened more than once), and the results were corrupted files and even corrupted file systems. For some users, the results were catastrophic, necessitating a full reinstallation and resulting in loss of LOTS of data. Journaled file systems have helped to mostly resolve and at least lessen that risk. Are the secure file deletion tools helpful? Yes. Most assuredly, all of them are far better than the normal file deletion accomplished with the rm command. Do they hide or eliminate data? That depends on who you ask. To at least some extent, they prevent data from being recovered when using user level file recovery tools. But, they may not prevent a forensic computer lab from doing the same. As a case in point, in the article "Digital Forensics: In-depth analysis of SRM and BCWipe (for unix)" blog article on the SANS Digital Forensics and Incident Response website, author Juan Leaniz deleted files from a *nix system using srm, shred and bcwipe. He then tried to recover the data using the open source command line tools collectively known as "The Sleuth Kit." You can check out the tools here, where they may be downloaded for free. There is also a companion tool called "Autopsy," which expands/harnesses the capabilities of The Sleuth Kit. Both tools can be downloaded for free, but you will have to compile them from source to install them on your system. At any rate, I'm getting a bit off topic. In every case where he attempted to do a secure file deletion with srm, shred and bcwipe, the tools in The Sleuth Kit were able to completely recover/view the "deleted" data from the hard drive. Such revelations don't make me rest easy about "secure file deletion" on my computers. Not that I have anything to hide, but if I did, I sure wouldn't be relying on these tools to cover my tracks or obfuscate sensitive data. Securely Wiping Magnetic Media Probably the MORE secure way to get rid of sensitive data (or cover your tracks) from magnetic media would be to completely wipe the hard drive. Fortunately, there are three tools you can install from the PCLinuxOS repository to help you accomplish this. Before we proceed, I feel that it's very important to issue a very, very terse and necessary warning. CAUTION: These actions are irreversible, and will result in total data loss! DO NOT try this on a drive that contains data you want to keep, at least until you've made a backup of any data/files you might want to retain. With that out of the way, I also have to come forward and state that I have not yet tried any of these methods that follow. Even with all the computers I have (each one is dedicated to a specific purpose), I am not in a position where I can wipe the hard drive of any of them. Instead, I must rely on the knowledge and attempts by others. In this respect, I am merely the messenger of what others have divulged. For much of this, we can thank PCLinuxOS forum member (and Super Hero) Not_yet_16 for his tireless and unselfish work in showing us how to securely wipe magnetic media. bcwipe Say what? Didn't I already cover this one? Well, yes I did. But there is an option with bcwipe that allows a user to wipe an entire hard drive, or hard drive partition. I'll spare you from having to read a repeat of everything else I've already written about bcwipe. Instead, let's focus on this one option. The command you will need is as follows: bcwipe -b -v /dev/sdX This will completely wipe the specified drive. The -b command line switch tells bcwipe to delete the contents of the block device specified at the end of the command line. The -v option specifies verbose output, so you have some indication of what is happening and so you can monitor the progress. The /dev/sdX is the drive/partition designation that you want to wipe. By default, bcwipe will use the Gutmann method to wipe the hard drive using 35 passes. If you wanted to use the DoD seven pass method, add in the -md command line switch after the -v option (it will save you a whole lot of time, and will most likely be just as effective). You can also enter the command as follows, if you want to zero out the free space of the specified target: bcwipe -F -v -mz [target] Doing this, you will overwrite all of the free space on the specified target with one pass of zeros. So, on the laptop I'm using to write this article, I could enter "bcwipe -F -v -mz /home" to zero out all the free space in my /home directory, which exists on its own drive partition. That free space should also include any data from files that have been "deleted," but not yet overwritten. This is why I said earlier that if I had to choose one tool for securely deleting files, bcwipe would be it. It's flexible to use for individual files (with no guarantees, obviously) and to use for wiping magnetic media, it's easy to use, and it appears to do the job. dd & dcfldd I combine both of these tools under the same section because they both use the exact same command line syntax. At one time, and until very recently, dd lacked any progress indicators to let you know that it was even doing anything. You'd execute a command and just sit back and wonder. So, since dcfldd did offer progress indicators, some users transitioned to using it in place of dd, especially for tasks that took a bit of time to complete. In fact, dcfldd uses dd as its basis. Lately though, users have reported that dd now has progress indicators. To "activate" the progress indicator with the dd command, add the status=progress option to the end of the dd command. So the choice is yours about which one to use. They will both accomplish the task we aim to complete. To completely wipe a hard drive, you will need to use this command:
dd if=/dev/zero of=/dev/sdX
The if=/dev/zero sets the input file to all zeros. The of=/dev/sdX writes those zeros out to fill up the drive identified as /dev/sdX. On the laptop I'm writing this article on, that would be sda. To completely wipe a hard drive partition, you will need to alter the command a bit, like this:
dd if=/dev/zero of=/dev/sdXY
The first part of the command remains the same. Only the last part of the command, the of part, needs to change. Notice how we now have sdXY. The X represents the drive that contains the partition, Y, that I want to wipe. On the laptop I'm writing this article on, that would be sda5 for the /root partition, and sda6 for my /home partition. To completely wipe the free space on a hard drive (which should include deleted files), you will need to enter the command like this:
dd if=/dev/zero of=/dev/sdXY/wiped
The command remains the same as the previous one, with one addition. With this version of the command, we write out the zeros to the file named "wiped." This will create one huge file that consumes the free space on the designated partition, full of zeros. Then, just go in and delete the file named "wiped" and the free space will be reclaimed. If your /home directory is on a separate partition, this is a very effective way to wipe the free space. If you want to do this on your /root partition, however, it would be best to do this from a different operating system (another installation on the same computer), or from a LiveCD/LiveDVD/LiveUSB. Otherwise, you will run out of space on your /root partition. As you can see, wiping an entire hard drive, wiping a partition, or wiping the free space on a drive all require slightly different approaches. But these are also probably one of the most effective ways of eliminating any traces of sensitive data. Darik's Boot and Nuke Informally known as DBAN, Darik's Boot and Nuke is a 16.7 MB LiveCD ISO file that you burn to a CD. You can download the ISO from SourceForge. 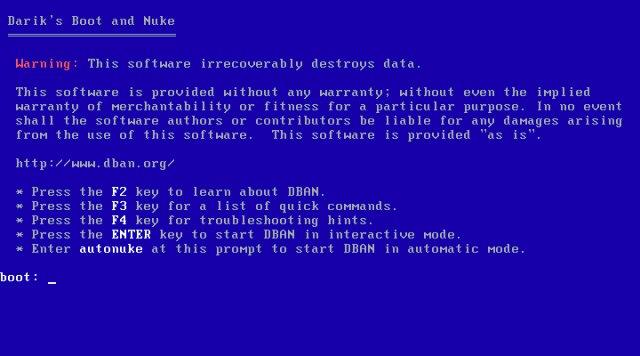 Since you boot DBAN from a LiveCD session, it doesn't care what the installed operating system is. Your mouse won't be needed (or recognized) since it's menu driven via the keyboard. From the SourceForge download page: "Darik's Boot and Nuke ("DBAN") is a self-contained boot floppy that securely wipes the hard disks of most computers. DBAN is appropriate for bulk or emergency data destruction." Insert the LiveCD and reboot your computer to run off of the LiveCD. Once it has booted, follow the onscreen menu prompts. Don't expect it to be particularly fast, though. Some of the comments on SourceForge tell of it running for almost two days to finish wiping large hard drives. Also, DBAN will ignore SSDs, and will not work on them ... and I suspect you wouldn't want it to, anyways. Secure Wiping Magnetic Media Summary Without a doubt, wiping magnetic media is WAY more certain to eliminate any traces of sensitive data that you don't want anyone else to recover. In an age when privacy is under attack from all directions, and more and more criminals are using more sophisticated methods to gain access to your private and personal data, you can't be too careful. Back in 2008, there was a challenge posted to three different professional data recovery firms to see if they could recover data from a drive that was overwritten with one pass of zeros. The challenger (System16) divulged that the dd command was used to wipe the drive with a single pass of zeros. Upon hearing that dd was used, two firms immediately declined to review the drive. The third was willing to try, but admitted that their Unix team stated a "less than zero percent chance" of retrieving any data from a drive overwritten with a single pass of zeros using the dd command. You can read more information about the challenge, which lasted one year, here. If it were me, I'd certainly trust the results from using the dd and dcfldd commands. If professional data recovery firms won't even look at a drive that was wiped with these commands, then I shouldn't expect anyone to be able to retrieve any sensitive, private or personal data. When all else fails ... If none of the above methods give you enough peace of mind, then you can always physically destroy a hard drive. There are several methods you can use, and some are more fun than others. Yes, I said fun.  First of all, you can take the tried and true route and drill holes in the hard drive. There are a lot of YouTube videos with folks doing just this. If you choose this route, please be sure to clamp the hard drive in a vise or to your work surface. You DO NOT want to hold the hard drive in one hand and attack it with a drill in your other hand. The hard drive could spin uncontrollably as it breaks free from your grip (yes, the risk is very high here), or you could drill through your hard drive and straight into your hand that's supporting the hard drive. In either case, you're most likely going to (at least) be paying a visit to the Emergency Department of your local hospital. Unfortunately, there are some "less than bright" individuals showing you how to do it the dangerous way in some of these videos. Please ... do NOT follow their lead. Use proper tool safety, and wear proper protection (goggles anyone?) to prevent injury to yourself. Another way of putting holes in your hard drive (and rendering it inoperable, and thus rendering your data unretrievable) is to shoot holes in it at the shooting range (if that's an option for you). There are a lot of YouTube videos showing people doing just this. I will caution you that not all of the videos are produced by the brightest of individuals. So, if you decide on this route to literally obliterate your data, please practice firearm safety. Some of the clowns in the videos just have way more testosterone than common sense. Yet another way to dispose of your hard drive is to smash it with a hammer. Just as with the previous two methods, there are several YouTube videos showing you how to go about it. And, just as with the previous methods, not everyone follows common sense safety rules ... like wearing eye protection. Even the so-called "pros" employ unsafe practices in their videos (think Geek Squad). A lot of newer hard drives have glass platters that are coated with iron oxide. This makes their destruction very easy: just a couple of good, powerful whacks with a hammer and the glass platters are shattered, rendering your data unretrievable. For older hard drives, their platters are made of aluminum or steel, so they will require a much more severe "beating" to render the data on them unretrievable.  You can also utilize machines that are especially made for the physical destruction of hard drives. These machines typically are quite expensive (thousands of U.S. dollars), but the costs associated with them are far less than the theft of your personal information and data. You can watch some YouTube videos showing these machines in action. While you may not want to purchase your own "Disk Destroya" machine, there may be companies in your area that will put your used hard drive through the machine. They will most likely charge a modest fee. If you work in a machine shop or automotive shop and have access to a hydraulic press, it's highly doubtful that your used hard drive will survive a few trips through the press with tons of pressure applied to your hard drive. Just be sure you clear it with your boss or shop foreman first. We don't want anyone losing their job over this. Also, it would be wise to alter the compression point with each pass through the press. Finally, you can open up the hard drive and physically scrape the iron oxide coating from the platters. Or, you can cut up the platters with a cutoff wheel grinder or power hack saw. At any rate, you will rest assured that there is NO chance of ever retrieving the data on those drives ... ever. Consider environmental issues when you dispose of your destroyed hard drive's carcass. Many electronic devices contain dangerous and poisonous compounds, like lead and mercury, and you will want to insure that your hard drive is disposed of properly. Improper disposal could risk those dangerous and poisonous compounds leaching into surrounding soil and groundwater. They may not affect you today, but these compounds can affect your children and your grandchildren in the future. In some jurisdictions, you can be fined or charged with a crime for improperly disposing of such items. Also, keep in mind that trying to sell a computer without a hard drive will cause you to get a significantly lower price for your used computer. If you're giving it away, the person (or entity) receiving your discarded computer may not have the money or knowledge to replace the hard drive. Despite your good and/or charitable intentions, they will end up with a computer that they cannot use. Both situations can be remedied by you buying a new hard drive and installing it (and the OS) before selling or giving away your old computer. Even an inexpensive new hard drive is better than no hard drive at all. Overall Summary Thanks to the widespread use of journaled file systems, secure file deletion by itself is no guarantee, except for preventing recovery by user level file recovery tools. They do a fairly decent job at preventing the average Joe from gaining access to your files and data. But, a forensic computer lab or professional data recovery firm will probably have no problem -- whatsoever -- retrieving the data that was deleted with one of these tools. If you can do it, wiping the entire hard drive is your best bet, short of physical destruction of the hard drive. There are many different methods you can use to physically destroy the hard drive: degaussing with a strong magnetic field, drilling holes through the hard drive platters, sledge hammers, incineration, and physical shredding ... just to name a few. There are even companies that make machines dedicated to the destruction of data storage media. Costs for such machines run in the thousands of U.S. dollars. Just as much as privacy has catapulted itself to the forefront of our consciousness, ecological concerns also remain. The gross, physical destruction of hard drives leaves them as nothing more than landfill fodder. With that remains concerns about toxic chemicals used in the production of hard drives and their components leaching into the soil and possibly making their way into our groundwater systems. Still, for some users, this remains the most certain way to destroy any traces of sensitive, personal or private data. But, given that professional data recovery firms won't accept the challenge to attempt recovery of files/drives zeroed with the dd command, there are definitely options other than the physically destruction of a hard drive that may still give several years of useful service. Perhaps the ideal solution lies with a combination of the two methods. First, delete your sensitive/personal/private files with one of the secure file deletion commands. Second, follow that up with the wiping of the free space on that drive. After that, you should be able to sleep well at night, safe in the knowledge that no one can ever get their hands on your data ever again. |