| Previous
Page |
PCLinuxOS
Magazine |
PCLinuxOS |
Article List |
Disclaimer |
Next Page |
PCLinunxOS Backup Strategies |
|
by Peter Kelly (critter) According to Wikipedia, it was somebody named Connie Eble who first got the phrase "S**t Happens" into print and, although he never actually said it, Forrest Gump made the phrase famous in the movie that bore his name. Unfortunately though, "it" does happen, so we should be aware of the fact and take suitable precautions. Large corporations are aware of this and employ many IT professionals to maintain the integrity of their data. Realizing that nothing can be 100% safe, they usually have fall-back plans known as 'Damage limitation Strategies,' which presumably means that they pass on the cost of the foul-ups to their customers. As home and small system users, we can't do that, so we need to consider just how valuable the data that may be lost, or compromised, actually is. Based on that, we can assess how we can protect the data, and how much effort are we going to put into that protection scheme. A regular question in the PCLinuxOS forums is 'Which program should I use to create a backup of my system?' This is usually accompanied by 'it must be simple to use and to set up', 'It must be automatic so that I don't have remember to do it', and 'When I have screwed up my system so completely as to make it unusable the program should automatically recover everything'. Now wouldn't that be just dandy? Unfortunately, no such single program exists but perhaps, using several different applications, we can develop a strategy that comes close to achieving those demands. Before moving onto the 'how' we must consider 'what', 'when' and 'where'. What to back up The obvious answer to this is 'everything,' and my response is no, not everything. Why not? Because there is no point. Your personal data is a must. The home directories of you, and any other users, are also critical. Home directories contain, among other things, all of your personal settings that make your home a home. You don't want to lose all of that. But the system files, no. Restoring those files rarely works as you would expect, and can actually cause some serious problems. A different approach needs to be taken to re-introduce those files, which we will cover later. Before performing a backup, you may want to run a program such as Bleachbit. It will remove accumulated junk, such as temporary files and caches, reducing the size of the backup. When to do the backup As often as possible is the ideal answer, as often as practical is more realistic. This takes some thought. On my system, I have my home directory which, as stated above, contains my personal settings and some current 'work in progress' files. I also have a much larger data directory mounted within my home directory. The data directory contains most of the stuff I might need to access, along with my photo, music and video collections. Other files are archived more permanently on remote hard drives. Occasionally, I add files from my home directory to the data directory. The archives get updated manually, perhaps three or four times a year, as these files are not likely to be needed any time soon (some date back to the 1980's). The files in the home directory and the data directory need to be given a little more attention, and this should be an automatic process. Relying on remembering to do the backup is never a good strategy. My home directory gets backed up daily, and the data directory weekly. This works for me, but only you can determine your own requirements. Where to keep the backup There are many reasons why you may require access to backed up files: hardware failure, fire, flood, theft, litigation, etc. From this, it is reasonable to argue that possibly the worst place to have a backup is on the same partition of the same hard drive as the original data. The best place might be on multiple 'black box' flight recorders kept in multiple waterproof, fireproof containers locked in an impenetrable vault guarded by the military and witnessed by at least three high court judges. We will have to settle for something in between. The media to use really depends upon the quantity of data and the frequency of backups. Floppy disks, once popular are now quite useless for today’s modern data sizes. Optical media such as CD-ROM, are unreliable despite initial claims of indestructibility. Tape drives are frequently used in industry for their large storage capacity but they are expensive, subject to stretch and breakage, and store the data serially. Seeking a single file for restoration is a long, slow process. Solid state storage is convenient and quick, but for frequent backups, its' limited write cycle life span lets it down. Modern hard drives are incredibly cheap and reliable, and have large capacities, so this makes them an attractive proposition. However, hard drives are not infallible, so for more valuable data, multiple copies of the backup should be considered. To avoid the consequences of fire, flood and theft, one copy should be kept 'off-site.' (If the building burns down, then that's bad. If all your records and data get burned in the fire, it's a disaster). Off-site could mean another building or, increasingly popular, cloud storage. How to do the backup There are too many 'backup solutions' to name them all, but if you Google around to find out what backup applications other people are using you will find that the name rsync crops up many times. The command line rsync is my own personal favorite, but there are graphical versions such as grsync and luckybackup available from the repositories which simplify its use. Rsync will keep two data storage areas, a source and a destination, synchronized. The big advantage of rsync over a simple copy is that it will copy over only what has changed. This can mean that the destination gets steadily bigger as newer files are added. So, rsync has an option to delete files on the destination that are no longer on the source -- a true synchronization. Automatically deleting files from a backup is not always what you want. A week or so down the line and you may regret it, but you can't let the backup grow in size unchecked. The solution that I use is to do five incremental backups using hard links to existing files to save space. Before performing a backup, each of the existing backups are moved up one place with the oldest backup disappearing. This gives me a 'five backup' period of grace. The newest backup always contains at least a link to all available files. Let me demonstrate (skip this part if you are familiar with hard links and file storage).
Example:
ls -lh src If I copy these files to a directory named dest with the option -l the files will be copied as hard links, which point to the original files.
cp -l src/* dest However, if I issue the command du (disk usage) with the -h option to report human readable sizes, then I see this:
du -h
Directory dest is using only 4k of space for 1.1M of files!
rm -f src/* Then issue the du command:
du -h Now directory dest is the largest. This is because the links still point to the files, which in turn, still take up the same amount of space. What I deleted was the original links to the files, the names under which they were created. A filename is simply a hard link to the file's metadata, and therefore to the file itself. Only when the last link to the file is removed is the file 'deleted.' In fact, at this stage, only the space on disk taken by the file is marked as available, but no data is removed until over-written by a new file. But we no longer have a link to where the file data is stored on the disk. 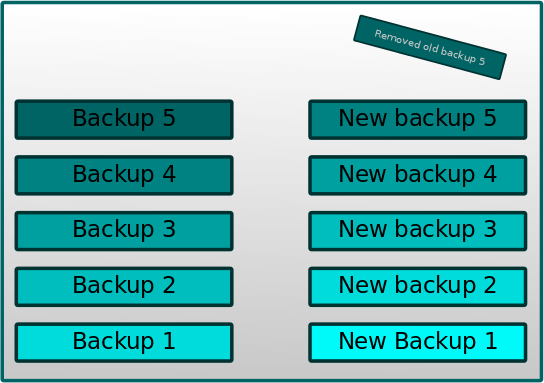 Applying this to rsync, we can allow the utility to 'delete' files no longer in the source as we still have the links to them in the older backups. Also, as we are only saving links to existing files, we only increase the overall size of the total backup scheme by the size of new files and the minimal size of the links. When one of the older backups is finally removed, we reduce the overall backup size by removing the last remaining links to files removed more than five backups ago. Using hard links to produce a series of incremental backups can certainly save time and space, but it also has another advantage. If a file is corrupt, then it has changed and the corrupt file is written to the backup. Normally, this would be disastrous, but this can be averted by using the hard link incremental backup system. Yes, the corrupted file is written to the backup, rsync has no way of knowing that the file is corrupt, only that it has changed. However, the previous backups still contain the hard links which point to the original uncorrupted file, which may then be recovered (at least until the oldest backup containing a link to the original file data on the disk has been removed). The results
The following are the results from backing up my data partition to a USB external drive. This partition currently weighs in at 220GB, with a little over a half million files.
# du -sh /home/pete/data/ The time taken to perform the backup:
# time data_backup.sh
Six minutes for a backup over a USB 2.0 interface to a sata-II hard drive is acceptable. The initial backup will take much, much longer than this (probably about two hours with this setup), but subsequent backups record only the changes.
# du -sh data_backup.* Backup one reports a size equal to the full contents of the partition, showing that it has links to all of the files. The other backups show additional links to removed files. 265MB total for five backups. Without the use of hard links, this would have been well over a Terabyte. Ten backups would use probably ~ 300MB. The rsync command The rsync utility is a terminal command that takes a lot of options to control its power. However, for non-command line users, the graphical front-ends such as grsync and Luckybackup allow you to build up the command from a graphical interface. Here I will show only the command line version as I use it. The following command should be one line only. The backslashes are line continuation markers.
rsync -aAvzHX --progress --stats --delete \ First the options -aAvzHX
Next, we tell rsync the source and destination.
/home/pete/data/ Do not forget the trailing slash on these last three lines. This is most important. Using the command I put the command into a little script that does all of the directory manipulation for me. This is nothing complicated, but you must remember that both the source and destination must be connected and mounted during the backup. If this is a problem you may want to extend the script to automate this, or at least issue a warning.
#!/bin/bash
Running this script updates the series of incremental backups.
Making everything happen according to a schedule Now we have to automate the entire backup process. We need the data backup to be repeated every week, ideally on a Sunday morning when the computer is running and there is little other traffic. For this, I use the cron system utility. I run all backups as root to avoid any 'permission denied' errors. I covered using cron in issue 57 of The PCLinuxOS Magazine, so I will only show the relevant details here. In a root terminal enter the command crontab -e Unless you have already set up this file, you will be presented with an empty edit window, press "i" to enter insert mode, and then add your entries. Mine looks like this:
SHELL=/bin/bash If you refer to the cron article link above, you will find that I have asked cron to run the data backup script at 9:00 a.m. every Saturday, and the home backup every day at 9:30 a.m. These two files are stored in /root/bin, so that becomes the first part of the PATH variable assignment. Setting up e-mail The MAILTO variable is set to my own username on this PC so that the output from the scripts will get e-mailed to me for confirmation. This will happen only if internal mail delivery is set up which, by default, it is not. Setting up a simple mail system can be done quite easily. Open synaptic and install postfix, which will also pull in lib64postfix1 as a dependency. Now you will have to edit two files as root. The files are in the directory /etc/postfix. Open the aliases file and scroll down towards the end where you will see these two lines:
CHANGE THIS LINE to the account of a HUMAN Change postfix to the username of the user who will receive roots e-mail. On this system, this is me. Save the file, and open up main.cf. After the line: # user configurable parameters Add the line myhostname = elysium.localhost setting it to whatever your hostname is. Save the file and you are done. At this stage, the postfix service is not running, so open up the PCLinuxOS Control Center, and under system > manage system services, find the entry for postfix. Make sure the box 'On boot' is checked, and then click the Start button. Close the control center. Now check that mail is working. Open a root terminal and type: mail username Replace username with the actual users login name. You will be prompted for a subject heading, and then for the body of the text. Press control-d to finish, and you will see EOT (end of transmission). You will then be returned to the command prompt.
mail pete Now, open a normal terminal and enter the command mail. You should see something like this (below). Type 1 to read the e-mail, or q to quit mail.
[pete@localhost ~]$ mail Testing the backup system I would strongly recommend thoroughly testing this setup before trusting your precious files and settings to it. I set up a small directory with a few subdirectories and a scattering of files, set up cron to perform the execution every 10 minutes, and then ensure that both the e-mails are received and the backups correctly performed. Try deleting a file or two, and then recover them by copying them back from the older backups. When you are confident and release the new system for use, watch it carefully over the first cycle of backups. In my case, this means six days for home backups, and six weeks for data backups. Only then can you really trust the system. Remember, a corrupt backup is as bad as no backup. Recovering the system PCLinuxOS is a pretty robust system when regularly updated and kept protected from the ravages of its mortal enemy, the user. Even so, there are times when intervention is required. If you have backed up your data files and personal settings, then the safest route is to reinstall the system from a downloaded ISO, and then to do a full update. After doing this, restoring your backed up files should give you a fully working system as you remember it, but without all of the accumulated cruft that we all seem to accumulate over time. If you decide to re-install the system but have installed lots of extra applications that you really cannot do without, then I am afraid that you will have to reinstall them. Synaptic can make this task a lot easier by generating a list of all installed applications. Open Synaptic and under the drop down File menu, select 'Save Markings As…'. Type in a suitable name for the list, check the 'Save full state, not only changes' box in the lower left corner, and then save it to somewhere that will not be over-written, like a usb thumb drive. After the re-installation and a full update, in Synaptic select 'Read Markings...' from the File menu. Load up the saved list and click apply. Synaptic will then install everything that is missing. If you don't want all of the files re-installed, you can uncheck them before applying. MyLiveCD is an excellent utility for capturing a restorable snapshot of your system, and there is now also a graphical user interface to make it even easier. There is a 4GB maximum file size limit, although work is underway to overcome this. I am unsure if this is currently working. My personal favorite for full partition backups, such as an operating system, is fsarchiver -- which also has a shiny new graphical interface. More than one partition can be put into an archive, making it suitable for full system and data backups. Restoration though is only by a full partition. Individual files cannot be selected, and often with data files it is a single file that gets corrupted or goes mysteriously missing. The fsarchiver utility will also restore the partitions original uuid, which is used by grub to boot the system. This can help to simplify recovery on multi-boot systems. Conclusion The perfect backup strategy is a bit of a holy grail, constantly sought but never found. The system outlined here has worked for me over many years and I trust it. I also make copies of the backups and keep one copy off site. Paranoid? Perhaps, but I still have my files after many years. |
||||||||||||||||||||||||