| Previous
Page |
PCLinuxOS
Magazine |
PCLinuxOS |
Article List |
Disclaimer |
Next Page |
Monitor Your System With Conky, Part One |
|
by Peter Kelly (critter)  "Conky is a free, light-weight system monitor for X, that displays any information on your desktop." That description is from the official website and rather understates the abilities of this useful little application. The name, the website informs us, "comes from a character in the Canadian TV show titled "Trailer Park Boys," a ventriloquist’s dummy I am told. Don't let that put you off though. Conky is a serious and effective utility. The idea was forked from a similar tool named "TORSMO", an abbreviation of "Tyopoyta ORvelo System Monitor" which means something in Finnish and I am sure that author thought it appropriate. Conky is available from the PCLinuxOS repositories. Today, Conky is a mature program offering a great number of configuration options and access to many system features, such as memory usage and network throughput as standard. Additionally Conky can execute shell functions and output the results on screen. Provision is made for conditional output in form of if-then-else type statements, and the newest version in the repositories now has hooks for the Lua scripting language. This allows the more intrepid users to take advantage of some advanced features, which include the use the Cairo graphics libraries. One feature that seems very popular with users is to have Conky display its output with a transparent background seemingly pasted onto the desktop wallpaper. The popularity of Conky is such that there are a plethora of examples and downloadable scripts available on the internet, enabling less ambitious users the ability to enjoy some of these extended features. Conky is not limited to displaying boring system statistics. You can display a clock, graphics, weather reports, or whatever your imagination can dream up. You can see some advanced examples at http://www.deviantart.com/browse/all/?q=conky. Many of the examples on this website have accompanying code that can be downloaded to use on your own machine. Many of the examples use some very advanced techniques not available with the basic Conky which will not be discussed until the second part of the article, by which time I hope to have covered enough theory to allow you to compete with them. This article will start by showing you some less demanding conky examples, take you through the basics of setting up your own Conky displays, as well as demonstrate the use of shell commands to generate output. Part two will introduce the use of interfacing to Lua scripts and exploiting the functions in the Cairo libraries. Getting Started To get started I'll show, step by step, how to build a useful system monitor based on one I use myself -- shown below but without transparency. The original format for this file I picked up from somewhere on this forum a while back, but unfortunately I don't remember who posted it. Whoever it was, thank you. The content, however, has been extensively reworked to suit my own requirements. 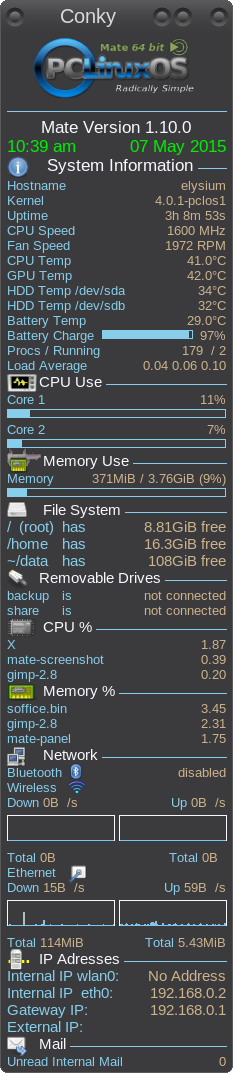 A Conky configuration file is a plain text file in two sections, both of which follow a strict format. The first section is the configuration section which determines how and where the Conky window and its contents are displayed. The second second section begins after the word 'TEXT' on a line of its own. Everything after this line is a candidate for display. I say candidate as it will only be displayed correctly if the format is correct. After installing Conky from the PCLinuxOS repository open a terminal and type the word conky. You should see the window below displayed. 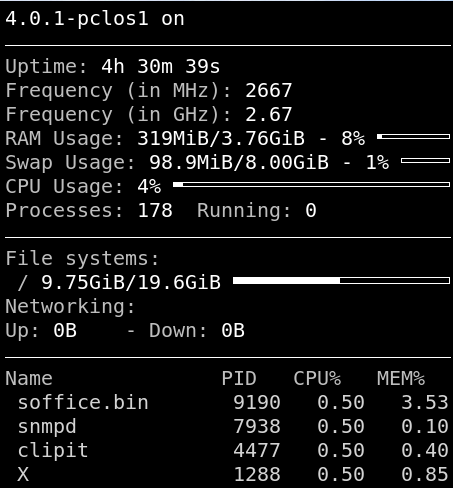 Some of the figures may be moving about, but if you see this, then Conky is working. To generate this screen, Conky uses its default configuration file which is: /etc/conky/conky.conf You could copy this file to your home directory: cp /etc/conky/conky.conf ~/.conkyrc and modify it, or you can create your own from scratch, which is what I am going to do. When the conky command is executed, it looks first for a hidden file in your home directory called .conky and, if found, uses that. If it is not found, then it uses its default file. That is, unless you start Conky with the -c option. This option tells Conky to use a named configuration file, which must be the next thing along on the command line before you press the enter key. This allows you to have multiple configuration files and multiple instances of Conky running, all doing different things. I'm going to name my configuration file .conkyrc_mag, so the start up command then becomes: conky -c ~/.conkyrc_mag I got into the habit of using the leading ~/ in case I type the command when I am not in my home directory and this is also the way you should use the command in an auto-start routine. The Configuration File -- Section 1 The commands to be used in the first section are all listed in the official documentation, which can be found at http://conky.sourceforge.net/config_settings.html. However, the commands and the accompanying explanation can be confusing, unless you are a seasoned Conky script writer. Some of them we'll never use anyway. This is how I configured things for the image above. It perhaps seems to be a lot to set up, but most of it will be the same in all of your configuration files with only minor changes. So once you have a set up that you like, there will need to be only minor changes, and some of the lines can be safely left out. Many of these options can also be set on the command line. Type conky --help for a full list. Some of these options concern transparency that works only when you are using a window manager that supports compositing and have that feature enabled. Fortunately, most of the window managers used by PCLinuxOS releases have this feature, but it must be enabled for transparency to work! In Mate, which I am currently using, this is done from the Mate Control Centre > Windows module where there is a checkbox to enable or disable the feature. Under KDE, you must enable desktop effects. Here is the configuration section of ~/.conkyrc_mag. The numbers on the lines below are not part of the file and should not be entered, they are for reference only. The descriptions that follow each line on the right should provide enough information for you to try different values and to see the effects. So, line by line, we have: 1 double_buffer yes You will almost certainly want to include this line and say yes, it reduces flickering when Conky is updating its display. The only other acceptable value here is obviously no. 2 own_window yes yes or no, again say yes. 3 own_window_argb_visual yes colors are described in values from 1-255 of the amount of red, green and blue they contain, three color channels -- rgb. By selecting this option a fourth channel is added, the 'alpha' or 'a' channel, hence argb. The alpha channel describes the amount of opacity. A value of 0 for full transparency, 255 for full opacity. This will usually be set to yes. A compositing window manager is required for transparency.4 own_window_class Conky This line can be omitted as Conky is the default window class but the ability to set it can be useful if you want to use some window manipulation tools. 5 own_window_hints skip_taskbar This line accepts a string of options separated by commas (no spaces). These options define the appearance and behaviour of the actual Conky window. The available options and their effects are:
undecorated - remove the window decorations such as the close button and title bar 6 own_window_transparent no This sets or removes the transparency of the Conky window. It only works when compositing is enabled. 7 own_window_type normal
Normal - this is the default desktop - this has most of the window hints enabled panel - this produces windows that cling to the screen edges override - the window is not controlled by the window manager and provision must be made to accommodate this -- not recommended unless you really know what you are doing. 8 own_window_title Conky This is the title that is displayed on the title bar when the window is 'decorated' and transparency is disabled. The default is to display the system hostname. 9 update_interval 5.0 This decides how often Conky should update its display with new information. The value is in Seconds (5 seconds here). Refreshing too often causes Conky to eat more system resources. The value can only be ascertained after running Conky with a revised configuration file. A bigger value is usually better. Ask yourself "How often do I really need to see new information?" This value depends upon:
The work required to get this information Any data manipulation or formatting that is required prior to displaying the data. 10 alignment top_right Where the Conky window should be displayed. Options are:
top_left top_middle bottom_right bottom_left bottom_middle These may be abbreviated to: tr, tl, tm, br, bl, bm as appropriate. 11 background no For most users this line can be omitted. Saying yes forks the process to the background when Conky is started. 12 border_width 1 This is a border filled with the background color, or the default color specified in line 14, between the window edges and the displayed content. In most cases a small value will suffice. Borders are drawn if line 19 says yes. 13 cpu_avg_samples 2 When CPU data is requested what is shown is not the instantaneous value but an average over a number of readings. The more readings are taken the more accurate the result. For most practical purposes a low value is sufficient. 14 gap_x 5 The gap, in pixels, between the chosen alignment edge (line 10) and the conky window in the x (left -- right) direction; 15 gap_y 5 as above in the y (up -- down) direction 16 default_color white This determines the default color when no other is specified and the color for the border declared in line 19. The color can be the name of a color as defined by the X11 color scheme which is nicely displayed on this web site: http://www.graphviz.org/doc/info/colors.html Alternatively a hexadecimal value such as FFFFFF may be used (Note: no leading #). The GIMP color selector is useful for obtaining these values. 17 default_outline_color white The outline referred to here is that decided upon in line 21. Colors are as above 18 default_shade_color white The color of the text drop shadow if enabled in line 22. Colors are as above. 19 draw_borders no This is the border described in line 12 20 draw_graph_borders yes This draws a rectangular border around the area in which the graph will be displayed. 21 draw_outline no This option outlines the text and graph borders in the color chosen in line 17 22 draw_shades no The shades referred to are text drop shadows. 23 net_avg_samples 2 This works as for the CPU samples described in line 13. 24 no_buffers yes The buffers referred to here are memory buffers. The kernel does not release memory immediately, some data is held ready for re-use rather than re-loading but that memory is always available to be used when required. Saying yes here will display only the memory that is actually in use. Saying no reports the total memory currently holding data even if that data is not currently active. 25 out_to_console no It can be helpful to say yes here if things are not working quite right. The output that Conky is trying to display is then also printed on the console which can make it easier to see where the error is. Normally you would want to say no. 26 out_to_stderr no This is similar to the line above and can be usedas a further debugging aid 27 stippled_borders 0 If you have enabled borders then this allows you to have them broken or dashed. The value is the length, in pixels, of the gaps and the solid portions. A value of 0 gives a continuous border. Leaving out this line has the same effect as a value of 0. 28 uppercase no If yes then text is forced to upper-case. 29 use_xft yes This provides support for X freetype font rendering which is generally a good thing. If you don't understand the difference try saying no to see which you prefer. That's what I did and then decided to say yes. 30 xftfont Sans:size=10 The default font face and size. This can be overridden in the text section. 31 own_window_colour 3b3b3e Here you can set the background color of the window if transparency is set to no. Colors are as described in line 16. 32 color1 ghostwhite Colors can be predefined for use in the text section using color0 to color9. This is useful for easily changing the look throughout the script and can also improve readability of the script. Colors again as line 16 33 color2 skyblue As above 34 color3 navajowhite3 As above 35 color4 green2 As above 36 # End of configuration section This is a comment and is ignored. Anything that follows a # is taken to be a comment and comments can appear on a line of their own or be added at the end of a command statement although you should add at least one space between the command and the comment to clearly separate the two. There is plenty to play with here, and there are lots more in the documentation. These are the ones that I use the most. The TEXT Section The word TEXT on its own line declares the start of the output section of the configuration file, and must follow the configuration section as described above. Case is not sensitive here, but I prefer to use upper-case to make it easier to see where this section begins. What you have here is a way to display static text, use the contents of pre-defined variables (names that refer to a value that can change, such as the speed of a fan) to provide system relative information in either a numeric, textual or graphical format, or to show the current status of an on-going process, perhaps the play status of a music track. By 'static text' I mean text that is output exactly as typed and does change according to the value of a variable or the returned value of a function. This is what a system monitor does, and this is exactly what Conky does -- did I leave anything out? If I did, then Conky can probably do that, too. Comments can be added in here, but a blank line will output a blank line. Spacing plays an important role in the text section, and so comments should be used with due care and consideration. Each of Conky's variables should be preceded by a '$' and it is better to enclose them and any arguments in curly braces, as shown below. The braces are not strictly necessary, but help to reduce spacing and parsing errors. Without the braces, text that follows a variable must be preceded by a space in order for Conky to be able to correctly recognize the variable. The space will then be printed, which is not always desirable. Without the space, conky will not recognize the variable and will print out the entire string verbatim, if possible. Get into the habit of always doing this, and you will have fewer problems with your output. Below are the contents of the text section for the demo system monitor, numbers added for reference are not part of the script: Again, line by line, although some of the explanations may be a little longer here. 37 TEXT The section starts here 38 ${image /home/user/Pictures/conky/pcloslogo.png -p 27,0 -s 160x60} All of the text that follows the line number should be on one line. It is possible to split the line with a backslash if you are careful but this can cause problems if the backslash is in an inappropriate place. I have all of the images I want to display in Conky in a folder which is inside the Pictures folder of my home directory. This line will place the named image in the window. The -p 27,0 positions the image 27 pixels right and 0 pixels down relative to the top left of the window. The -s 160x60 scales the image to 160 pixels wide by 60 pixels high. 39 ${voffset 0} The value of 0 here does nothing but a larger value will instruct Conky to start printing its output at a position the corresponding number of pixels lower down. Similarly a negative value will move the insertion point upwards. The line is included here to allow me to control the layout more easily if I decide to make some changes. 40 ${font Liberation Sans:size=10} This command will temporarily override the font settings given in the configuration section, line 30 41 ${color2}${hr 1} Here color2, defined in line 33 is used to draw a horizontal line with a height of 1 pixel. The color may also be given as a 6 character hexadecimal number with or without the leading #. The length of the line will be adjusted to fill the available space. Look at the bottom of the image above, where we have 'Mail' to see how this works. 42 ${color1}${alignc}${exec VERSION=`mate-session --version | awk '{ print $2 }'`; echo -n Mate Version $VERSION} This line starts to get a little more complex. From the left. Use pre-defined color1, Align the output centrally in the window. Execute the following shell command. The command above can be broken down like this: get the version of mate that is running which, on my current system, retrieves mate-session 1.10.0 Pass this to awk which discards the mate-session part and then stores the remainder, the 1.10.0 part, in the variable VERSION. Finally, echo the text "Mate Version" followed by the contents of the variable VERSION so that we see Mate Version 1.10.0 on the screen. Doing it this way the current version is always displayed. For other desktop environments the command would need to be adjusted accordingly. The exec variable is used to execute shell commands to produce the required output. Shell commands can be quite resource intensive the exec variable executes the code at every update interval (line 9) and therefore Conky provides four other variants of the variable, excep, execi, texeci and execpi. The execp variable is provided for convenience, it allows you to mix other Conky variables in with your shell script and Conky will correctly interpret (parse) them but this is very resource intensive and you may have to increase the update interval to achieve acceptable operation. The execi variable adds an execution interval that must be greater than that defined in line 9 above. This allows you to control when the shell commands are executed independently of the conky update interval set in line 9. More useful is texeci which, like execi includes an interval but here the shell code is executed in its own thread, returning the data to Conky and destroying the thread after completion. See line 82 for an example of the use of texeci. Finally execpi is execp with an interval argument. To be effective the shell code must exit before the data can be returned to Conky so commands such as tail -f, which follows the additions to a file until interrupted, will not work. 43 ${color4}${time %H:%M %p}${alignr}${time %d %b %Y} Now we use a different pre-defined color, a shade of green, to display first the time and then, aligned to the right, the date. This is confusing because the conky command for date and time output is time but the format string is the same as the Linux date command. The output is suitable for my locale but users in the US might prefer to change the last time command to ${time %b %d %Y}. Typing date --help in a terminal will show all of the available options for time and date formatting. 44 ${image /home/user/Pictures/conky/summary.png -p 0,118 -s 22x22}${color1} System Information ${color2}${hr 1} Another image scaled and positioned to suit, followed by the simple text 'System Information' there are 8 leading spaces and 1 trailing space used to align the text although they don't show in the line above. See line 55 for a better positioning method. Following this we change to color2 and use a horizontal line to fill in the remaining space. 45 ${font Liberation Sans:size=8}${color2}Hostname ${color3}${alignr} ${nodename} Another font override. This time only the size is changed to be slightly smaller. A switch to color2, The static text "Hostname " (note the trailing space), Then change to color3, the text following to be aligned to the right right. This text is the value of the Conky variable ${nodename} which is the host name of the currently accessible machine, usually, but not necessarily, the machine that you are working on. 46 ${color2}Kernel ${color3}${alignr}${kernel} Back to color2, the static text "Kernel ", color3 once again and then the value of the Conky variable ${kernel} which shows the version of the kernel currently in use. This last value is aligned to the right of the Conky window. 47 ${color2}Uptime ${color3}${alignr}${uptime} This line follows the format of the line above but shows how long the system has been up (time since last reboot). 48 ${color2}CPU Speed ${color3}${alignr}${freq} MHz Again a similar output but this time showing the current (averaged) speed of the CPU. 49 ${color2}Fan Speed ${color3}${alignr}${exec sensors | sed -n '/fan1/p' | tr:w -s " " | cut -d" " -f 2 } RPM This time we have to use a little more shell stuff to display the information that we need. Start with color2. Print the text 'Fan Speed ' to the Conky window. Change to color3 right align the next text which is retrieved by executing the following shell commands: sensors -- Displays the output provided by libsensors, which is usually quite a lot, this is then piped to the sed command which isolates the line containing data for fan1, this data is then passed to the tr command which uses the -s option to 'squeeze' repeated spaces from its output. This is then passed to the cut command which splits up the data into groups of characters separated by a single space and outputs the second group, or field, of found characters. The final stage of this line prints out the static text 'RPM' which includes the separating space. 50 ${color2}CPU Temp ${color3}${alignr}${exec sensors | sed -n '/(crit/p' | sed -n '/temp1/p' | cut -d" " -f 9 | sed 's/+//'} Now we need the CPU temperature and this is another complex command. What I do to get the correct output, stripped of the superfluous stuff, is to keep trying the command in a terminal until the results are exactly what I need. For the above exec command I opened a terminal and typed the command sensors This produced a screenful of output. After reading through this output I used a sed command to look for keywords that will reduce the number of hits. After that it is a process of elimination and best guessing to determine the correct values and choose one. Next the line is trimmed to contain only the required data. I do realise that this is a tortuous route to travel to get a simple bit of information but after doing it a couple of times it does become easier and you do learn a lot about using useful tools such as sed, awk and cut. 51 ${color2}GPU Temp ${color3}${alignr}${exec sensors | sed -n '/temp10/p' | cut -d" " -f 8 | sed 's/+//'} Similar to line 50 52 ${color2}HDD Temp /dev/sda ${color3}${alignr}${exec hddtemp /dev/sda | awk '{print $4}'} Similar to line 50 53 ${color2}HDD Temp /dev/sdb ${color3}${alignr}${exec hddtemp /dev/sdb | awk '{print $4}'} Similar to line 50 54 ${color2}Battery Temp ${color3}${alignr}${exec sensors | sed -n '/temp5/p' | cut -d" " -f 9 | sed 's/+//'} Similar to line 50 55 ${color2}${if_match "${battery_percent}"=="0"}Battery %${alignr}${color3}Battery not installed${else}Battery Charge${goto 100}${color2}${battery_bar 8,90}${alignr}${color3}${battery_percent}%${endif} This time we use a conditional expression: We want to change the output according to the battery conditions that exist. If there is no battery installed then we state the fact and exit the line. If the battery shows a charge then it must be installed. Now we display a graphical bar gauge and the percentage charge. First we set the color to color2. Next we read the value of the Conky variable ${battery_percent} and test the value we read against the absolute value "0" with the ${if_match "${battery_percent}"=="0"} Conky test. If we get a match then we print "Battery %" and then, right aligned, print the text "Battery not installed" then we move on to the next line. If the test fails, then there is a charge detected and a battery must be present. Now the ${else} statement kicks in and we print "Battery charge" move the insertion point to 100 pixels right with ${goto 100}. Inserting spaces as we did in line 44 is one way to position text but has the disadvantage that it is dependent on the size of the font, images and other components that make up the line. Using the ${goto} Conky variable positions the insertion point a fixed number of pixels from the left hand window edge, in this case 100 pixels. This will provide a consistent look to the output. change to color2, print a battery bar gauge 8 pixels high, 90 long. Next, right aligned and in color3, we print the value of the Conky variable ${battery_percent} followed by a % sign. We finally end the conditional expression with the Conky variable %{endif}. 56 ${color2}Procs / Running${color3}${alignr}${processes} / ${running_processes} Set the color to color2, print static text 'Procs / Running', change to color3 change alignment and print the value of some Conky variables separated by ' / ' 57 ${color2}Load Average ${color3}${alignr}$loadavg color, text, color, alignment, Conky variable value 58 ${font Liberation Sans:size=9}${color1}${image /home/user/Pictures/conky/fft.png -p 0,336 -s 30x20}${goto 46}CPU Use ${color2}${hr 1}
This is a header line as line 44 but uses the ${goto} variable to position the insertion point. 59 ${font Liberation Sans:size=8}${color2}Core 1 ${color3}${alignr}${cpu cpu1}% Change the font size and use color1."Core 1" is static text and is simply printed out. Change output color to color3, use right alignment and output the percentage of core 1. Individual cores are identified as cpu1, cpu2 etc. the argument cpu0 is used to output the total cpu usage. The final "%" is static text. 60 ${color2}${cpubar cpu1 8} Output a cpu usage bar gauge 8 pixels high for core 1 61 ${color2}Core 2 ${color3}${alignr}${cpu cpu2}% As line 60 but using core2 62 ${color2}${cpubar cpu2 8} Output a cpu usage bar gauge 8 pixels high for core 2 63 ${font Liberation Sans:size=9}${color1}${image /home/user/Pictures/conky/ram-use.png -p 0,410 -s 34x26}${goto 46}Memory Use ${color2}${hr 1} This is a header line as line 58. 64 ${font Liberation Sans:size=8}${color2}Memory ${color3}${alignr}$mem / $memmax ($memperc%) Resize font again, change color to color2, insert the static text 'Memory ', change to color3 and right alignment, insert the current value of memory usage (this is affected by line 24), static text ' \ ', the total amount of memory available to the system, static text ' ' (a space) and the percentage of memory in use (again affected by line 24). This does not include swap space, there are separate Conky variables available for that. 65 ${color2}${membar 8} Display an 8 pixel high memory usage bar graph in color2. 66 ${font Liberation Sans:size=9}${image /home/user/Pictures/conky/hdd.png -p 0,462 -s 20x20}${color1}${goto 46}File System ${color2}${hr 1} This is a header line as line 58. 67 ${color2}root${goto 60}has${color3}${alignr} ${fs_free /} free I have three internal drive partitions that I want to monitor and they are mounted at
'/home' and at '/home/user/data'. 68 ${color2}/home${goto 60}has ${color3}${alignr} ${fs_free /home} free As line 67 69 ${color2}${if_mounted /home/user/data}~/data${goto 60}has ${color3}${alignr} ${fs_free /home/user/data} free${else}~/data${goto 60}is${color3}${alignr}not mounted${endif} Sometimes this partition is not mounted to protect the data it holds and so as well as knowing the available free space on the device I want to also show the mount state. For this I need to use a conditional statement. First I test the ${if_mounted} Conky variable. If this test returns positive (true) then everything up to the ${else} statement is output and execution of the line is complete. If the test fails (false) then execution jumps to a point immediately after the ${else} Conky variable and execution continues outputting the text in appropriate colors and right aligned. 70 ${image /home/user/Pictures/conky/ext-hdd.png -p 0,530 -s 22x22}${color1}${goto 46}Removable Drives ${color2}${hr 1} This is a header line as line 58. 71 ${font Liberation Sans:size=8}${color2}${if_mounted /mnt/backup}backup${goto 60}has ${color3}${alignr} ${fs_free /mnt/backup} free${else}${if_existing /dev/disk/by-label/backup}backup${goto 60}is${color3}${alignr}not mounted${else}backup${goto 60}is${alignr}${color3}not connected${endif}${endif} I also have two external drives that I want to monitor. I use labels to identify my partitions but I could also use device nodes such as /dev/sda1 or the devices UUID. My drives are labelled 'backup' and 'share'.In this case each of the drives can be in one of three states:
Connected but not mounted Not connected.
/dev/disk/by-path ( device node) /dev/disk/by-uuid. 72 ${color2}${if_mounted /mnt/share}share${goto 60}has ${color3}${alignr} ${fs_free /mnt/share} free${else}${if_existing /dev/disk/by-label/share}share${goto 60}is${color3}${alignr}not mounted${else}share${goto 60}is${alignr}${color3}not connected${endif}${endif} As line 71 73 ${font Liberation Sans:size=9}${image /home/user/Pictures/conky/processor.png -p 0,580 -s 30x20}${color1}${goto 46}CPU % ${color2}${hr 1} This is a header line as line 58. 74 ${font Liberation Sans:size=8}${color2}${top name 1} ${color3}${alignr}${top cpu 1} The ${top} conky variable reports on processes by CPU usage ranked from highest to lowest. The variable takes 2 arguments, type and ranking. Here we report by type name and ranking 1 (the highest CPU usage). Type can be any one of: name, pid, cpu, mem, mem_res, mem_vsize time, uid, user, io_perc, io_read or io_write The top 10 processes may be reported on. 75 ${color2}${top name 2} ${color3}${alignr}${top cpu 2} As line 74 for process ranked 2 76 ${color2}${top name 3} ${color3}${alignr}${top cpu 3} As line 74 for process ranked 3 77 ${font Liberation Sans:size=9}${image /home/user/Pictures/conky/memory.png -p 0,644 -s 30x20}${color1}${goto 46}Memory % ${color2}${hr 1} This is a header line as line 58. 78 ${font Liberation Sans:size=8}${color2}${top_mem name 1}${color3}${alignr}${top_mem mem 1} As line 74 for process ranked 1 but sorted for memory usage instead of CPU usage. 79 ${color2}${top_mem name 2}${color3}${alignr}${top_mem mem 2} As line 74 for process ranked 2 but sorted for memory usage instead of CPU usage. 80 ${color2}${top_mem name 3}${color3}${alignr}${top_mem mem 3} As line 74 for process ranked 3 but sorted for memory usage instead of CPU usage. 81 ${font Liberation Sans:size=9}${image /home/user/Pictures/conky/network.png -p 0,709 -s 20x20}${color1}${goto 46}Network ${color2}${hr 1} This is a header line as line 58. 82 ${font Liberation Sans:size=8}${color2}Bluetooth${image /home/user/Pictures/conky/bluetooth.png -p 60,724 -s 18x18}${if_match "${texeci 10 cat /proc/acpi/ibm/bluetooth | grep status | awk '{print $2}'}"=="enabled"}${alignr}${color3}enabled${else}${alignr}${color3}disabled${endif} My laptop is a Thinkpad and the status of the bluetooth device is stored in the file /proc/acpi/ibm/bluetooth. For other machines there will probably be a similar entry. The bluetooth status can be either 'enabled' or 'disabled'. This line uses the ${if_match} Conky variable to determine the current status and report on it. The search is done using the ${texeci} Conky variable which starts a new thread to execute the code and repeats it at 10 second intervals. This allows the rest of Conky to go about its business while this low priority search is in progress. The rest of the code in the line should be familiar by now. 83 ${if_up wlan0}${color2}Wireless${image /home/user/Pictures/conky/network-wireless.png -p 61,740 -s 18x18}${alignr}Signal Strength ${color3}${wireless_link_qual}%${else}${color2}Wireless${image /home/user/Pictures/conky/network-wireless.png -p 61,740 -s 18x18}${endif} This line checks the wireless network adaptor, wlan0 for a connection and if found reports the signal strength. The check can be made more strict by an entry in the configuration section. The ${if_up_strictness} Conky variable accepts an argument that can be:
link -- up and with a link address -- up, with a link and an associated IP address 84 ${color2}Down ${color3}${downspeed wlan0}/s ${alignr}${color2}Up ${color3}${upspeed wlan0}/s Still with the wireless adaptor, this reports on the download and upload speeds 85 ${color1}${downspeedgraph wlan0 25,107 7ac6f7 d7ba8e -l -t} ${alignr}${color1}${upspeedgraph wlan0 25,107 7ac6f7 d7ba8e -l -t} Displays a graph of the download speed of the wireless adaptor, 25 pixels high and 107 pixels wide using 2 different colors defined in hexadecimal with no leading #. The -l argument uses a logarithmic scale enabling small values to be displayed and the -t argument introduces a temperature gradient changing color according to the value recorded. 86 ${color2}Total ${color3}${totaldown wlan0} ${color2}${alignr}Total ${color3}${totalup wlan0} The totals downloaded and uploaded by the wireless adaptor. 87 ${color2}Ethernet${image /home/user/Pictures/conky/ethernet.png -p 60,826 -s 20x20} The start of the output for the Ethernet adaptor eth0 88 ${color2}Down ${color3}${downspeed eth0}/s ${alignr}${color2}Up ${color3}${upspeed eth0}/s As line 84 but for eth0 89 ${color1}${downspeedgraph eth0 25,107 7ac6f7 d7ba8e -l -t} ${alignr}${color1}${upspeedgraph eth0 25,107 7ac6f7 d7ba8e -l -t} As line 85 but for eth0 90 ${color2}Total ${color3}${totaldown eth0} ${color2}${alignr}Total ${color3}${totalup eth0} As line 86 but for eth0 91 ${font Liberation Sans:size=9}${image /home/user/Pictures/conky/ip-addresses.png -p 0,911 -s 22x22}${color1}${goto 46}IP Adresses ${color2}${hr 1} This is a header line as line 58. 92 ${color2}Internal IP wlan0: ${alignr}${color3}${addr wlan0} The IP address assigned to wlan0 93 ${color2}Internal IP eth0: ${alignr}${color3}${addr eth0} The IP address assigned to eth0 94 ${color2}Gateway IP:${alignr}${color3} ${gw_ip} The gateway IP address 95 ${color2}External IP: ${alignr}${color3}${texeci 3600 wget http://checkip.dyndns.org -O - -o /dev/null | cut -d : -f 2 | cut -d \< -f 1} The external IP address downloaded from anexternal website at one hourly intervals. For security reasons this value should not be openly displayed and so I have removed it in the image above. 96 ${font Liberation Sans:size=9}${image /home/user/Pictures/conky/mail.png -p 0,998 -s 20x20}${color1}${goto 46}Mail ${color2}${hr 1} This is a header line as line 58. 97 ${font Liberation Sans:size=8}${color2}Unread Internal Mail ${alignr}${color3} ${new_mails /var/spool/mail/user} Check for new internal e-mails. This feature must be set up to be used here. I use postfix so that I can receive notifications from services like cron and from backup scripts. Using Conky To try out Conky, create a configuration file in your home directory and add all of the configuration section above, lines 1 to 36 inclusive. Follow this with the word TEXT on its own line. Save the file with a name such as conky-template. This template will work for most of the Conky configurations that you need to create, with only minor changes. Next add a single, complete line from the text section, that's lines 38 to 97. It doesn't matter which line (these are only examples), but any lines that display images must be adjusted to point to an actual image, and any partitions or network interfaces must be similarly adjusted. Choose a simple line to start with, and don't try to add too many lines yet, or you may have problems if things don't work correctly. Re-save the file with a suitable name, e.g. ~/.conkyrc_mag. Open a terminal and call the file you created with conky -c ~/.conkyrc_mag (or whatever you named your file, and don't forget the leading period). If all goes well, you should see the output from that line. If not, then check your typing. If you need to make any corrections and you saved a template file then, you should make the same changes to that file. Do it now before you forget them. Once you have this running, you can add and remove lines in the TEXT section, and change things around to build your own, personalized Conky. Try changing some of the values in the configuration section to see their effect. Use a different font or several fonts. Certainly change the color values to suit your theme or mood. This is a personal thing, and you will never be happy with your work until it looks right for you. If you followed so far, then you will have a good grasp of Conky configuration. The script I used as an example suits my needs, and covers most of the basics. Here are a couple of examples to give you ideas. You should know enough by now to be able to produce something similar.   If you look on the internet, you will find many examples like these, and some a lot more advanced than these. Some are so advanced that Conky needs assistance to be able to show them, and we'll cover all of that in due course. First let's look at a few more things that the basic Conky can achieve. Conky is not limited to reporting purely system related information. It can be quite a versatile tool. For example, in an article I wrote for the magazine about the Music Player Daemon, mpd, I demonstrated the use of Conky to display the name and status of the track playing and an image of the album cover. The configuration file is a part of the article, so I won't repeat it here, but the Conky display looked like this. 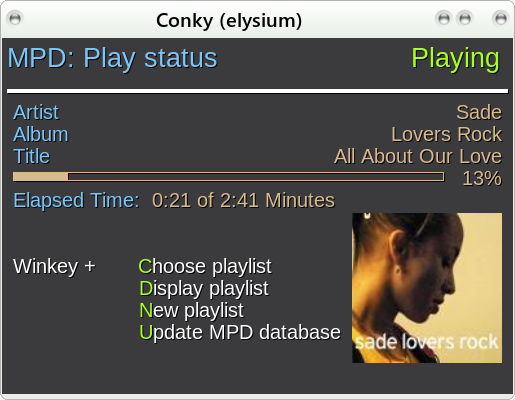 RSS  To display an RSS feed in a Conky window, open your template file and resave it as ~/.conkyrc-rss.
In the configuration section: This will give you a fixed size display even when the window contents change.
Your template file should have been saved with an empty TEXT section so In the TEXT section add just these lines: That is all that is needed to create a new Conky once you have the basic template. Before I show the results I'll explain what each change does. The ${rss} conky variable accepts the following arguments:
uri is the address of the rss feed, here this uses the http protocol, but this Conky variable should be OK with any protocol that the curl command can handle. Interval is the update interval in minutes action refers to what part of the feed you want to display. This can be:
num_par is the item number from the feed This rss Conky variable runs in its own thread and Conky must be re-started to correctly show any changes to the configuration file.  The text from each line supplied by the item_descr argument can be quite long, and Conky is not very good at wrapping the text. The information displayed here is enough to notify me of anything I might like to investigate further. Although I have demonstrated the feature as a stand-alone application, the rss content can form part of a more complex Conky display. Transparency We can easily make this Conky display transparent by changing two lines in the configuration section. For this to work, compositing, or desktop effects, must be enabled.
own_window_transparent no
  This demonstrates one of the difficulties with transparency. The two images above are of the same Conky display on two different areas of the same background image. The colors could, of course, be changed to accommodate this, but this is something that should be considered when designing a Conky display. The next two images show the same thing, first with compositing turned off and then with compositing back on, but with the text colors changed to contrast better with the background image. If you see image three, check you have enabled compositing!   Templates The use of templates can simplify configuration files, particularly when the same type of information is required over several lines. Line 67 of .conkyrc_mag had this line: ${color2}root${goto 60}has${color3}${alignr} ${fs_free /} free Line 68 was almost identical. If I added a template definition to the configuration section: template1 ${color2}\1${goto 60}has$alignr}${color3}${fs_free \2} Then lines 67 and 68 would become:
${template1 root /} Line 69 was ${color2}${if_mounted /home/user/data}~/data${goto 60}has ${color3}${alignr} ${fs_free /home/user/data} free${else}~/data${goto 60}is${color3}${alignr}not mounted${endif} This gets simplified to ${if_mounted /home/pete/data}${template1 ~/data /home/pete/data}${else}~/data${goto 60}is${color3}${alignr}not mounted${endif} Putting a lot of the complexity out of the main body of the TEXT section which makes things easier to control. This is how the templates work. A template is defined/described in the configuration section of the configuration/resource file. Yes, I know the terminology is confusing, just run with it and soon you'll be fine. A template definition has a name comprising the label 'template' followed immediately by a number from 0 to 9. Our template is named 'template1'. The rest of the template definition is constructed just like a line from the TEXT section of the file. The exception here is that where in a TEXT section line we would insert the names of the items that we want Conky to report upon, the template has a 'place holder' which is a number preceded by a backslash. I think the numbers can be from 1-9, but I'm not sure -- use 1-9, you'll never need more than 1-4 anyway! Place holders are analogous to place holders in extended regular expressions for those who understand that concept. When a template name is encountered in the TEXT section of the file it is substituted by the entire contents of the template definition with a few minor changes. These changes are that the placeholders are replaced by the values that immediately follow the template name. In our example this means that \1 is replaced by the first item following the template call, \2 by the second item etc. So if \1 is replaced by root and \2 is replaced by / then ${template1 root /} becomes ${color2}root${goto 60}has$alignr}${color3}${fs_free /} and ${template1 home /home} becomes ${color2}home${goto 60}has$alignr}${color3}${fs_free /home} The placeholders are replaced by the items that immediately follow the template call. The rest of the items in the line e.g ${goto 60} are interpreted as normal. If this seems confusing, and it certainly was at first to me, then try a few examples and I am sure that you get a grasp of the concept. Gauges and Bars We've seen bars already, battery bars, memory bars and cpu bars. They give an instant visual impression of the usage of the item that is being represented. A battery bar shows how charged the battery is, not by a number but by the length of the bar proportional to the possible maximum length of the bar. The color can be changed, as well as the length. The height can be changed and the position of the bar within the display, but nothing else. They are useful but not really very interesting. Conky has another type of proportional representation the we haven't yet seen -- the elliptical gauge, which works in the same manner as a pressure gauge or a speedometer. Gauges are available for all of the things that bars can be used to represent, battery charge, memory usage...
Using these two lines produces this output:  Okay, it works and you can see what you are meant to see. In some situations this is just fine and no more is required. But hey, this is Linux, and we don't settle for ok. We want WOW! If you want WOW!, we can do WOW! But you've got to work for it. You need Lua and Cairo. We will cover that in Part Two. |