
| Previous
Page |
PCLinuxOS
Magazine |
PCLinuxOS |
Article List |
Disclaimer |
Next Page |
Ad-free Browsing With Privoxy |
|
by Paul Arnote (parnote) Internet users across the globe -- except for some webmasters -- definitely have one thing in common: they hate and despise the tons of advertising that is crammed down our throats on a daily basis. Do the advertisers really think people click on those ads? Does anyone except for the most computer illiterate user actually click on them? For me, they provide a cause to avoid those products. After intruding on my space, those "products" will be the last ones I consider when making a purchase. Sure, there are browser specific extensions, such as AdBlock and AdBlock Plus, that help eliminate the continual assault of the endless advertising barrage. Sure, you could install one of the aforementioned browser extensions. But the problem is that they aren't an across the board cure. If you install AdBlock Plus in Firefox, that single extension is exclusive to Firefox. To accomplish the same thing in Chrome or Chromium, you have to turn around and install a version of AdBlock Plus that's exclusive to that particular browser. But wait a minute! There is another way. The "other way" works across the board, and you only have to install one program from the PCLinuxOS repository. Install just one program that works across any web browser that you may happen to be using. Put an end to installing multiple, browser-specific versions of the same extension. It's called Privoxy. Getting Started First, install Privoxy from the PCLinuxOS repository, via Synaptic. The typical and usual advice to insure that your computer is fully updated before installing programs from Synaptic should go without saying.  The first time you use Privoxy, you will need to manually start it from the command line. As the root user, issue the following commands: service privoxy startnetstat -nap|grep privoxy Take notice that the second command provides the proxy address and port that Privoxy is using. The default value is 127.0.0.1:8118 (listening in on localhost, on port 8118). On subsequent reboots, Privoxy will be set to start when you boot your computer. You only have to perform this step the first time you use Privoxy. Now, if you use Firefox and ONLY Firefox, you can use this information to setup Privoxy's proxy information within the Firefox settings (Edit > Preferences). Go to the Advanced tab, then the Network tab. Click on the top button, marked "Settings." 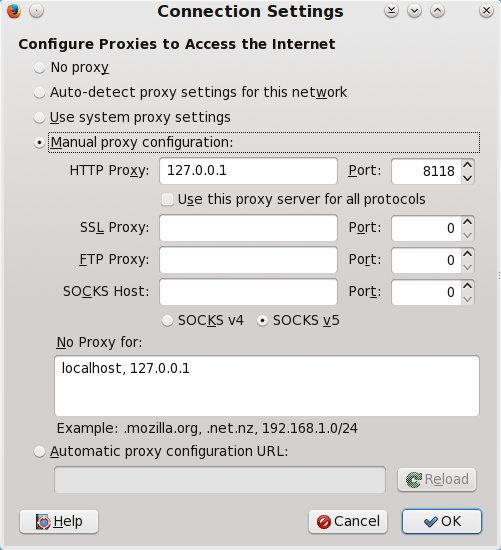 Select the radio button next to "Manual proxy configuration," then fill in the HTTP: Proxy field with 127.0.0.1, and set the port (immediately to the right) to 8118. It probably is a good idea to place a check in the box immediately below, labeled "Use this proxy server for all protocols," as well. This is all good and fine, if as we said, you used Firefox, and only Firefox. But then, you're handcuffing the abilities of Privoxy. Very few users use only one web browser. I personally have four installed on most of my computers: Firefox, Chrome, Chromium and Midori. Even an out-of-the-box PCLinuxOS KDE installation will have a minimum of two different browsers installed (Firefox and Konqueror). So, let's skip setting up Privoxy only in Firefox. Within the dialog box above, set Firefox to the "Use system proxy settings" instead. Rather, we'll go into PCC and set up a system-wide proxy that will work not only with Firefox, but any web browser you have installed on your computer. 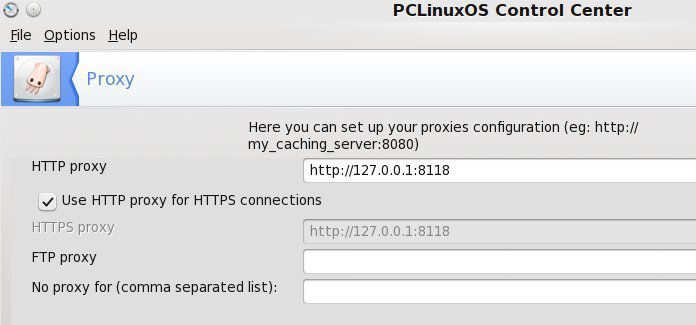 Open the PCLinuxOS Control Center (a.k.a. PCC, or Configure Your Computer), and go to the Network & Internet tab on the left side of the window. About halfway down the right pane, click on Proxy. Enter "http://127.0.0.1:8118" on the first line, and place a checkmark in the box in front of "Use HTTP proxy for HTTPS connections" setting. Click the OK button at the bottom right corner of the window, and OK in the next window. Now you will need to logout and back into your computer for Privoxy to be active and able to perform its duties. 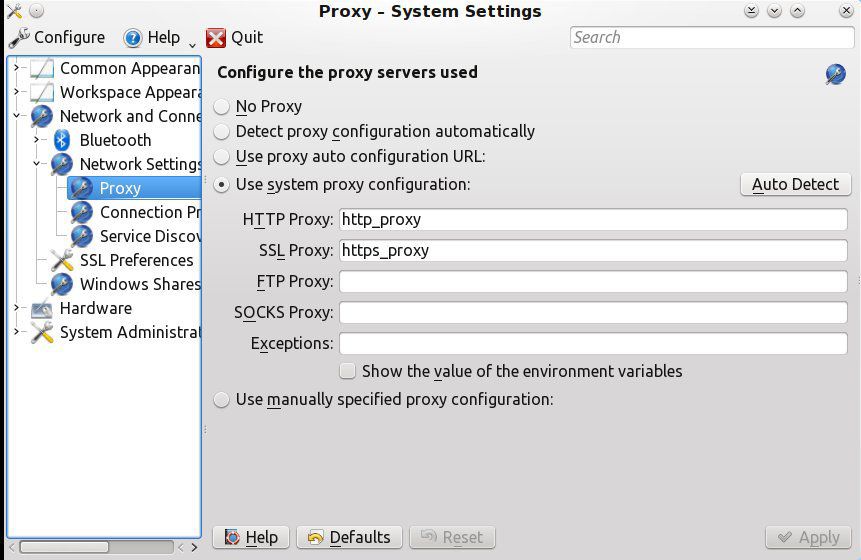 KDE (and Gnome) users will have one extra step to perform, since those two desktop environments add another layer to the use of proxies. Select "Configure Your Desktop" (a.k.a. KCC), then go to Network and Connections > Network Settings > Proxy. Select the radio button next to "Use system proxy configuration," then select the "Auto Detect" button. Then, select the "Apply" button at the bottom right of the window. Tweakin ... Not Twerking As it sits, with its default settings, Privoxy works. Below are some examples.   The Omaha World Herald site without Privoxy (top) and with Privoxy (bottom).  My hometown newspaper without Privoxy (top) and with Privoxy (bottom). In the images above, notice the lack of ads on the pages displayed after the use of Privoxy. It's proof positive that Privoxy works. However, Privoxy can do so much more. To get an idea, check out Privoxy's online user manual. There are many settings you can tailor to your internet browsing needs. While we're not going to go over all of those (everyone's tastes and needs can vary widely), let's talk about what you need to do to give yourself the option of changing Privoxy's settings. 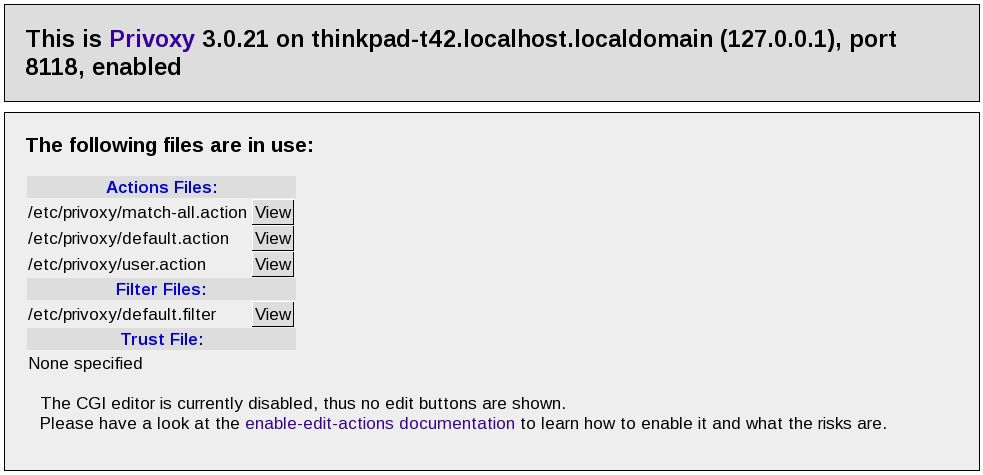 First, check out Privoxy's built in web-based configuration page, which allows you to control Privoxy from within your web browser. Don't worry -- you're not connecting to anywhere on the web. The configuration page is right on your computer, so you are accessing only your computer. Select the first link under the Privoxy Menu section (near the top). By default, you can only view the settings (as in the image above), so let's change things so that you can tailor your copy of Privoxy. As the root user, open the file /etc/privoxy/config in a text editor. About half way through the file, look for the "enable-edit-actions 0" entry. Change it to "enable-edit-actions 1" and save the file. Close out your text editor. Now, refresh the "showstatus" configuration page. Your page should look like the one below. 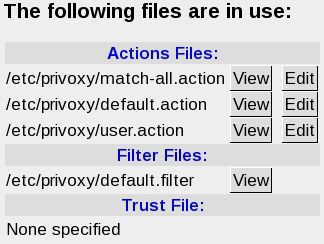 Now, when you select one of the "Edit" buttons, you will see all kinds of settings, similar to that displayed below. Clicking on the third "Edit" button down causes the following to be displayed (you may have to scroll down the page a bit). 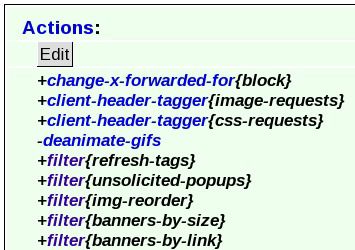 Clicking on the displayed "Edit" button will bring up a window similar to the one below. 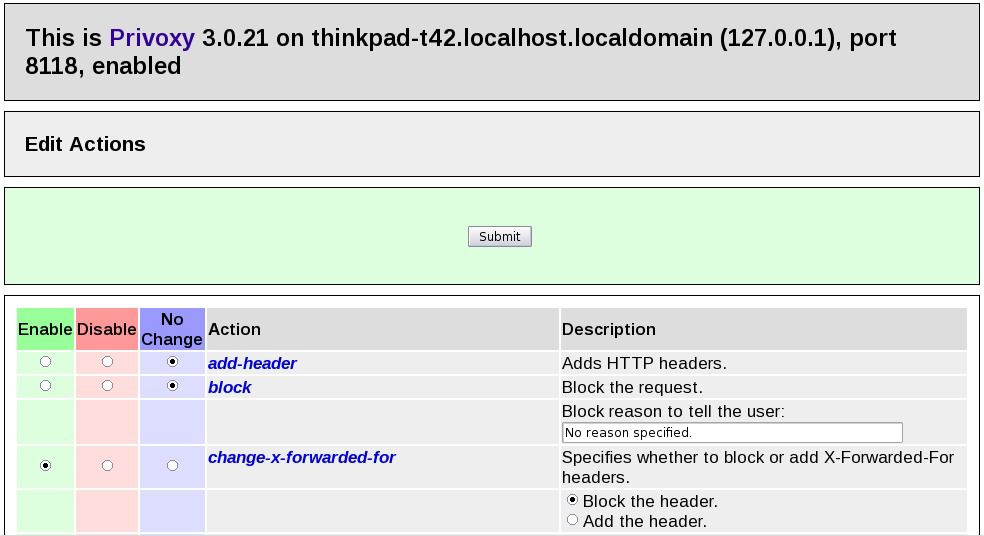 Scrolling down the page, you will find many, many settings you can enable or disable. Read through them and enable (green column) the items you want to block -- and disable (red column) the items you wish to allow. The blue column leaves the item set to the default values in Privoxy. Summary Overall, Privoxy is an outstanding way to block unwanted advertising when you're browsing the web. But don't be afraid to dig into the other capabilities of Privoxy, which can even serve as a parental content filter. You just have to set it up. Privoxy is a complete solution for filtering out the web content we don't want to view -- or that we don't want users on our computer to view (like little Johnny and little Susie). With Privoxy, you can now set up ONE content filtering solution that works on all browsers, as opposed to having to install a separate one on each browser you use. |
