| Previous
Page |
PCLinuxOS
Magazine |
PCLinuxOS |
Article List |
Disclaimer |
Next Page |
Computer Hardware 101: Power Supplies |
|
by horusfalcon The power supply unit, or PSU, is arguably the beating heart of any computer system. Without clean, reliable power, all the "go-fasters" in that system become useless. It is ironic, then, that the PSU is often the most overlooked item in a system. The PSU's basic functions are to convert AC line voltage into the various DC voltages used by the computer, and to provide wiring harnesses with proper connectors to support the various loads needing power. We'll wrap up this intro with some common-sense safety precautions. So-called "house current" computers use for power can kill you if you don't treat it with the respect it deserves. When working on a PSU, or anywhere inside a computer chassis, PULL THE PLUG and "SAFE" THE SYSTEM. Work at Zero Energy State. Stored voltages in a PSU are also a danger. The best way to ensure no stored voltages are present is to disconnect the AC cord, then push and hold the power button on the front of the case for long enough (ten seconds or so) to extinguish all standby lights on the motherboard (check once the case is opened, and repeat if needed until all LEDs are dark). In the testing procedures which follow much later, I eliminate any need for having power applied with the case covers open. It's much safer that way if something unpleasant does happen. Troubleshooting is another matter. Some of that must be done with power applied. Most advanced troubleshooting is beyond the scope of this article, but we do cover use of a Power Supply Unit Tester, and the proper precautions when doing so. Often, the simplest and safest way to treat the PSU is like it's a "black box." AC power comes in the back, and DC power to the loads goes out the front. Everything else in the middle is not so important. Why do I say this? Repairing a PSU is usually neither safe nor cost-effective, and is not recommended without proper knowledge, tools, facilities, and test equipment. It's safer, simpler, and cheaper in most cases to just swap the unit out with one known to be working. If this cures the problem, recycle your old unit and buy a new one. Don't open it up! Stored voltages in even a small, low wattage PSU can kill. Basic Terminology: Advanced training in electronics or computer science is not needed to be able to select and install a PSU. Some familiarity with basic terms, though, will be useful. Here's a short list: MTBF -- Mean Time Between Failures. Measures the average time a unit may be expected to perform before failing. Different vendors determine MTBF in different ways, so care should be used in making comparisons based on this statistic. Usually expressed in some multiple of hours. Noise -- also called Ripple, or Periodic and Random Deviation (PARD). This is a measure of the amount of unwanted variation in the DC outputs of a PSU, so it refers to electrical noise, not sound. It is usually expressed as a voltage, or as a percentage of the output voltage. Generally the lower this value, the better. Power Rail -- A power rail (or buss) is an independent output provided by a PSU. Many PSUs provide multiple power rails. If so, these will be called out on the unit's nameplate. Photo: Typical PSU Nameplate (from an old Compaq Presario) 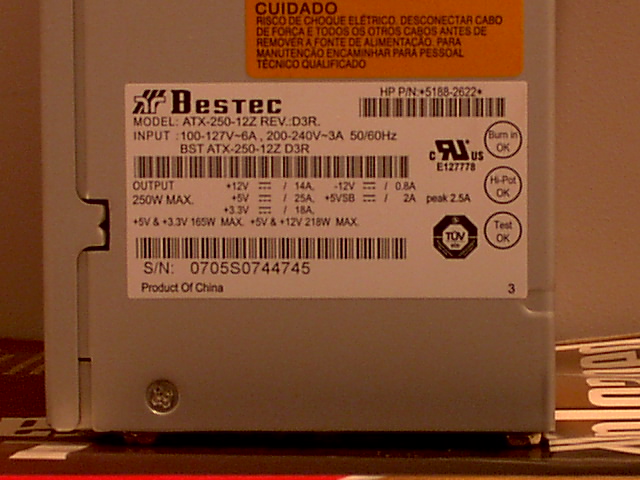 Wiring Harness -- for a power supply unit, wiring harnesses provide the connectors needed to connect the PSU to the components in the system. There are usually several different harnesses which support different types of components. Other terms will be explained as they are used. A list of references is at the end of the article for further reading. Power Supply Safety Certifications: There are many safety certification marks that apply to PSUs, most of which cover use of a unit in a particular country or region. Here's a partial list of certifying organizations: UL -- United States CSA -- Canada NOM -- Mexico ETL -- United States CE -- European Union INMETRO -- Brazil CCC -- China GOST-R -- Russia S-Mark -- Argentina emc-Mark -- Australia, Japan, Canada, U.S. There are many more, and links to more complete listings are given in the references section at the end of this article. At least one of these marks should appear on your power supply. The biggest reason for these standards is to assure safe grounding measures are taken so that a unit fails safely without undue risk of fire or electrical shock.  Note that UL's more familiar marks will not usually show up on a PSU. Look for their Recognized Component mark, shown above, instead. Power Supply Efficiency Certifications: There are two major certifications for computer components which rate their energy efficiency: Energy Star and 80 Plus. Much has been made about these in the popular press, but they are not the only considerations to be used when selecting a PSU. Energy Star is a program established by the U.S. Environmental Protection Agency. It's intent is to help promote the production and use of more energy-efficient electrical appliances. More about Energy Star ratings can be found at the link in the references for this article. Power Supplies are not usually Energy Star-rated apart from systems, so trying to find an Energy Star-rated PSU might needlessly narrow your choices. That said, most computer equipment for home use should already be Energy Star compliant. It's not a deal breaker. Gamers, especially, tend not to be much impressed by Energy Star gear.  80 Plus is a certification created by the Electric Power Research Institute. It asserts the efficiency of a certified power supply is 80% or greater across its range of operation. There are various "levels" of certification that go beyond the "basic" 80 Plus. Bronze, Silver, Gold, Platinum, Titanium, Unobtanium, whatever -- all these can mean somewhat better efficiencies, but all things for a price. For most home systems, plain old 80 Plus or 80 Plus Bronze is more than adequate without needless expense. It is wise to remember that EPRI is an industry group, and one of its major aims for 80 Plus is to provide a marketing tool for vendors. Table 1: 80 Plus Certification Level Comparisons
                 Internal    Power       Efficiency Efficiency Efficiency
                 Power       Factor      @ 20%      @50%       @100%
                 Volts AC    Correction  Loading    Loading    Loading
======================================================================
80 Plus          115/230*    0.90@100%   80%        80%        80%
80 Plus Bronze   115/230*    0.90@50%    82%        85%        82%
80 Plus Silver   115/230*    0.90@50%    85%        85%        85%
80 Plus Gold     115/230*    0.90@50%    87%        90%        87%
80 Plus Platinum 115/230*    0.95@50%    90%        92%        89%
80 Plus Titanium 230 only    >0.95@20%   94%        96%        91%
   Note: Titanium level supplies are 90% efficient at 10% load.)
80 Plus Unobtanium    Are you kidding? I know I was!
======================================================================
* - Note: Specifications given for 110 VAC operation. Specs for 230 VAC are slightly different.
For more information about 80 plus, visit the EPRI website and the Ecova Plug Load Solutions website given in the references. Note that neither Energy Star nor 80 Plus say anything truly specific about how well-regulated a PSU is! Units meeting these standards are generally quite reliable, but look at all the information available on a unit prior to selecting it for use, and do your own research! Power Supply Form Factors In the "bad old days" before the IBM PC and its clones, computer power supplies were big, heavy, bulky, noisy, and hot, and no two makers made them quite the same way. Nowadays lighter weight, modularity, and standardized form factors (physical sizes and plug connections) make it simpler to source a good PSU from a wide variety of vendors for a reasonable price. NOTE: Even now there are proprietary holdouts, some of which even look like "standard" PSUs, but have different wiring at their connectors, or slightly different physical form factors. It is wise to check your system documentation to see if a special PSU is required, otherwise system damage or installation problems could occur. (Older units from Compaq & HP, especially, tend to fall into this category.) There are a lot of different PSU form factors. We will only cover the more popular ones here. More information about less widely used form factors is available in the references. 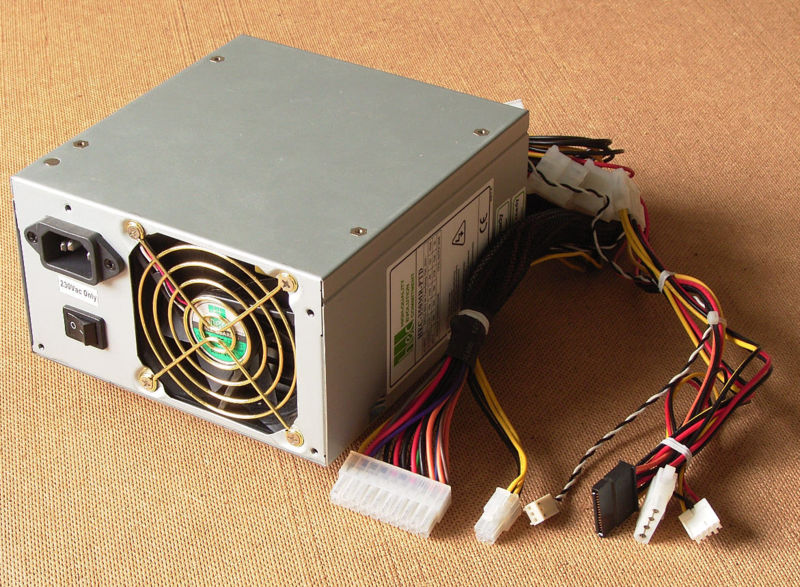 Photo: Rainer Knäpper, Free Art License (http://artlibre.org/licence/lal/en) ATX grew out of an Intel specification first published in 1995 to replace earlier XT, AT, and Baby AT machines. The best reference for this spec as it applies to PSUs is in the Intel document Power Supply Design Guide for Desktop Platform Form Factors, release 1.1, also linked in the references. Without getting too technical, ATX's major differences from its predecessors were more pins (to carry more current), better keying on power connectors (to make them "goof proof"), and "soft" start and stop which allowed the computer's operating system to shut off the power after a system is safely shut down, or "wake it up" by a remote signal sent over a network. ATX was at its height during the time when Intel's Pentium III, and AMD's Athlon line of processors were in popular use. It's main power plug has 20 pins, in two rows of ten. There was also a six-pin molex 2 X 3 plug which provided "auxiliary" power where needed. Around the turn of the century, the ATX specification was extended to include four more pins on the main power connector, and a four-pin (2 X 2) 12V connector to support CPU power for Intel's then-new Pentium IV processor. As time has moved on, this specification has seen many revisions, however, newer units are backward-compatible with older ones within this same family. Many units of this type have a 20+4 design for their main connector that makes it also backward-compatible with older ATX 20-pin types. Later ATX12V designs also provided one or more 6-pin PCIe power plugs to accommodate higher-end video adapters. If you have one or more of these video adapters in your system, make sure the PSU you select has enough of these plugs to provide the needed power. One "big deal" in later revisions is the use of a single "brute" 12V power rail. Earlier designs split the 12V power onto two or more rails for different purposes. This uncomfortably limited power in certain high-power systems. All the power is passing through one transformer, anyway, so using a single larger power rail for all 12V loads means fewer restrictions, and fewer losses. (It also meant a simpler, less expensive design, which helped lower cost.) "Modular" ATX12V Form Factors Many manufacturers began to cater to a growing "modder" market which wanted to be able to eliminate those wiring harnesses not actually used in a system build. The idea was to get rid of clutter and streamline the airflow in a system's interior to improve cooling. While not truly a "standard" form factor, most of these modular units feature a plug bay on the interior side of the unit such that the various wiring harnesses may be connected as needed. Some even feature multiple lengths of certain popular type harnesses to adapt to larger and smaller cases. These types of supplies are usually a bit more expensive than non-modular units, but can make for a much neater and better managed build. I have seen some articles suggesting the difference in airflow is significant, and others which say it makes no effective difference. In my own experience, the case interior is a few degrees F cooler, and a whole lot neater. 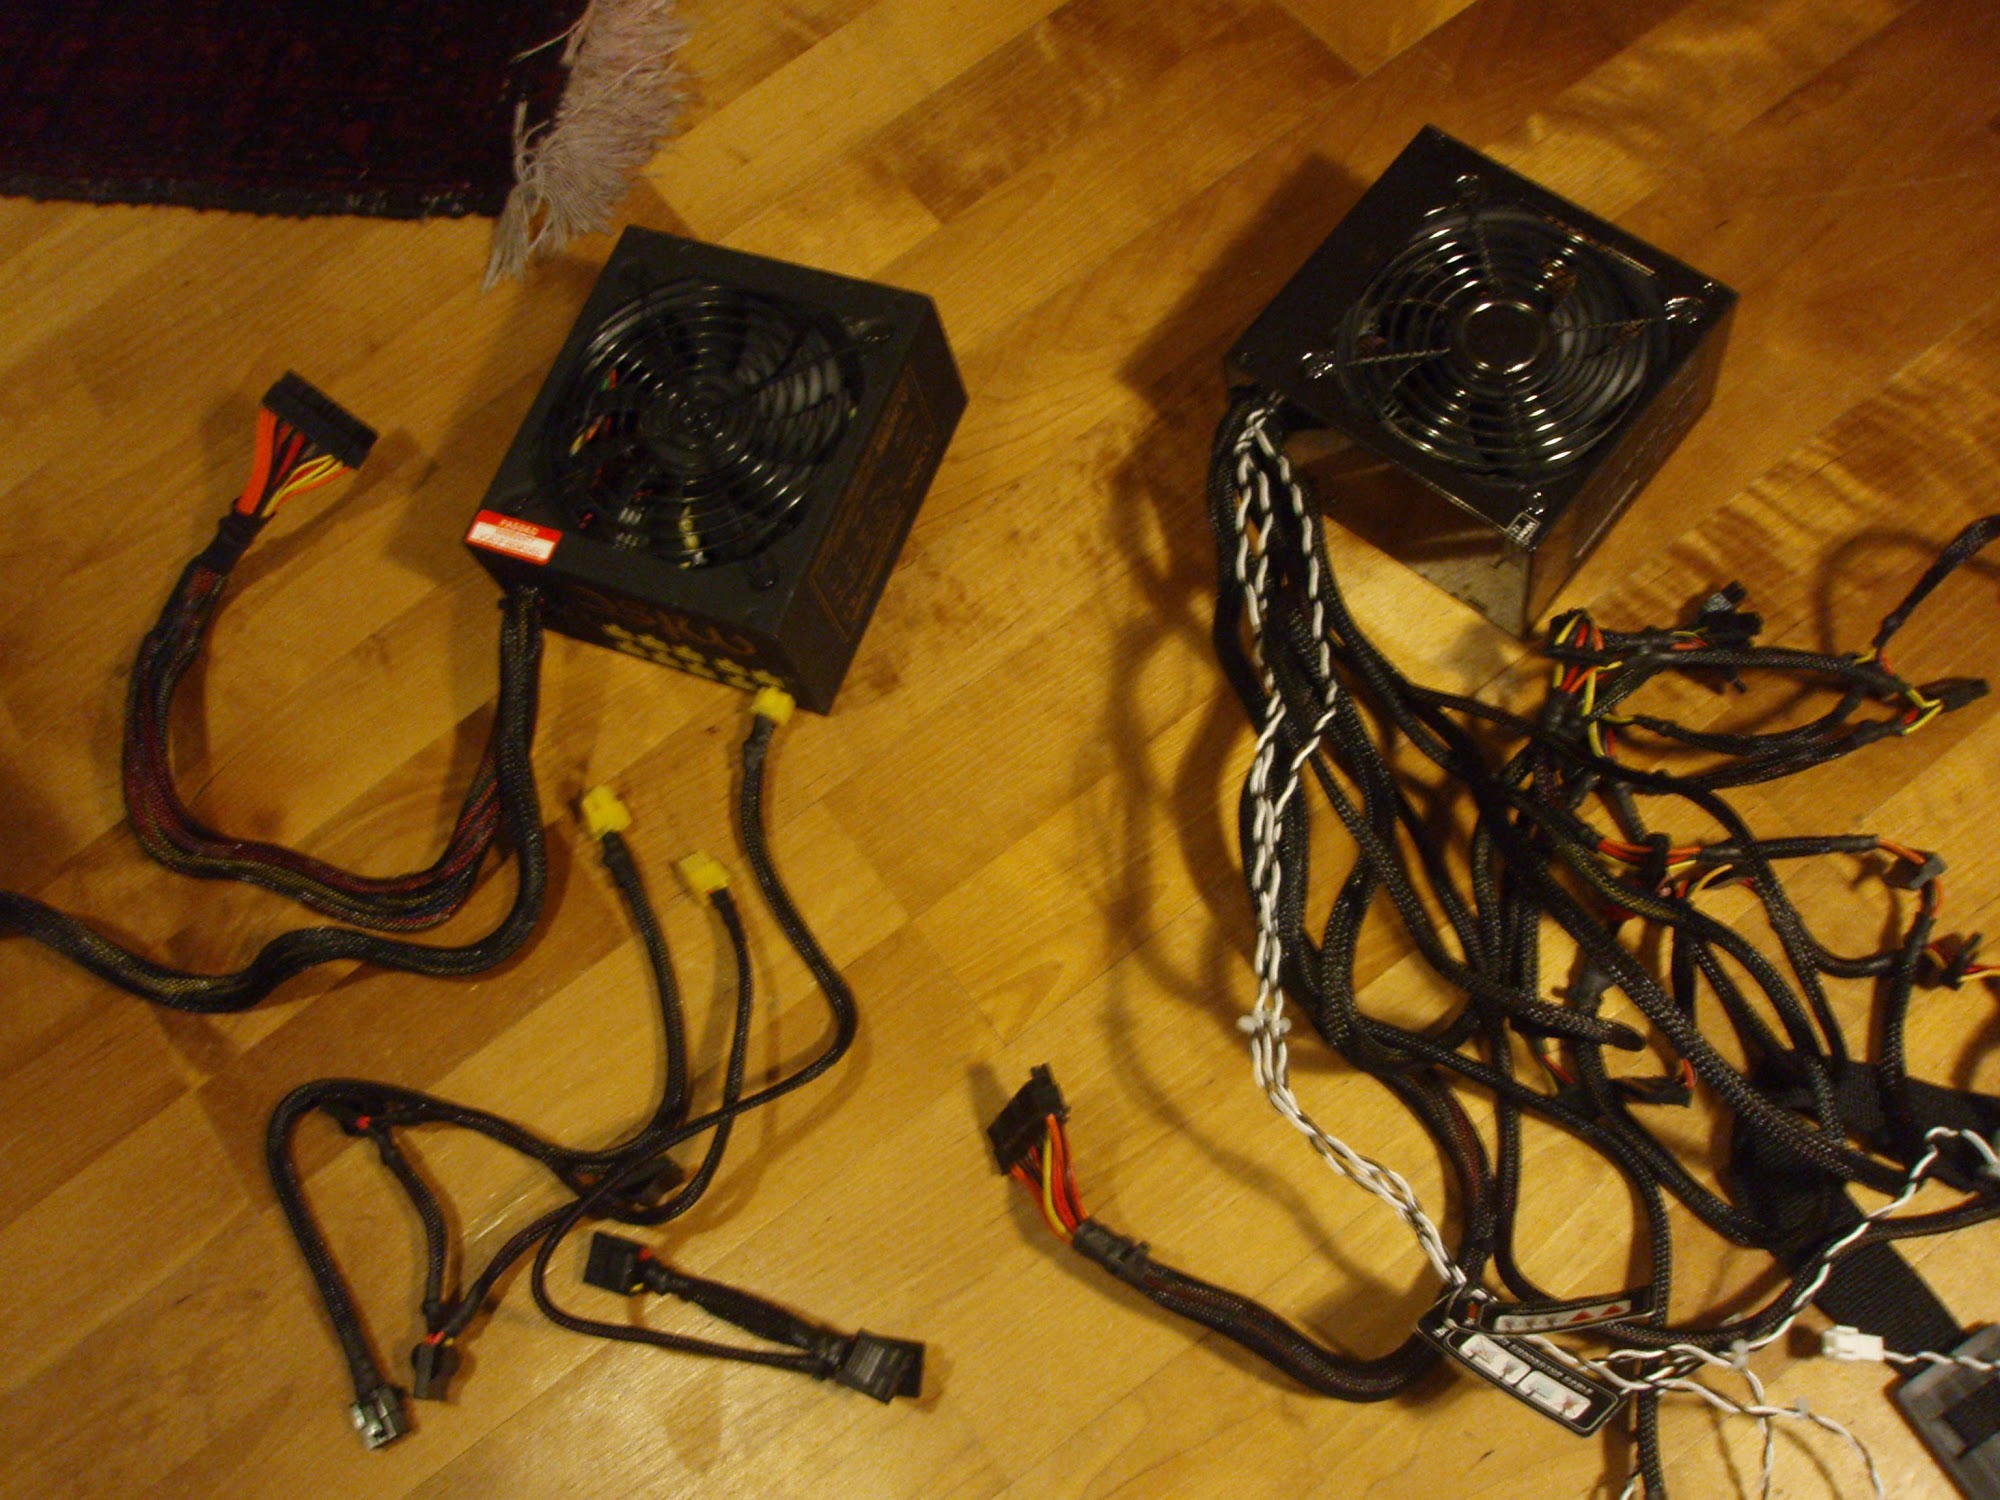 Photo: Modular vs. Non-Modular PSU (courtesy Ni-Sama at Wikimedia Commons) If neatness is a factor, and you're big into the fit and finish of your build, or if you're the type who is constantly in and out of the case, this type of PSU might be of interest to you. If not, a few velcro strips and cable ties will bind up the unused ends of a normal non-modular PSU quite nicely. Other Form Factors There are a wide array of other form factors that might be encountered when shopping for a PSU. This is a partial list. For more on this, see the references at the end of the article.
microATX a variant of ATX used for small, low power systems Vendor-Specific PSUs We've talked about this a bit in the intro, but it bears repeating. There are some (mainly older or "all-in-one") systems which use PSUs that may look compatible but are wired differently or provide different outputs. I like to call these the "gotcha" form factors. If you already have one of these machines and need to replace the power supply, your best bet will be to try to acquire one from the manufacturer (often too expensive to be cost-effective) , or look into after-market suppliers for your specific type. Consult any documentation you may have or can obtain if you suspect this note applies your system. Very often, sad to say, it's better and more cost-effective to replace a non-standard computer system with one which is better supported by off-the-shelf hardware. Selecting a PSU for Your Build Generally, there are three different reasons to shop for a PSU: either a new system is being built, an old one is being repaired, or a system is being upgraded. In the case of of the system being repaired, it's always good to be able to tell for certain your present PSU is really the problem. We'll cover more in-depth troubleshooting later on, but, for now, let's start by answering some basic yes-or-no questions about the original PSU in your system: 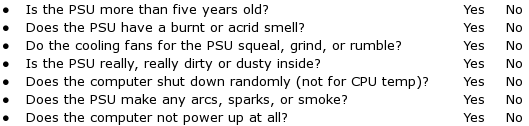 If the answer to three or more of these questions is "Yes", suspect your PSU. If the answer to five or more of these questions is "Yes", consider replacing it anyway because if it hasn't failed it will, and soon. If you have suspicions about your present PSU, do the troubleshooting mentioned later before buying a replacement unit. In the case of a new system being built, or an old one being upgraded with new equipment, selection becomes a matter of finding the right form factor, connector harnesses, and enough power to supply all the loads in your system without being too powerful. This brings us to our next topic, estimating a power budget. Estimating a Power Budget For Your System To avoid buying too much or too little power, the first thing to do is estimate a power budget for your system. A power budget is estimated by adding the power consumptions for all the devices in a system. Of the tools I've seen to do this, the eXtreme Power Supply Calculator (I use the free "Lite" version) is one of the best. Its extensive database and detailed hardware selections make getting a power estimate for your system a snap. The "Pro" version ($2.00 -- cheap) lists many more features, but these are only needed if you're building a piece of high-end hardware like a big workstation or server. A calculator like this one does all the technical math for you, and will give you at least a reasonably good figure for your system's power requirements without too much fuss.Screenshot: eXtreme Power Supply Calculator Lite Version 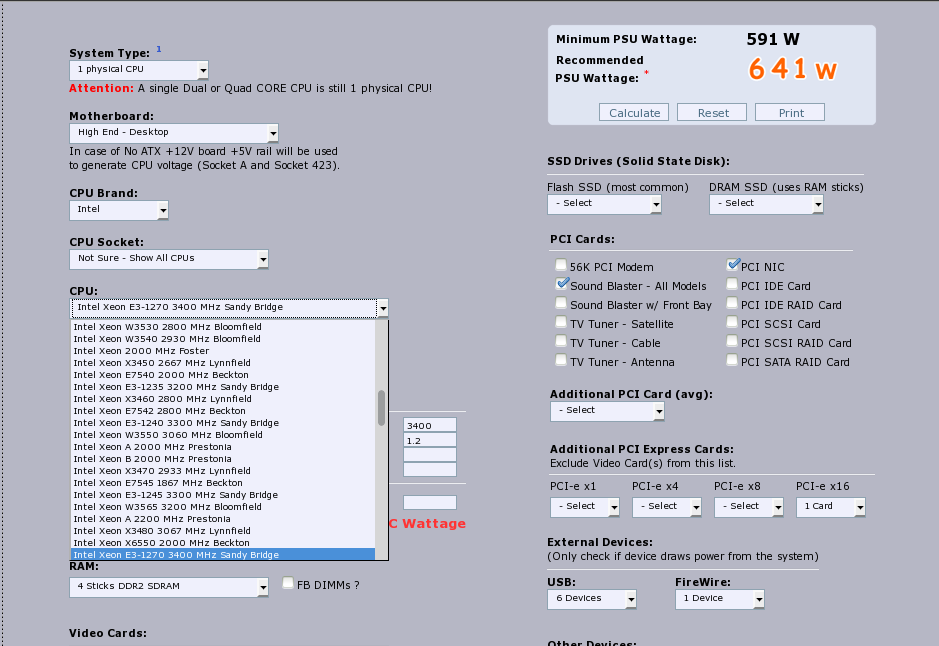 Choosing a Form Factor There are four basic considerations here: physical size, cooling, line voltage, and outputs. Physical size is a simple requirement -- can the PSU you're looking at fit properly into the space provided, and mate up with the mounting hardware correctly? If not, you're really not going to be happy with the result. So, how do you figure this out from an online advertisement? Start with the advertised form factor. Look closely at the documentation for your system, or on the nameplate of any existing PSU for clues. Read reviews on the unit. Take measurements of the existing PSU if all else fails. Form factor specs give physical dimensions for their PSUs. If a vendor does not list dimensions in their advertisements, ask for them. Most will be happy to provide them by email or even over the phone. In this case, yes, size does matter. As rated output of a PSU goes up, there is a tendency by some manufacturers to extend the depth of the unit to get more volume for components. Be sure the depth of the new unit will clear any obstructions during installation. Measure the clearances to be sure if there is any doubt. (For safety's sake, please take measurements with the power OFF.) Cooling is usually done by one or more fans moving air through the unit. Power supply fans in modern units move air out of the case. Some earlier ATX units pushed warm air from the PSU into the case. (I know, right?) If you are replacing an older unit with a newer one, it may be necessary to change the way air flows in the system, but in most instances cooling will improve with a newer style unit. Many newer units use bigger fans turning more slowly to move the same amount of air. This is to provide quieter operation at normal power levels, and to allow for some reserve cooling capacity at higher power. There are also fan-less PSUs for special applications where silent operation is a real priority. (These generally come at a premium price.) Line voltage on most PSUs is selectable via a small recessed slide switch on the back of the unit. Before installation, be certain this switch is set to the proper line voltage value for your region. System damage can result if this switch is set incorrectly!
Outputs are the wiring harnesses & connectors that provide DC power to system loads. The plugs for these need to be the right style and size for your motherboard and for any devices requiring power. This gets more important with older hardware such as IDE drives, which use a different power connector than more modern SATA drives do. General Ruggedness & Reliability Not all PSUs are created equal. Some models are better than others, even in a single vendor's product line. It pays to do your own research when shopping for a PSU. Technical reviews by recognized writers can be a big help, as can user reviews on vendors' websites. Check the references for some good sites to get you started. Whatever you do, don't just throw money at this problem. Paying more does not always mean you will get more. Read, research, and inform yourself on how a given vendor does business, how they rate their equipment, and how well others rate it. Installing A New Power Supply Unit Generally, it is simpler to install a PSU in a new computer case than it is to replace an existing unit. Nothing is in the way, power is already off, and the case is usually empty at this point. Stab the unit in the case, screw it down, and hook that bad boy up. What could be simpler, right? Well, that's basically it, but there's a bit more to the process if you're doing it correctly. Replacing an existing unit gets a bit more interesting. If you've never done any of this before, it can seem complicated, so let's run through some basic steps. Remember SPIRE:
There's one extra step for an installation. It's crucial to ensuring proper system operation.
For both removal and replacement, it is important to clean up and square away the work area when work stops. It's safer, neater, and will keep things better organized. Now that we've covered the basics, let's get into all this in more depth, starting with Safety. Safety Whether you are doing removal or replacement of a PSU, it is imperative for your safety and to prevent equipment damage that ALL WORK be done with the AC CORD DISCONNECTED and the unit at Zero Energy State. Shut down the system if it's running, and unplug the power cord from the back of the unit and the wall outlet, and set it aside. To "safe" the unit after unplugging it, press the front-mounted power button for several seconds to discharge any stored voltages before opening the case. After removing the cover, put it aside, out of the work area where it will not be in the way while you are working. Visually check for any lit LEDs on the system board. If found, hold down the power switch again until these all go out. Be aware that a computer case can have sharp edges and pinch points. Use good lighting, and look carefully before you put your hands anywhere in the case. Plan/Prepare Planning the work and preparing the work area with the correct tools, materials, and equipment can make your workflow much more efficient, safer, and less stressful. The work area should be well-lit, reasonably clean, and provide a table or workbench on which work will be done. If working on a kitchen table, consider using an old tablecloth or an old bed sheet to protect its surface while you work. The tool list for a power supply replacement job can be as short as a single screwdriver if no cable management is anticipated. When I'm on a house call, I typically bring a full tool bag, but here's the bare minimum:
Materials should include at minimum the hardware needed to mount the PSU, some small and medium sized cable ties for dressing wiring, and a roll of vinyl electrical tape. Permanent markers or wrap-around wire labels can help with identifying where connectors mate up. (I use a Dymo labeler with paper tape for this task.) Optional cable management aids like spiral wrap, velcro strips, heat-shrinkable tubing and braided wire sleeving kits can also enhance an installation, but are not absolutely necessary (and might require other tools such as scissors and a heat gun). A power strip with a master ON/OFF switch can be useful during testing. The master switch gives you a way to quickly de-energize a unit if something goes wrong. Lay out your tools and materials in such a way that they are ready to hand, but not in the way. Think ahead about how much room you will need to work, and lay out the area accordingly. Inspect Look over the power supply section of your case, noting any special features it may have. Some cases provide power supply latches, or frames for mounting the PSU which swivel or slide out of the case for inspection or maintenance. Most cases, though, simply screw the unit to the back of the case with four small screws. There may also be rubber mounts or gaskets provided for sound isolation. If these are used, be sure to look carefully before disassembling to see how to ensure proper grounding. This is usually done with a short length of green wire fastened to the metal of the case and PSU by screws and toothed (tessellated) washers. These washers help the screws bite into the metal surfaces and make a better electrical connection. Look for any sharp edges, removable fixtures (like drive bay cages), or pinch points. Use vinyl electrical tape to cover sharp edges before starting work. Look at what's connected to where. Take pictures or label what wiring is connected to what devices or motherboard plugs. Look at how wiring is routed in the chassis before disconnecting anything. Note also any system board interconnections that might become dislodged or disconnected during removal of the unit. (CPU fans are particularly subject to this.) Note especially any SATA drive connections and their cable routing. SATA power and data connectors on devices are delicate and easily broken. If it becomes necessary to disconnect a SATA cable to clear the PSU into the chassis, check for and unlatch any latch present before attempting to disconnect. Disconnect the plug by pulling gently but firmly straight back once any latch has been released. DO NOT SIDE-LOAD or FORCE a SATA connector! Doing so will likely damage the device's edge connector, not the cable end. Look for any odd or out-of-place things. I once found a dead lizard inside a computer. Remove any debris, dust, etc. prior to beginning work. Finally, the new PSU should be prepared for installation by setting its voltage selector switch, checking its wiring harnesses for any broken wires, cut insulation, or other damage now, before installation proceeds. Its hardware kit, if any, should be checked for any missing parts. Remove/Replace Here's where the fun begins. Removal of an existing unit proceeds as follows:
There may be a delay in performing the replacement. If so, review the first three steps of SPIRE: Safety, Plan/Prepare, and Inspect. Re-familiarize yourself with the work area, ensure the system is still de-energized and safe for work, and inspect the chassis and all existing interconnects before performing the replacement. When ready, proceed as follows:
Ensure In this step, make one more thorough sweep of the case internals. Look for such things as:
Testing Procedure At this point, the system is ready for testing. Proceed as follows:
Troubleshooting Power Supply Problems Power supply units are generally simple to figure out. The basic yes/no questions given earlier can sort out whether or not to suspect a PSU is going or has gone bad, but more testing should be done to verify these suspicions. The basic problems PSUs experience are overheating (caused by dust or fan failure), improper outputs, short circuits, open circuits, intermittent operation, and total failure. These can cause a variety of symptoms. Repairing a PSU is usually neither safe nor cost-effective, and is not recommended without proper knowledge, tools, facilities, and test equipment. It's safer, simpler, and cheaper in most cases to just swap the unit out with one known to be working. If this cures the problem, recycle your old unit and buy a new one. All that said, the simplest way to test a power supply unit is to either install it in a working system, or use a Power Supply Tester. These are available from many vendors online, and will provide enough load for the power supply to start up and indicate whether all the proper voltages are being produced. Some of the more sophisticated ones have LCD display panels built in, but most just have indicator LEDs that show whether supplied voltages are in the proper range for system operation. Power Supply Testers are not terribly expensive. If you do not have the luxury of having a spare system lying around, consider obtaining a tester and learning to use it safely. (Always follow the manufacturer's instructions.) If testing a PSU "on the bench" (outside the system case, or with a case cover removed), wear eye protection. If the PSU has been out of the case for more than five minutes without being connected to an AC outlet, it will be safe to plug the tester in per its included instructions. Once the tester is connected, plug the AC cord into the unit, and then into a power strip with a master ON/OFF switch. The unit should power up immediately, and the tester should begin indicating. More sophisticated testing is best performed by a qualified electronics technician, electrician, or computer systems technician. The results of a PSU tester, however, are enough to make a determination as to a PSU's functionality without need for these more expensive tests. Under no circumstances should non-technical persons open up a PSU. Stored internal voltages can linger for a very long time unless the unit is properly "safed" and grounded. The long and short of it: if the PSU is shown by a reliable PSU tester to have failed, replace it. Conclusions Power Supply Units for many different purposes are available at prices more reasonable than at any previous time. Many improvements have been made to design and features which make modern units more efficient, more stable, and less massive than previous models. We have explored the basics here in this article of how to select, remove, replace and test a Power Supply Unit in a modern computer. For those who want more information, the references following this paragraph are provided. I wish you every success in your computing endeavors! References
General Information
ATX Form Factor
Certifications
Other Form Factors
Tools DISCLAIMER: Inclusion of a product or service in these references does not constitute an endorsement, either of product, service, or vendor by the author of this article, and are intended to serve as examples of same in current use. Such products or services should be evaluated carefully by the reader to determine any suitability for a given purpose. |