| Previous
Page |
PCLinuxOS
Magazine |
PCLinuxOS |
Article List |
Disclaimer |
Next Page |
Xfce Power User Tips and Tweaks, File Utilities (Part 3)
|
|
by Paul Arnote (parnote) This month, we'll finish up our look at some Xfce file utilities tweaks. Last month, we featured the second part of the series, and the first part of the file utilities articles in the July, 2013 issue of The PCLinuxOS Magazine. Most of this month's file utilities center around working with ISO files. This includes utilities to check, compute and compare md5sum files. Convert Directory To ISO Let's allow our imaginations to run for a moment. Maybe you've just returned from a vacation of a lifetime, and you want to share your pictures with family and friends. Maybe you are getting ready to reinstall, and you need to backup certain files in your /home directory. Or maybe you have a really large collection of wallpaper files you want to share with your computer buddies. Whatever the case, this Thunar Custom Action is for you. 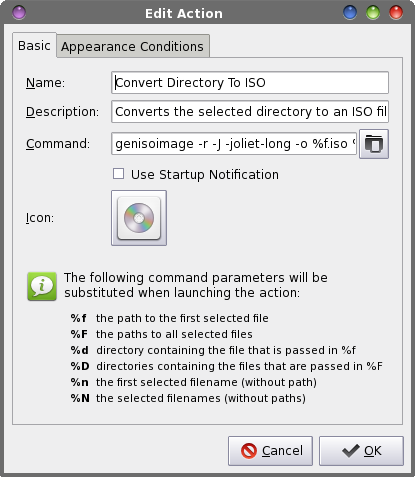 Enter genisoimage -r -J -o %f.iso %F | yad --progress --title="ISO Creation" --progress-text="Please wait ... File(s) being processed." --percentage=40 --auto-close --auto-killin the command line. (After all the articles in this series, you should already know the rest of the steps for creating a Thunar Custom Action.) Under the "Appearance Conditions" tab, leave the File Pattern set to the default value of *, and place a checkmark in front of Directories only. 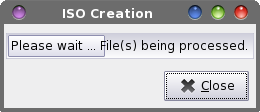 You can select one directory, or multiple directories. When you select "Convert Directory To ISO" from Thunar's right-click context menu, your selected directory/directories will be converted into an ISO file, ready to be burned to optical media. In the event that you selected multiple directories to be included in your ISO, the ISO file will be named after the first directory selected. However, all of the directories selected will appear within the ISO file. If you are seeking to fit files on a CD or DVD, you can select the directories, and then select "Properties" from the right-click context menu. Pay attention to the reported total file size. If your target medium is a CD, make sure the total file size is less than 700 MB. If your target medium is a DVD, make sure the total file size is less than 4.3 GB. In both cases, I'd recommend reducing those figures by about 3-5%. For whatever reason (byte alignment?), the ISO file will be slightly larger than the reported total file sizes of the directories by themselves. If nothing else, it'll give you a little "wiggle room," and help insure that your ISO file will fit onto the target optical medium. Burn ISO To CD Once you download your favorite PCLinuxOS Live CD or DVD, you will probably want to burn it to the appropriate optical medium. Who knows? You may even want to burn the ISO file we created in the previous Thunar Custom Action to optical medium. With this Thunar Custom Action, you can get busy burning your CD or DVD with two simple clicks of the mouse. 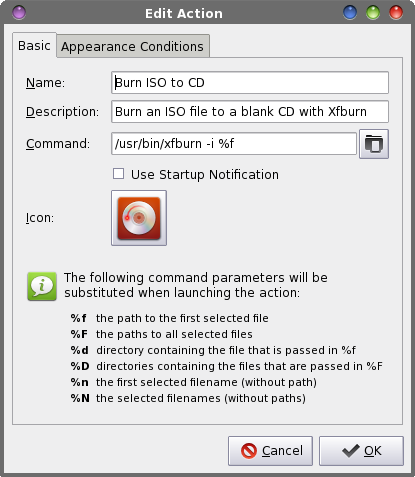 Enter /usr/bin/xfburn -i %f in the command line of the Edit Action dialog box. Under the "Appearance Conditions" tab, set the file pattern to *.iso;*.ISO, and place a checkmark in front of "Other Files." 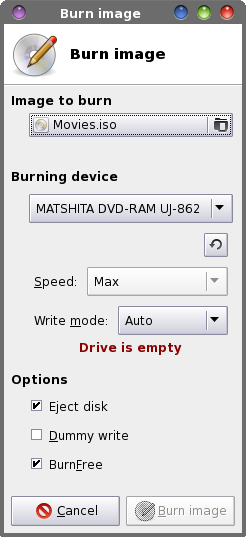 When you right click on an ISO file and select "Burn ISO To CD" from Thunar's right-click context menu, xfburn (Xfce's CD/DVD burner) will open, ready to burn the file to your selected optical medium. As an exercise, you can also perform something similar by creating a data disc compilation. Create a new Thunar Custom Action, with the command /usr/bin/xfburn -d %F (or you can use %N if you prefer). Under the "Appearance Conditions" tab, leave the file pattern set to the default value of *, and place a checkmark in front of every file type. Just select the multiple files you want to include on your data disc, then select your new Thunar Custom Action from Thunar's right-click context menu. Xfburn will open, prepped to create a data disc compilation, and automatically import all of your selected files. You can also do the same thing, but for creating an audio disc compilation. For an audio disc, your command will be /usr/bin/xfburn -a %N (or you can use %F, if you prefer). Under the "Appearance Conditions" tab, leave the file pattern set to the default value of *, and place a checkmark in front of "Sound Files." Just select the files you want to include on your audio disc, then select your new Thunar Custom Action from Thunar's right-click context menu. Xfburn will open, prepped to create an audio disc compilation, and automatically import all of your selected audio files. Convert IMG File To ISO Sometimes you might find a CD image file online, but it's stored in the *.img format. Fortunately, Linux has the tools to convert a *.img file to a *.iso file -- which we can work with. This Thunar Custom Action is for those files.  Enter ccd2iso %f `basename %f .img`.iso on the command line of the Edit Action dialog box. Under the "Appearance Conditions" tab, enter *.img as the file pattern, and place a checkmark in front of "Other Files." Notice that this will only match files with a file extension of "img" in all lowercase letters. If you download a file that has the file extension in all uppercase letters, rename the file to use all lowercase letters in the file extension before running this. To execute this Thunar Custom Action, right click on the *.img file, then select "Convert IMG File To ISO" from Thunar's right-click context menu. Once you've converted the *.img file to an ISO file, you can use the previous Thunar Custom Action to burn the new ISO file to the appropriate optical medium. Mount ISO OK ... it's time for another show of hands. How many of you had an ISO file lying around and wanted to see the files it contains? Well, this next Thunar Custom Action will help resolve your curiosity.  Enter gksu 'mkdir -p /mnt/%n' && gksu 'mount -o loop -t iso9660 %f /mnt/%n' && thunar '/mnt/%n'on the command line of the Edit Action dialog box. Under the "Appearance Conditions" tab, set the file pattern to *.iso;*.ISO, and place a checkmark in front of "Other Files." 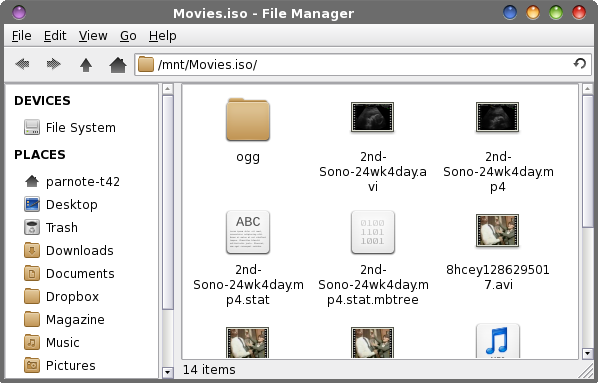 Now, whenever you want to take a peek inside an ISO file, simply right click on it and select "Mount ISO" from Thunar's right-click context menu. You will be asked to provide the root password -- twice -- and then the contents of the ISO file will be displayed in a new Thunar window. You can view those files just as you would any other file on your system. You can even copy them to your /home directory, if you choose. Unmount ISO Want to know something about that ISO file that you just mounted? This Thunar Custom Action allows you to unmount that ISO file, and remove all traces of it ever having been opened. 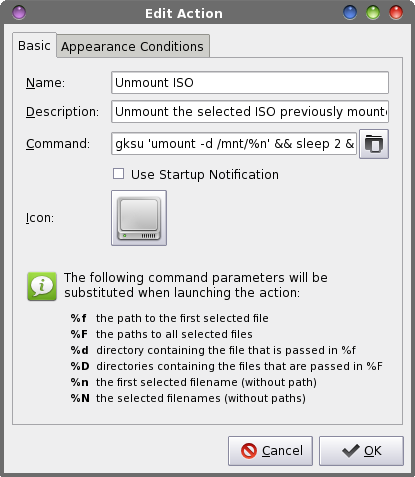 Enter gksu 'umount -d /mnt/%n' && sleep 2 && gksu 'rm -f -r /mnt/%n'on the command line of the Edit Action dialog box. Under the "Appearance Conditions" tab, enter *.iso;*.ISO as the file pattern, and place a checkmark in front of "Other Files." To unmount the previously mounted ISO file, you will need to back to the original ISO file in the first Thunar window and right click on the original ISO file. Select "Unmount ISO" from Thunar's right-click context menu. You will be prompted for the root password -- twice -- and the ISO file will be unmounted, and then all traces of the folder in the /mnt directory will be removed after a two second pause (to allow time for the ISO file to be properly unmounted). Compute md5sum Checksum When you are downloading or preparing to use an ISO file, one thing you should be doing is checking the integrity of the ISO file by checking the md5sum checksum. This Thunar Custom Action provides you one method of checking the integrity of the ISO file. 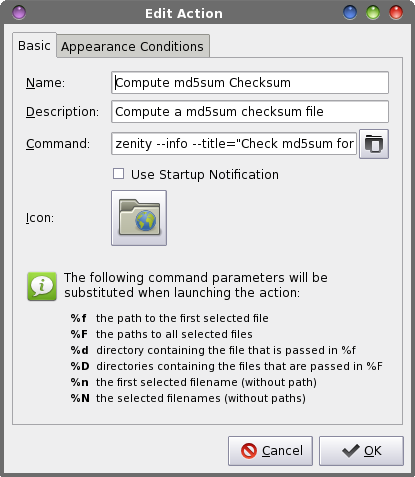 Enter zenity --info --title="Check md5sum for %n" --text="$(md5sum %n)" | zenity --progress --percentage="50" --auto-kill --auto-close --title="Checksum utility" --text="Calculating md5sum for %n"into the command line of the Edit Action dialog box. Under the "Appearance Conditions" tab, set the file pattern to *.iso;*.ISO, and place a checkmark in front of "Other Files." 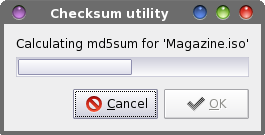 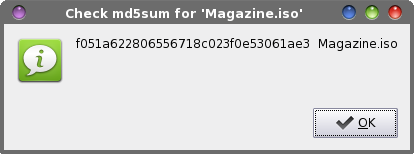 When you select an ISO file, then select "Compute md5sum Checksum" from Thunar's right-click context menu, you will first get a Zenity static progress bar while the md5sum checksum is being computed. This will be followed by a second Zenity dialog box that displays the md5sum checksum. While it's true enough that md5sum checksums can be used with any file, their use is most common with ISO files. You can modify this Thunar Custom Action easily enough to produce a md5sum checksum for any file on your system. Under the "Appearance Conditions" tab, simply change the file pattern back to the default value of *, and place a checkmark in front of every file type (except Directories ... I can't think of any reason to check the md5sum checksum of a directory). Create md5sum Checksum This Thunar Custom Action differs from the previous one in that it actually creates an md5sum checksum file, instead of just displaying it in a Zenity information dialog box. 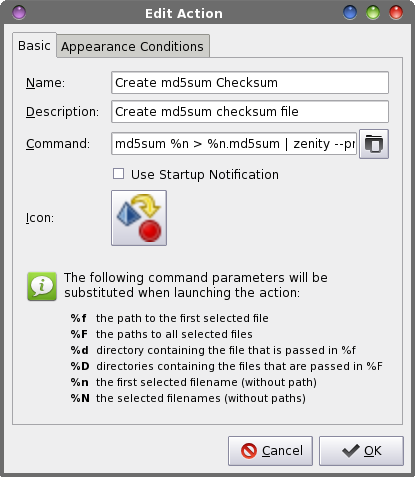 Enter md5sum %n > %n.md5sum | zenity --progress --percentage="50" --auto-kill --auto-close --title="Checksum utility" --text="Creating md5sum for %n"in the command line of the Edit Action dialog box. Under the "Appearance Conditions" tab, set the file pattern to *.iso;*.ISO, and place a checkmark in front of "Other Files." Like I mentioned when I talked about the previous Thunar Custom Action, you can expand the creation of md5sum checksums to all file types, if you want, by following the same directions I provided previously. Check md5sum This Thunar Custom Action is probably the most useful of all of the ones that work with md5sum checksums. It will compare your existing md5sum checksum to insure that it matches that generated from the original file. 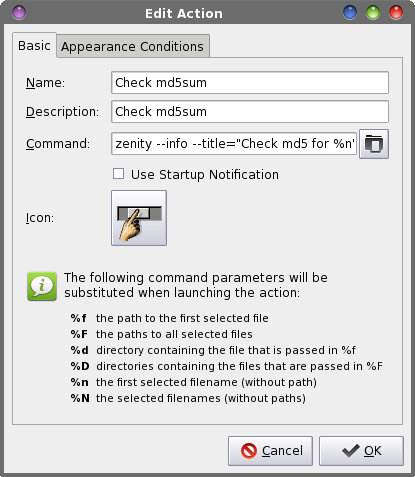 Enter zenity --info --title="Check md5 for %n" --text="$(md5sum -c %f)" | zenity --progress --percentage="50" --auto-kill --auto-close --title="Checksum utility" --text="Checking md5sum for %n"into the command line of the Edit Action dialog box. Under the "Appearance Conditions" tab, set the file pattern to *.md5sum, and place a checkmark in front of "Text Files" and "Other Files."  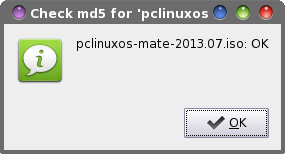  When you right-click on a *.md5sum file and select "Check md5sum" from Thunar's context menu, you will first see a static Zenity progress bar. If the md5sum file is correct for the associated file, you'll get a Zenity information dialog box that tells you that the md5sum file checks out OK. If the md5sum file is incorrect or doesn't match up with the associated file, you'll receive a Zenity information dialog box that tells you that the md5sum file has failed the check. Install RPM I save this one for last. WARNING: Remember that installing RPMs from outside the official PCLinuxOS repository may render your installation as unsupportable! As such, you are advised to NOT install outside RPMs. Proceed at your own risk! If you do install outside RPMs, you may not receive support via official PCLinuxOS support channels (such as the PCLinuxOS forum or the #PCLinuxOS-Support IRC channel). Now, with that out of the way, there may be times when you need to install an RPM. Hopefully, it's an "official" PCLinuxOS RPM. At this point, it's imperative to remind you that PCLinuxOS RPMs are created especially for PCLinuxOS, and their format may not be the same as RPMs for other distros. Thus, don't assume that a Fedora RPM, or an OpenSUSE RPM, or a Mandriva RPM, or a Mageia RPM will work under PCLinuxOS. Most likely, none of the above will work with PCLinuxOS -- except a PCLinuxOS RPM. There are many reasons why they won't work, and this topic is much more than we need to go into here. 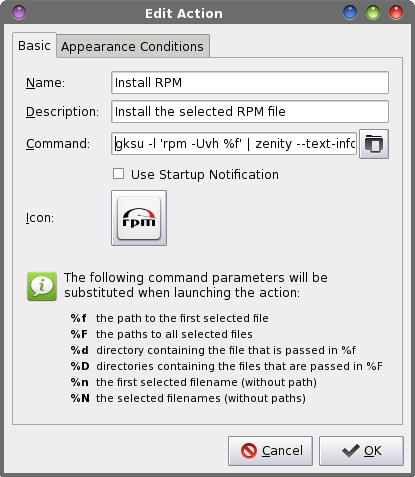 Enter gksu -l 'rpm -Uvh %f' > /home/your-user-name-here/tmp/rpm.txt' | zenity --progress --percentage="50" --auto-kill --auto-close --title="Install RPM" --text="Installing selected RPM file..." && zenity --text-info --title="Install RPM" --filename="/home/your-user-name-here/tmp/rpm.txt" --width=800 --height=250 && sleep 10 && rm -f /home/your-user-name-here/tmp/rpm.txtin the command line of the Edit Action dialog box. Under the "Appearance Conditions" tab, set the file pattern to *.rpm;*.RPM, and place a checkmark in front of "Other Files" for the file type. Let me explain what's going on here. First, we ask for the root password, and when supplied, the command to install the RPM is called. The output from the rpm command is written out to a temporary file (rpm.txt) in your /home/username/tmp directory. A static Zenity progress bar dialog box is displayed, to provide some visual feedback to let you know that "something" is happening. Once the rpm command has finished, the progress bar dialog box disappears, and a Zenity text-info dialog box is displayed, filled with the output from the rpm command. We issue a "sleep 10" command to allow time for the temporary file to be displayed, and we then delete that temporary file. You will need to change the command above to reflect your username on your computer. We cannot use ~/tmp (as you might think) because the information is written out to the root user's /tmp directory. As such, we have no file viewing or deletion rights, as a "normal" user, in the /root/tmp directory. By specifying the exact location of the temporary file, and locating it in your /home/username/tmp directory, we have full access to that file, both to display it and to dispose of it when we're done with it. Summary That wraps up the file utilities. I'm sure that you might be able to come up with or think of some other possibilities. If you come up with a Thunar Custom Action for a file utility, I'd love to hear about it. I can't possibly think of them all. We all come from different backgrounds, and as such, we all have different needs. Feel free to let me know via email, or send me a PM in the PCLinuxOS forum. Next month, I'll wrap up the Xfce Power User Tips, Tricks & Tweaks article series by taking a look at some miscellaneous tips. Some of them are ones that I either left out of previous discussions, or ones that I "discovered" after publication of the article to which they would have belonged. I'm also working on a special surprise for the final article in this series, so stay tuned! |