| Previous
Page |
PCLinuxOS
Magazine |
PCLinuxOS |
Article List |
Disclaimer |
Next Page |
Managing Running Processes From Terminal
|
|
by Antonis Komis (agmg) The Linux terminal has several useful programs and commands for managing the processes running on your system. In this article, we'll discover what a process is and list the most well-known commands that will allow you to view, kill or change the priority of a running process. What is a process? Every computer program is a collection of instructions, written to perform a specific task. When you run a program, the operating system loads it on RAM (Random Access Memory), in order for the CPU (Central Processing Unit) to access it and execute it. A process is an instance of a computer program that is currently being executed. It contains the program code and its current activity. Depending on the operating system, a process may be made up of multiple threads that execute instructions concurrently. In multitasking operating systems, multiple processes can share processors (CPUs) and other system resources. Multitasking allows each processor to switch between tasks that are being executed without having to wait for each task to finish. Depending on the operating system implementation, switches could be performed when tasks perform input/output operations, when a task indicates that it can be switched, or on hardware interrupts. top The top program provides a dynamic, real-time view of a running system. It displays system summary information (like uptime, cpu, memory and swap usage etc) and a list of the most CPU-intensive processes running on your system. The types of system summary information shown and the types, order and size of information displayed for tasks are all user configurable and that configuration can be made persistent across restarts. The top program is installed by default in PCLinuxOS and can be run by issuing the command top in your favorite terminal emulator. 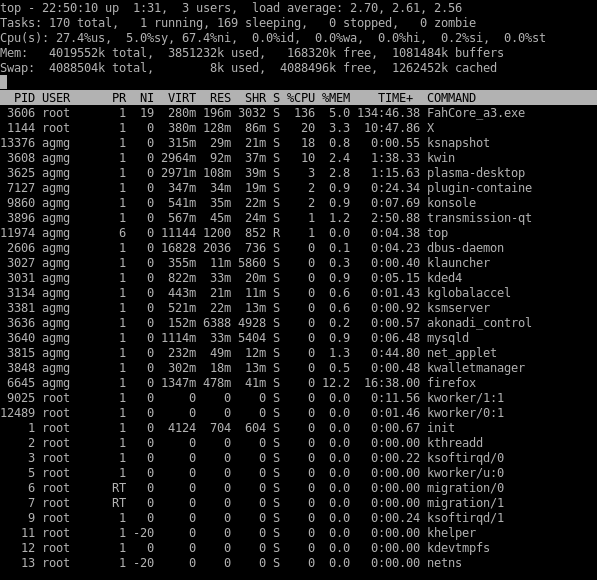
Let's have a more detailed look at this window. 
Information displayed: Second row: tasks 
Information displayed: Third row: cpu(s) 
Information displayed: Fourth row: memory usage 
Information displayed: Similar information is displayed in the fifth row but for swap (virtual memory)  The following rows constitute the list of the processes running on your system. Let's have a look at the Information that different columns provide:
- PID: Process Identifier The top program can be run with several command-line arguments: -d Specifies the delay between screen updates. You can change this with the s interactive command.-p Monitor only processes with given process id. This flag can be given up to twenty times. This option is neither available interactively nor can it be put into the configuration file. -q This causes top to refresh without any delay. If the caller has superuser privileges, top runs with the highest possible priority. -S Specifies cumulative mode, where each process is listed with the CPU time that it, as well as its dead children, has spent. -s Tells top to run in secure mode. This disables any interactive commands. -i Start top ignoring any idle or zombie processes. -C display total CPU states instead of individual CPUs. This option only affects SMP systems. -c display command line instead of the command name only. -H Show all threads. -n Number of iterations. Update the display this number of times and then exit. -b Batch mode. Useful for sending output from top to other programs or to a file. In this mode, top will not accept command line input. It runs until it produces the number of iterations requested with the n option or until killed. Output is plain text suitable for display on a dumb terminal. Several single-key commands are recognized while top is running (interactive commands). Some are disabled if the s option has been given in the command line. space Immediately updates the display. ^L Erases and redraws the screen. h or ? Displays a help screen giving a brief summary of commands, and the status of secure and cumulative modes. k Kill a process. You will be prompted for the PID of the task, and the signal to send to it. For a normal kill, send signal 15. For a sure, but rather abrupt, kill, send signal 9. The default signal is 15, SIGTERM. This command is not available in secure mode. i Ignore idle and zombie processes. This is a toggle switch. I Toggle between Solaris (CPU percentage divided by total number of CPUs) and Irix (CPU percentage calculated solely by amount of time) views. This is a toggle switch that affects only SMP systems. n or # Change the number of processes to show. You will be prompted to enter the number. This overrides automatic determination of the number of processes to show, which is based on window size measurement. If 0 is specified, then top will show as many processes as will fit on the screen; this is the default. q Quit. r Re-nice a process. You will be prompted for the PID of the task, and the value to nice it to. Entering a positive value will cause a process to be niced to negative values, and lose priority. If root is running top, a negative value can be entered, causing a process to get a higher than normal priority. The default re-nice value is 10. This command is not available in secure mode. S This toggles cumulative mode, the equivalent of ps -S, i.e., that CPU times will include a process's defunct children. For some programs, such as compilers, which work by forking into many separate tasks, normal mode will make them appear less demanding than they actually are. For others, however, such as shells and init, this behavior is correct. In any case, try cumulative mode for an alternative view of CPU use. s Change the delay between updates. You will be prompted to enter the delay time, in seconds, between updates. Fractional values are recognized down to microseconds. Entering 0 causes continous updates. The default value is 5 seconds. Note that low values cause nearly unreadably fast displays, and greatly raise the load. This command is not available in secure mode. f or F Add fields to display or remove fields from the display. o or O Change order of displayed fields. See below for more information. l toggle display of load average and uptime information. m toggle display of memory information. t toggle display of processes and CPU states information. c toggle display of command name or full command line. N sort tasks by pid (numerically). A sort tasks by age (newest first). P sort tasks by CPU usage (default). M sort tasks by resident memory usage. T sort tasks by time / cumulative time. W Write current setup to ~/.toprc. This is the recommended way to write a top configuration file. Using this command, next time top is started, it will use all configuration edits you've made (except those which -by design- can't be included in the configuration file).
You can find a lot more information about top in its man (manual) page: htop htop is an improved version of top. It gives you the ability to scroll the list, both vertically and horizontally, to see all processes and their command lines. Additionally, you can perform process-related tasks (kill, nice) without entering the PID of the process. 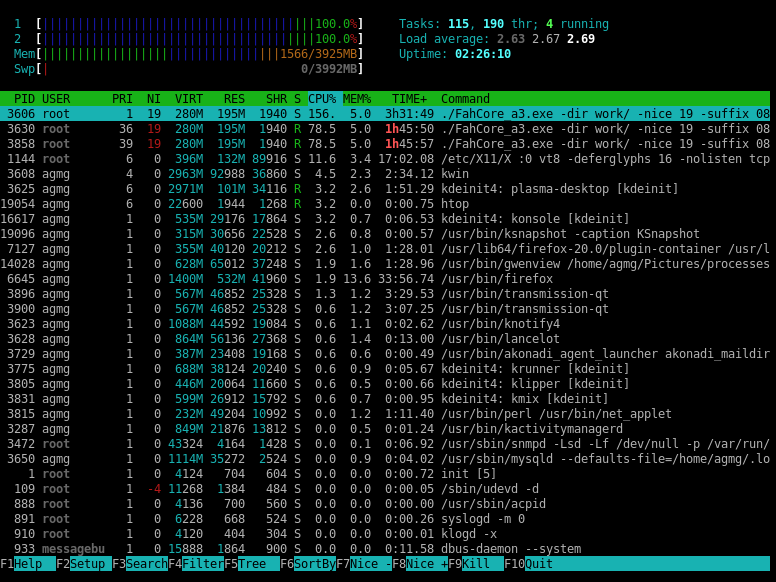 Let's have a look at the top section of this window:  This section provides information about CPU Usage (separate graph for each core), memory and swap usage as long as information about running tasks and system load and uptime. You can fully customize this section to display more or less information by pressing F2 (Setup). Below this section is the list of running processes which is similar to the one we saw previously on top. As mentioned earlier, you can use the arrow keys of your keyboard to navigate inside this list, both vertically and horizontally. htop also supports mouse interaction. The footer of this window displays the htop menu commands.  By pressing F1 you get a complete list of htop commands: 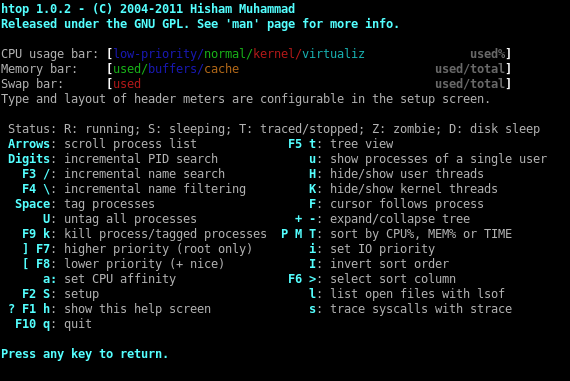 htop lets you, among other things, search for a specific process by its name, sort the process list by any field (CPU usage, memory usage etc) and select multiple processes to kill or increase/decrease their priority (nice). Like top, htop can also be run using command line arguments:
-d --delay=DELAY Delay between updates, in tenths of seconds ps The ps command is another way of displaying running processes from terminal. Typical syntax for the ps command is ps [options] Running ps without options, displays information about current terminal: 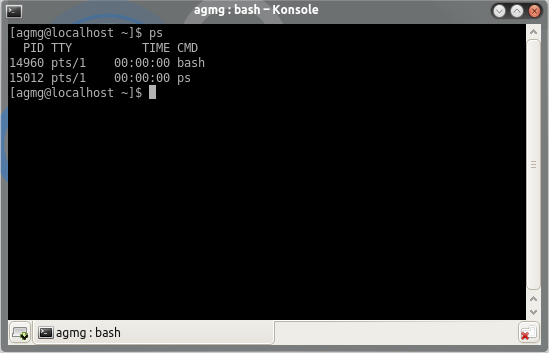 To display full information about each process currently running, type ps -ef 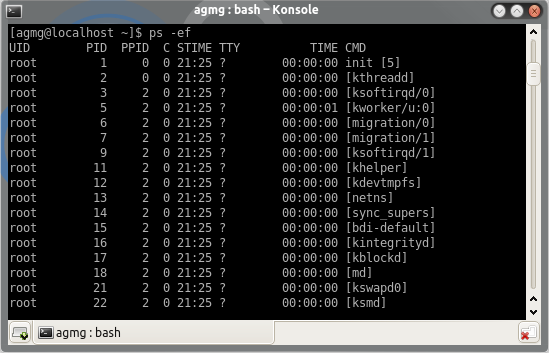
-e lists information about every process that is currently running 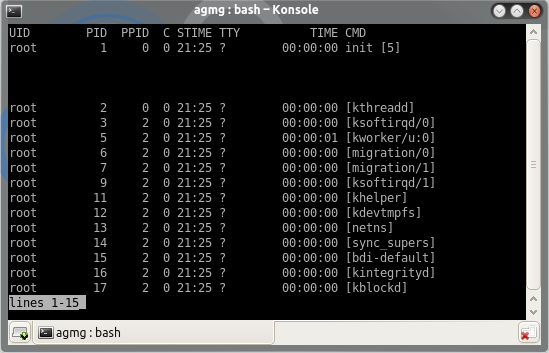
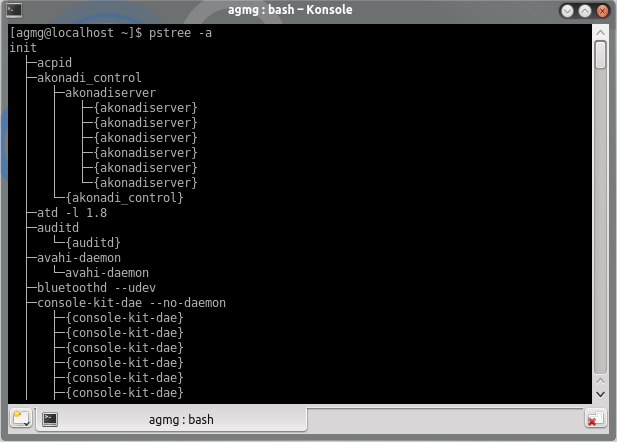
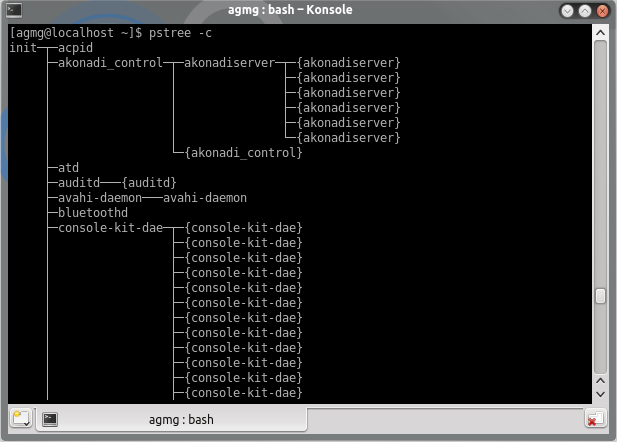
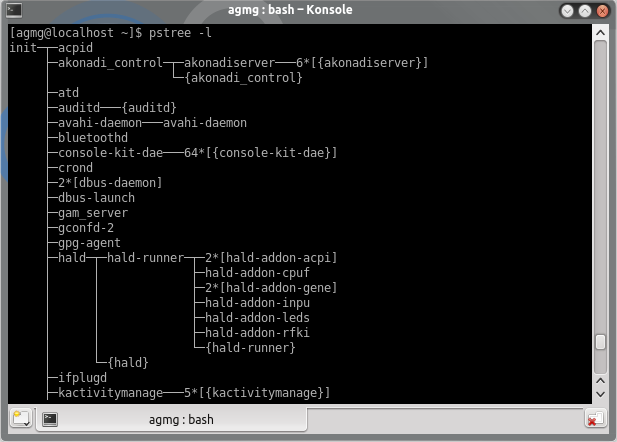
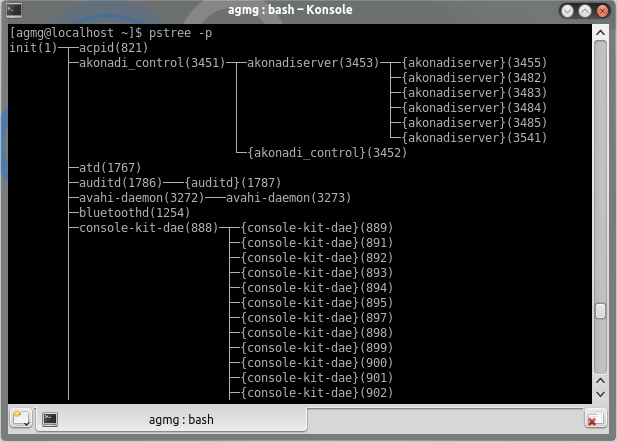
Press q to exit when you're done. 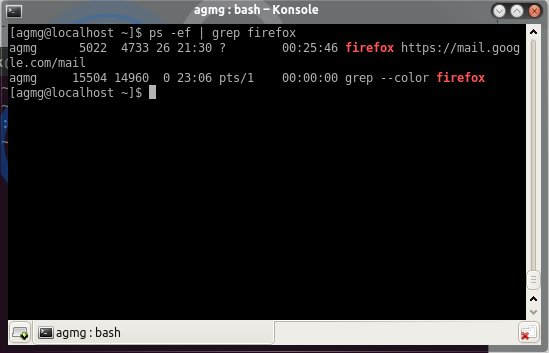 You can also view the process in long format using the -l option: 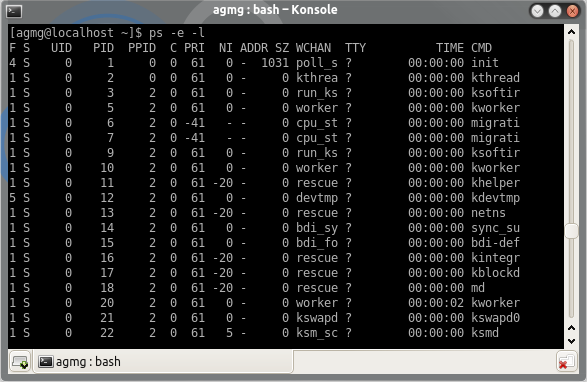 For a complete listing of the ps command options, you can consult its manual page: http://linux.die.net/man/1/ps pstree pstree is a command similar to ps but displays the process list using a tree view: 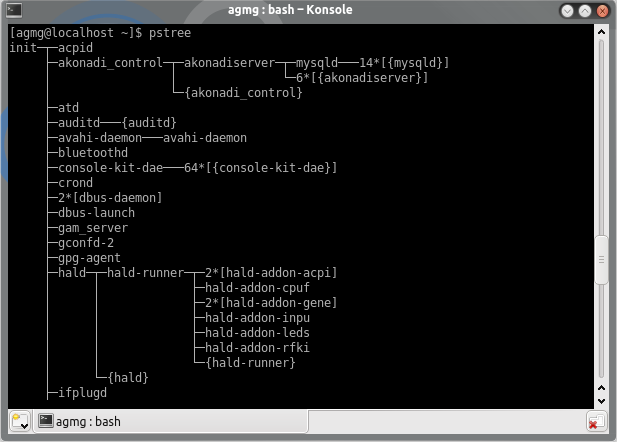
pstree also has several command line arguments. Let's have a look at some of them: pgrep The pgrep command searches the process table on the running system and prints the process IDs of all processes that match the criteria given on the command line. For example, if you want to find out the PID of Firefox, you must type pgrep firefox.  If you want to view the process name in addition to the process ID for each matching process, you can use the -l argument (long output):  Another useful argument which can be used in conjunction with -l, is -f which will display the full argument list of each matching process, as long with its PID: 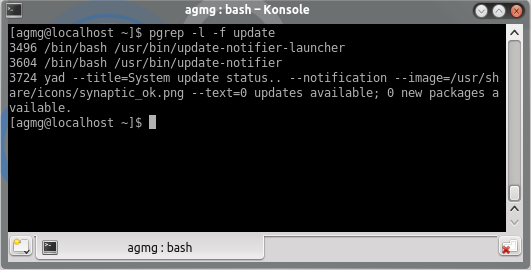 The -n argument will select only the newest (most recently started) of the matching processes (in the example is used in conjunction with the -l argument):  The -o argument will select only the oldest (least recently started) of the matching processes (again, in the example, it is used in conjunction with the -l argument):
More information on pgrep and its options can be found in its manual page: http://www.lehman.cuny.edu/cgi-bin/man-cgi?pgrep+1 pkill, killall, kill All of the above commands can be used to send any signal to a process, each one in a different way, but are mostly used to terminate (send TERM signal - SIGTERM - Value 15) or forcibly kill a stubborn process (send KILL signal - SIGKILL - Value 9). The TERM signal is the default signal sent by these commands to the specified process. For more information about Signals in Linux, please visit this page: http://man7.org/linux/man-pages/man7/signal.7.html Using pkill pkill can kill a process using its name. For example if you want to kill the Firefox process, simply type pkill firefox Note that pkill will kill every process that includes "firefox" in its name. You can view which processes they are, by using the pgrep -l firefox command described previously.
The default signal that pkill sends to a process is the TERM (terminate) signal. You can change that by issuing the command with the -signal argument. The signal may be specified either as a name (with or without a leading SIG), or numerically. For example, if you want to forcibly kill Firefox, you can type
Using killall killall works in similar way with pkill but by default it requires the precise process name. So, if you type killall firefo, you'll see the following error: 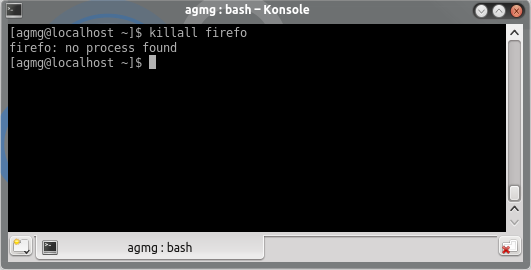 killall also sends the TERM signal by default. You can change that by using the -s argument, which (like with pkill) can be either the name of the signal (with or without a leading SIG) or its value: 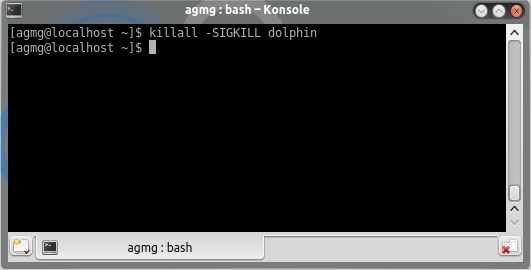 Using the -v argument will instruct killall to report if the signal has been successfully sent: 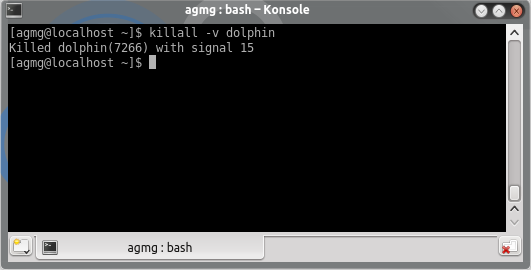 More information on killall and its options can be found in its manual page: http://linux.die.net/man/1/killall Using kill kill sends a signal to a process using its PID. Again, the default signal sent is TERM but you can change it like with pkill or kill (using the -s argument). It's the least convenient way because you have to know the process ID before issuing the command. You can use any of the top, htop, ps or pgrep commands described above to find out the PID of the process you want. 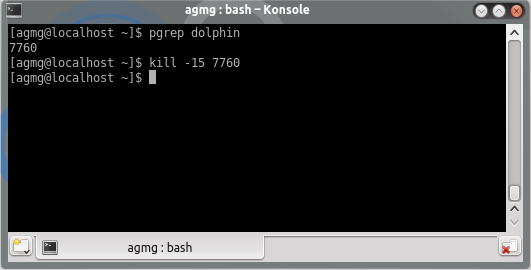 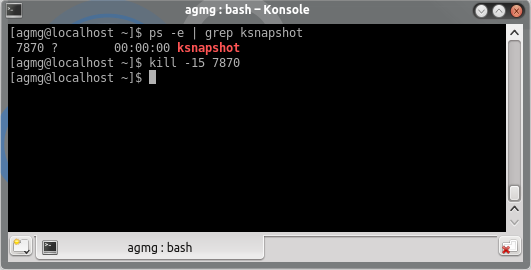 Again, if you want more knowledge about kill, don't hesitate to read its manual page: http://unixhelp.ed.ac.uk/CGI/man-cgi?kill nice & renice The above commands are both used to change the priority of a process. But what is process priority? When talking about processes, priority is all about managing processor time. Instead of technical stuff, let me give you an example. Let's say you're surfing the internet while listening to your favorite mp3 files. What a great time to combine all the videos you took on your last vacation to a larger one, using your favorite video editor. At some point, while surfing, listening to your music and encoding your videos, you are starting to experience slowdowns in your browser or small pauses on the mp3 playback. This happens because the third task you have assigned to your computer, the video encoding, is taking too much of your system resources, putting your other tasks in the back burner. If you don't mind your video to finish a couple of hours later, you can tell your processor to give less attention to this task and more to your surfing and listening to music (this is just a fictional example but I hope you get the picture). In Linux we can set guidelines for the CPU to follow when it is looking at all the tasks it has to do. These guidelines are called niceness or nice value. The Linux niceness scale goes from -20 to 19. The lower the number the more priority that task gets. If the niceness value is a high number like 19 the task will be set to the lowest priority and the CPU will process it whenever it gets a chance. The default nice value is zero. By using this scale we can allocate our CPU resources more appropriately. Lower priority programs that are not important can be set to a higher nice value, while high priority programs like daemons and services can be set to receive more of the CPU's focus. You can even give a specific user a lower nice value for all of his/her processes so you can limit their ability to slow down the computer's core services. The nice command is used to run a command with an adjusted scheduling priority. On the other hand, the renice command is used to change the priority of an already running process. The process will use the modified priority for as long as it runs. It will return to its default priority once it's shut down and started again.
The syntax of the nice command is: nice [OPTION] [COMMAND [ARG]...]
The renice command alters the scheduling priority of one or more running processes. The following who parameters are interpreted as process ID's, process group ID's, user ID's or user names. The renice'ing of a process group causes all processes in the process group to have their scheduling priority altered. The renice'ing of a user causes all processes owned by the user to have their scheduling priority altered. By default, the processes to be affected are specified by their process ID's.
The following options are available: 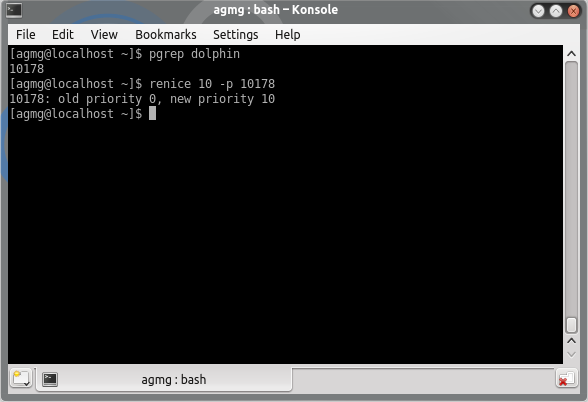 If you try to raise the priority of a certain process that is not owned by you, you will get a "operation not permitted" message. Only a superuser can raise any process priority. Users other than the super-user may only alter the priority of processes they own, and can only increase their "nice value" within the range 0 to PRIO_MAX (20). 
For more information on these two commands you can consult the manual pages. xkill xkill is a command for forcing the X server to close connections to clients. This program is very dangerous, but is useful for aborting programs that have displayed undesired windows on a user's screen. xkill is not installed by default in PCLinuxOS. To install it, open Synaptic Package Manager and search for xkill. If the xkill is issued without a command line argument, it will display a special cursor (a skull) with which you should select a window to be killed. Click on the application which you want to abort forcefully or select the X window/application whose client you wish to kill with the left mouse button. If a pointer button is pressed over a non-root window, the server will close its connection to the client that created the window. If you change your mind, you can click the right mouse button to abort.
You can use xkill with the following command line arguments:
When you type xwininfo in terminal, the mouse cursor will change to a cross, allowing you to select the window that you want to get information on. 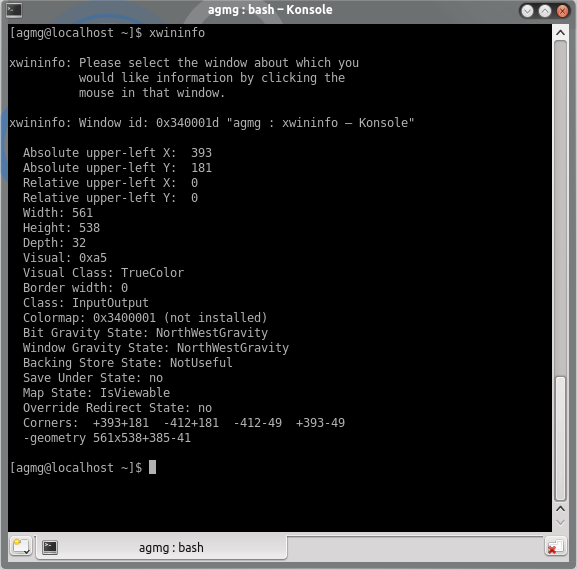 The Window ID is the information we need. The command to kill the desired window, would therefore be: xkill -id 0x340001d You can find the xkill manual page either by typing man xkill in terminal or by visiting the following page: http://www.manpagez.com/man/1/xkill/ |