Windows Migration: Live Session & Installation
by agmg (Antonis Komis)
In a previous article, you have learned how to download, verify and create a CD, DVD or a USB with PCLinuxOS. In this article, you will use this medium to install PCLinuxOS to your hard disk, either by creating a dual boot system (thus, keeping your existing Windows installation), or by completely wiping your disk and installing only PCLinuxOS to it. But before doing that, how would you like to try the new operating system without making any changes to your computer? Sounds interesting? Keep on reading.
LiveCD
A LiveCD is a complete, bootable operating system that runs in the computer’s memory (RAM) without the need of a hard disk drive. Although this term is used to describe all types of “live” operating systems, the medium is not limited to a CD. You can have a LiveCD running from a DVD, a USB flash drive, an external hard disk or even a flash card, as long as your computer supports it. The main purpose of a LiveCD is to allow you to experience and evaluate an operating system before installing it, but can also be used to repair corrupted or infected Windows installations, backup files from a dying system and much more. A normal Windows CD or DVD can’t offer you these possibilities.
In this section of the article we will cover just the basics: boot from a PCLinuxOS LiveCD to a complete desktop, connect to the internet, install a couple of programs and experience it before deciding whether or not to install it.
NOTE: The screenshots were taken from a PCLinuxOS KDE 2012.08 LiveCD but they apply to every version of PCLinuxOS.
One thing you should keep in mind is that a normal LiveCD can’t save files or customizations you make during the live session. Once you reboot your computer, everything will return to its previous state. There is an option to create a LiveCD that can save files and remember your preferences. It is called “persistence.” We will discuss this option later in this article. For now, insert your LiveCD medium to your computer, reboot, and be sure to select that medium as your boot device. You will see a screen similar to this:

The LiveCD option will be selected (highlighted) by default. Before booting, if you wish to change the language to one other than American English, press F2 and select a language. If you wish to change the screen resolution from 800x600 to another, press F3. If you have changed any options, select the LiveCD option and press ENTER. Otherwise, simply wait for the live session to load. It may take some time because the whole operating system is loading to the computer memory. The procedure also depends on the read speed of the CD/DVD/USB. Once done, select your keyboard layout and you will be presented with the PCLinuxOS desktop.

The default KDE LiveCD desktop
One of the first things you might want to configure in your live session is your internet connection. This will allow you to surf, check your emails, watch online videos and install new programs through PCLinuxOS’ package management software, Synaptic. In the lower right corner of the desktop, you can see the notification area showing the status of your network connections, system volume, removable devices and other notifications. If you are using an ethernet connection to access the internet, then it will most probably have already been automatically configured. If you have a green check mark, then you’re good to go. If you see a red X mark, it means that your network connection isn’t configured properly.
If you are using an ethernet connection and still see a red X mark, the best thing to do is visit the official PCLinuxOS forum (www.pclinuxos.com/forum) to get more help. If the connection is wireless, then you need to enter your wireless network security key before you can access the internet. To do that, left click on the Network Manager to view your network connections.
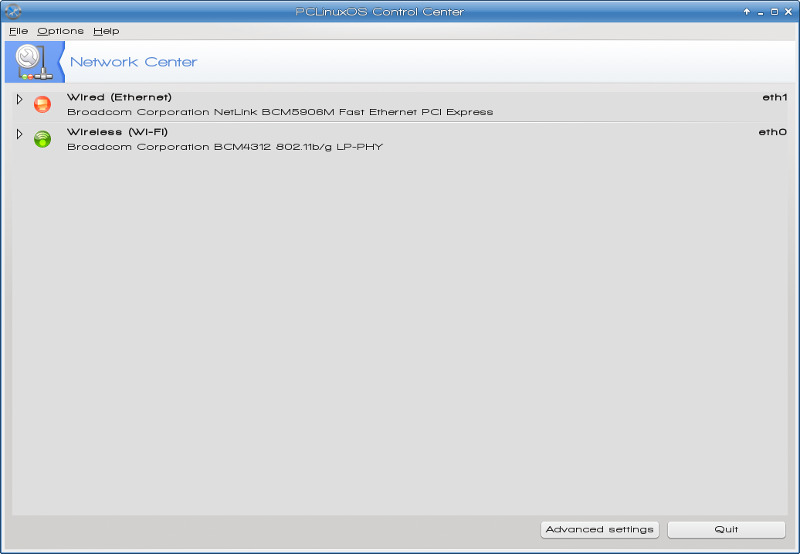
By pressing “Configure” you can view your connection’s settings and set a security key if your connection needs one. If you can’t see any network connections in this window, then your network adapter may not be configured properly. (Again, visit the forum for more help).
If you like, you can have a look at PCLinuxOS’ package management program, Synaptic. You can find it in the taskbar or in the menu under Software Center. Synaptic is the proper way to install and remove programs and keep your system up-to-date.
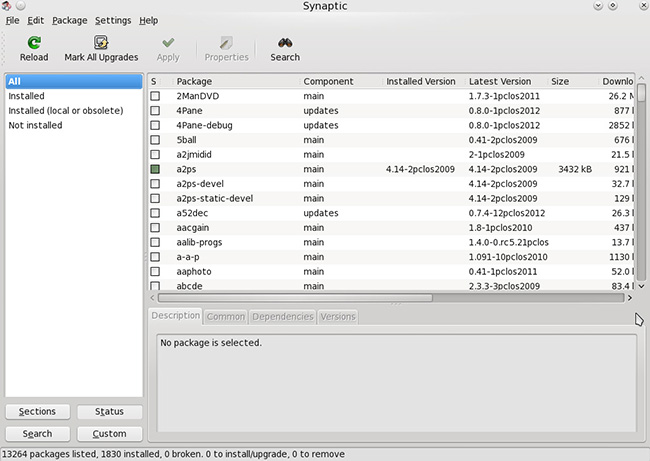
Synaptic Package Manager
Click “Reload” to refresh the package list and then “Mark All Upgrades” to update your live session. Feel free to explore the available choices, install some programs and get familiar with software management. Don’t be afraid. If something goes wrong, you can always start a fresh live session. Nothing will be changed on your computer and no one will get hurt.
Last but not least, you can use your current live session to create a new LiveCD on a USB flash drive or hard disk using a program designed specifically for PCLinuxOS, the PCLinuxOS LiveUSB Creator. You can find it in the programs menu under More Applications -> Configuration. This tool will also allow you to create a Live USB with persistence which will save your files and preferences even after a reboot, provided there is enough disk space on the drive. This way you can have a live system on which you can install the programs you prefer, keep it updated and use it on any computer you want. Practically a whole operating system in your pocket!
Creating a LiveUSB with persistence (quick guide)
1. While in the live session, insert a USB drive. Ignore the Device Manager pop-up.
2. Navigate to More Applications -> Configuration -> Configure Your Computer (or press the corresponding icon in the panel).
3. Navigate to Local Disks -> Manage Disk Partitions.
4. Select your USB drive from the tabs.
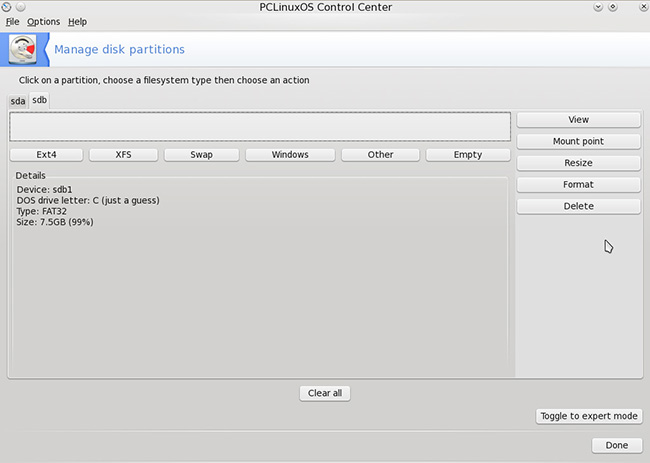
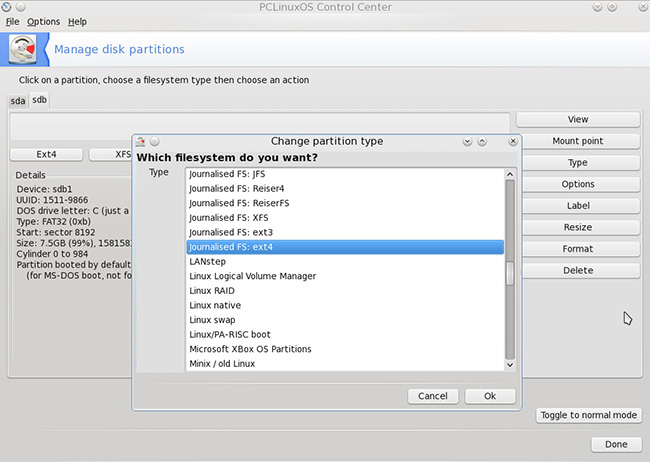
5. Press “Toggle to expert mode”.
6. Select “Type”. From the window that pops up select an ext filesystem (most commonly ext4 or ext3).
7. Back in the main window, press “Format” to format the drive with the new filesystem.
8. When formatting is finished, press “Done”, remove the drive and close all windows.
9. Again, navigate to More Applications -> Configuration -> PCLinuxOS LiveUSB Creator.
10. After the welcome screen, you will be asked if you want to run the script as root. Select “Yes” and type the root password of the live session, which is “root”.
11. Plug in your USB drive when prompted.
12. The script will scan the drive and present a window with information about the partitions that are currently on the disk.
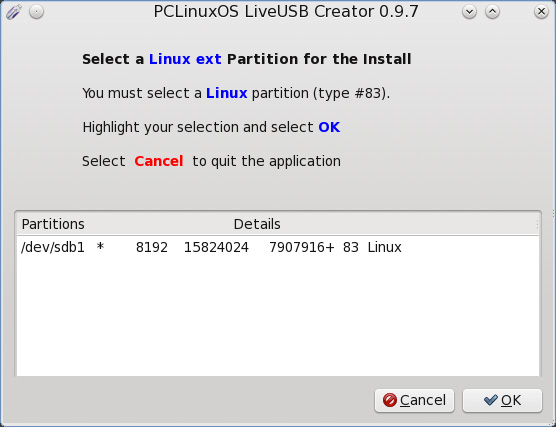
13. Select the desired partition and press “OK”.
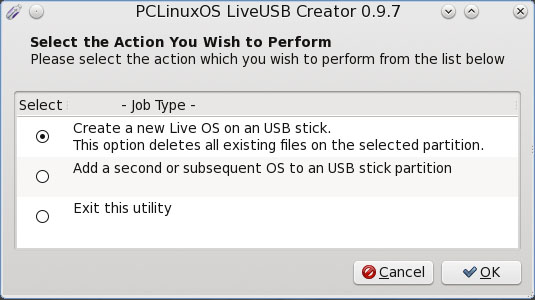
14. The next window will ask you whether you want to create a new Live OS on the USB drive or add a second or subsequent OS to it (if there is already one or more OS). This is the first time we use this tool so select the first option.
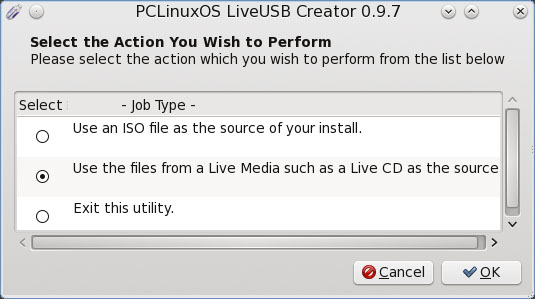
15. In the next window select the second option to use the files of the Live CD or USB from which the live session is running.
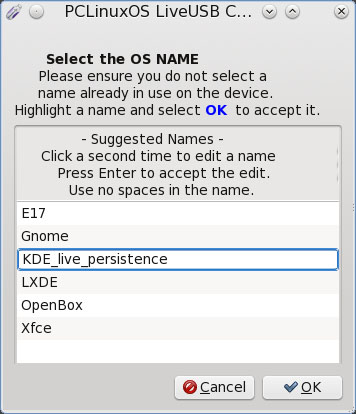
16. Give a name for your LiveUSB and press “OK”.
17. The script will then ask you to locate the file livecd.sqfs. From the window that pops up, select “File System” (from the “Places” pane on the left) then navigate to initrd -> cdrom and select the file livecd.sqfs.

18. Confirm your selection and let the script finish.
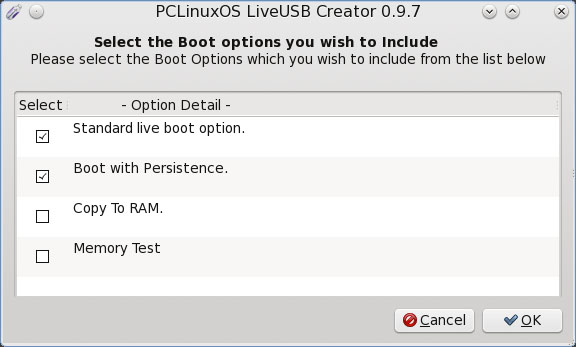
19. In the next confirmation window you will be asked about the Boot options. The “Standard live boot option” will be selected by default. To enable persistence you have to select also “Boot with Persistence”. The option “Copy to RAM” will load the whole operating system (making it faster provided you have enough RAM available) while the option “Memory Test” will add an entry for memtest (memory testing program) in the boot menu.
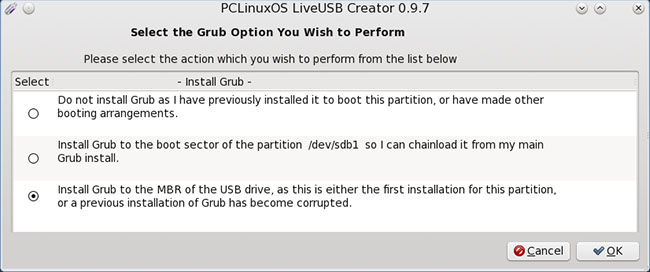
20. The final screen is about the GRUB options. If this is the first installation to the USB drive, select Install Grub to the MBR. If you are managing your own bootloader, select one of the other two options, depending on your preference.
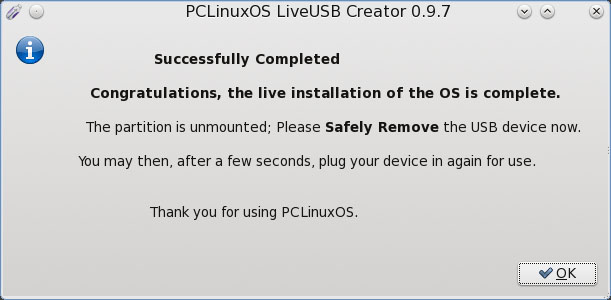
Congratulations! You now have a PCLinuxOS LiveUSB with persistence enabled.
When you feel ready and have decided to install PCLinuxOS on your hard disk proceed to the next section of this article.
Installation
Before proceeding with the installation, you must decide if you want to keep your existing Windows installation, or whether to completely wipe the disk and only have PCLinuxOS installed on it. The first scenario is known as “dual boot,” and will allow you to select during boot which operating system you want to use. This is the most common scenario for users who are making their first steps in the Linux world because it gives the ability to explore Linux and come back to Windows anytime you feel like or need to. This is the scenario we are going to cover in this article. If you are planning to completely remove Windows from your disk, you can go straight to “Step-by-step installation”.
Preparing your hard disk
We will use a Windows 7 installation as an example for the illustrations. The Disk Management software can also be found in Windows XP and Windows Vista. You can also use third-party partitioning software for this job. A very nice program which has a free version for home use (and I personally recommend) is EASEUS Partition Master Home Edition
For Windows XP:
Navigate to Control Panel -> Performance and Maintenance -> Administrative Tools -> Computer Management -> Disk Management
For Windows Vista/7
Navigate to Control Panel -> System and Security -> Administrative Tools -> Computer Management -> Disk Management
Because the FAT32 and NTFS file systems are so prone to fragmentation, it’s strongly recommended that you defragment your Windows drive before proceeding. Some recommend running the defrag program three (3) times, consecutively. This will help insure that you don’t experience any data loss with your Windows files.
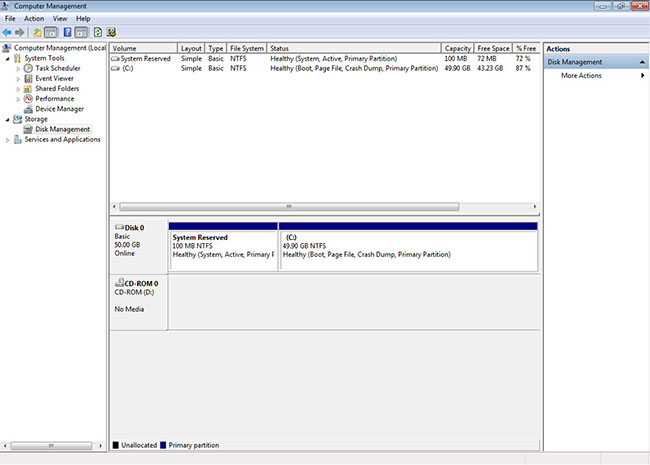
In this window you can see all the disks and their partitions. In the example, we have a 50 GB hard disk containing 2 partitions: the first one has a size of 100MB (System Reserved) and is always created during Windows 7 setup for system use. This partition has to be intact to ensure the flawless operation of Windows. The second one (C:) has 49.90GB size and is the main partition where Windows and programs are installed. We will reduce the size of this partition and make space to install PCLinuxOS. Select this partition, right click on it and select “Shrink”. You will get to the next screen.

This window shows the total size of your partition and the size of the available shrink space. There is no magic recipe about how much space you should spare for your PCLinuxOS installation. It depends on the size of your disk and the files on it (which in turn defines the available shrink space) and how you are planning to use Linux (more programs and files, mean more space). In general, Linux uses much less space than Windows and separates installation files and applications (root partition or /) from users files (home partition or /home). In this example, I will use all the available space (around 25GB) with a plan to devote 8GB for the root partition (installation and applications), 2GB for /swap (virtual memory) and the rest for /home (for personal and configuration files). Select the desired size and press “Shrink”.
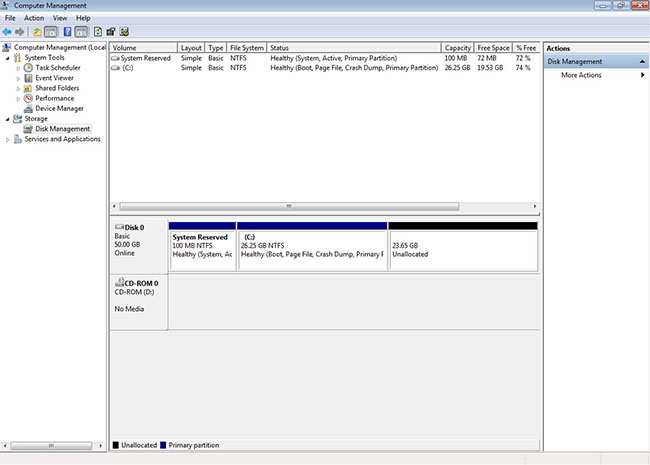
Now there is one more partition in your hard disk that reads “Unallocated.” This means that it hasn’t been formatted with a file system yet, so it’s just unused space (that’s why there is no drive letter for it). We are done here. It is time to go back to our Live CD/DVD/USB and install PCLinuxOS. Don’t worry, it’s as easy as 1,2,3!
Step by step installation
Before rebooting, ensure that you have inserted your Live CD/DVD/USB and your computer is set to boot from it. When the boot menu appears, select “Install PCLinuxOS” to begin the installation wizard. Of course, you can start a live session as discussed in the beginning of this article and then proceed with the installation by clicking on the “Install PCLinuxOS” icon on your desktop. I suggest you select the US Keyboard for the installation (you can change it later and add new layouts very easily).
NOTE: The screenshots were taken from a PCLinuxOS KDE 2012.08 installation but the wizard works in the same way for every version of PCLinuxOS.
The first screen you will see will look like this:
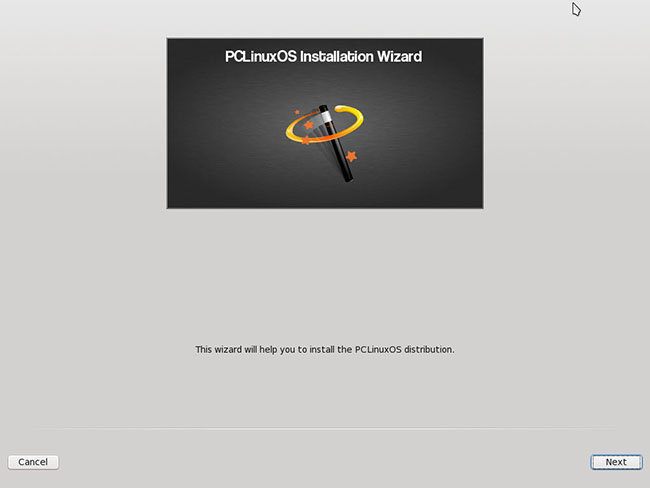
Press “Next” to get to the next screen:

This screen is similar to the one in Windows Disk Management. It shows all the available disks and their partitions and presents the installation options. I will explain each one of them:
Use free space
This option will use the partition we created earlier and will create 3 new partitions: one for root (/), one for swap (/swap) and one for home (/home), depending on your partition’s size and your computer’s available memory (RAM). This option is recommended if you are not very familiar with partitioning.
Use the free space on a Microsoft Windows partition
This option is used to create a partition in the free space of an existing Windows partition. We won’t use this option as we have already prepared a partition for our PCLinuxOS installation.
Erase and use entire disk
Self-explanatory. Windows will be deleted from the disk and all free space will be used by PCLinuxOS.
Custom disk partitioning
This option is the most advanced and gives you absolute control over the partitioning procedure. We will have a more thorough look at this option right away.
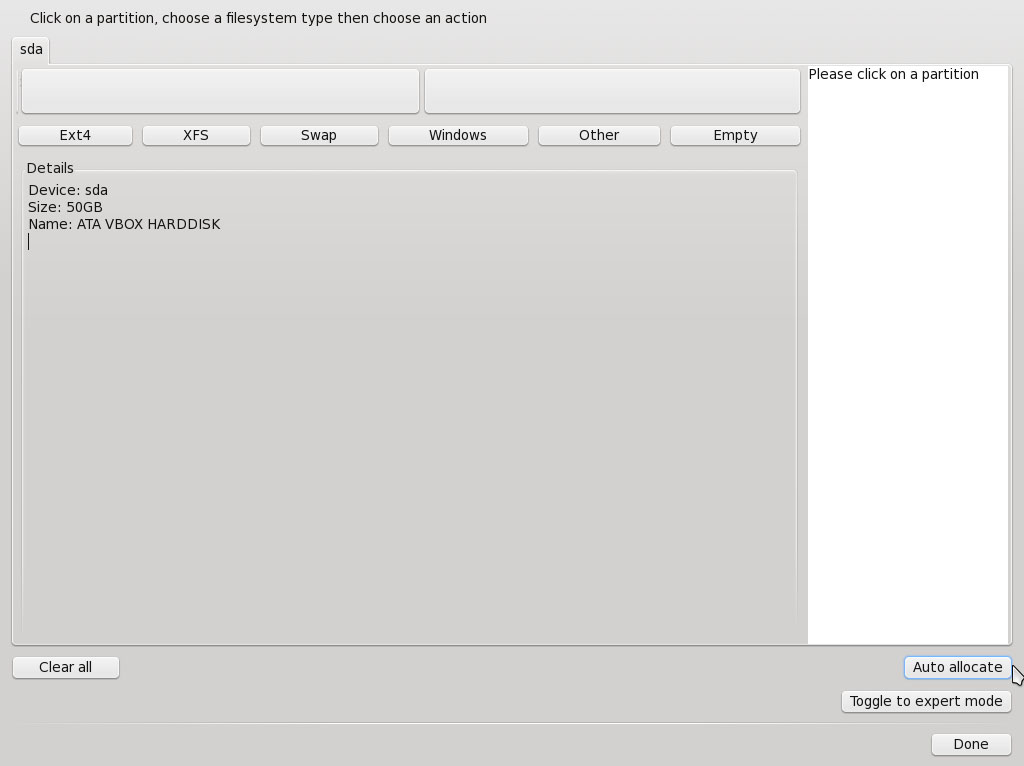
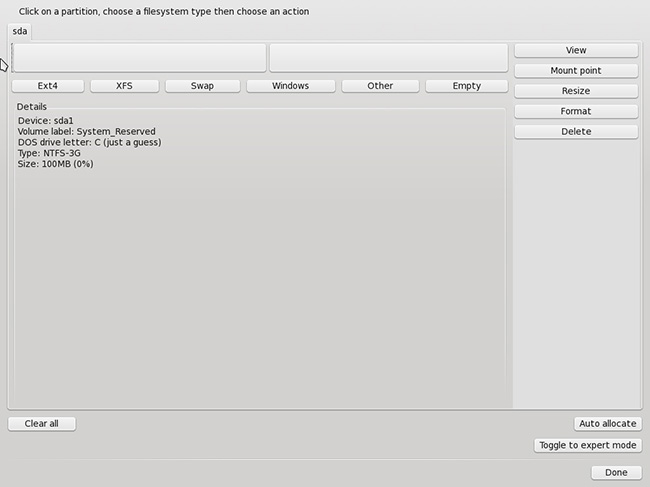
In this screen we can see all the partitions we have previously created. If you click in each partition, you will get detailed information about that partition. The first partition on the left is the Windows system partition (100 MB). It is showing as a thin line because its size is very small compared to the other two.
The next partition is the main Windows partition.
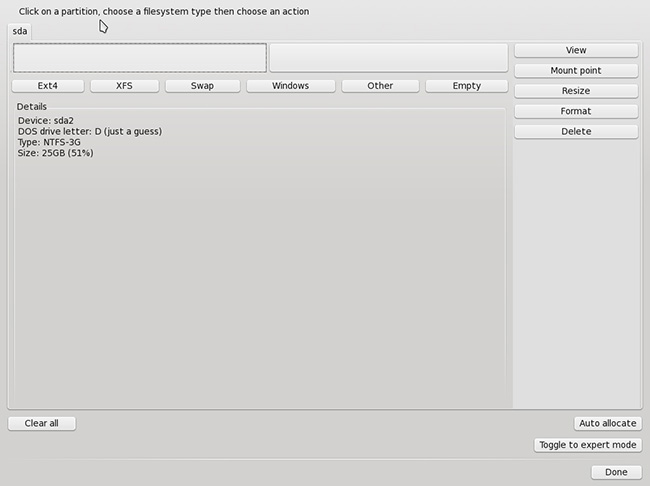
The last partition is the one we created for PCLinuxOS and this is the one we will work on.
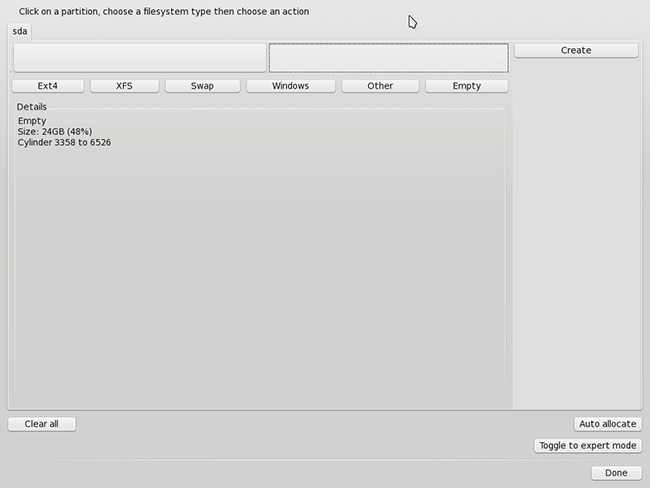
You can see that this partition is empty and its size is 24 GB. If we click on Auto Allocate, the setup wizard will automatically create the partitions in a way similar to the option “Use free space” in the previous screen.
CAUTION: selecting this option and then pressing “Done” can’t be reverted.
EXTREME CAUTION: If you click on “Clear all” all the partitions will be removed and all data on the disk will be lost!
Select Create to move on to the next screen.
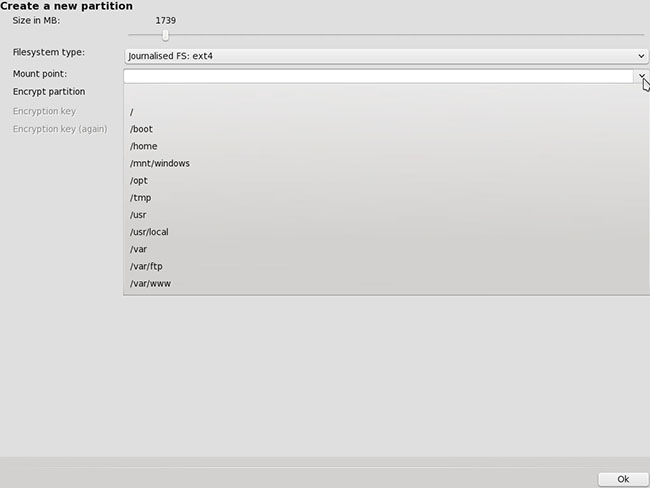
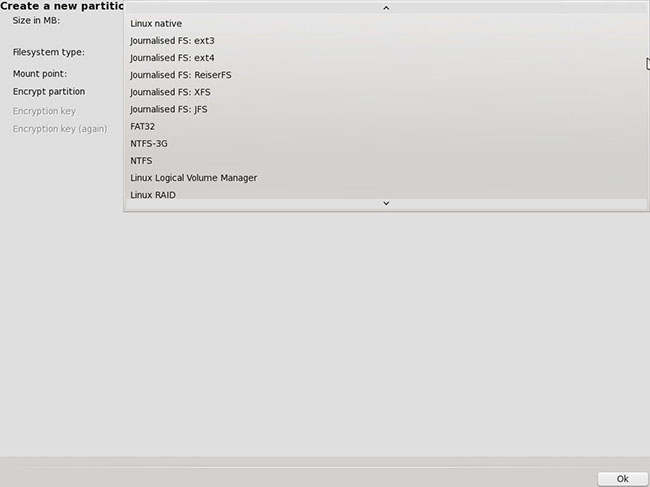
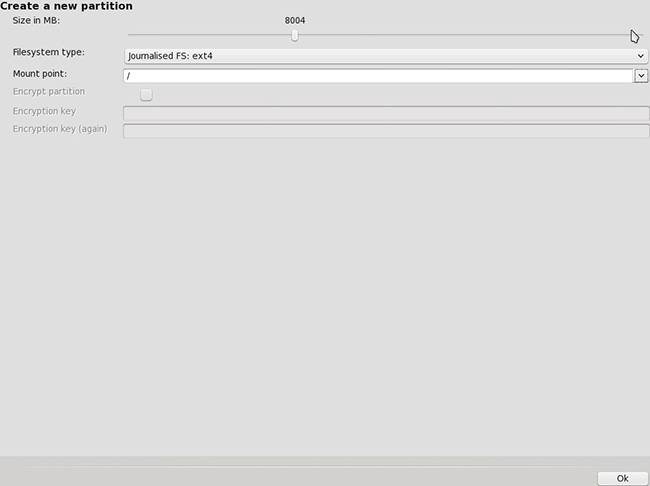
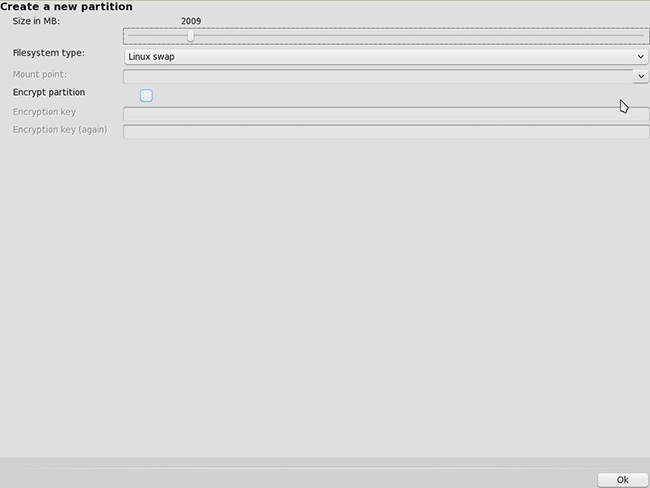
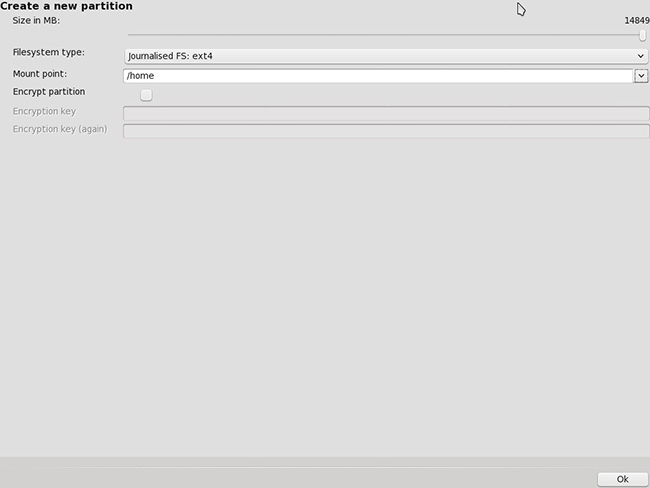
In this screen you have the option to set the size of your Linux partition, its filesystem type and its mount point. You can also set disk encryption if you need to.
If you decide to manually set your partitions, you should do a further reading about the Linux filesystem and the definition of a mount point to fully understand what you are doing. Some links that might help:
Linux Filesystem explained:
Linux Mount Point:
http://www.linfo.org/mount_point.html
Types of Linux filesystems:
http://www.kernel.org/doc/man-pages/online/pages/man5/filesystems.5.html
For the purpose of this article I will create three partitions to use as mount points for root (/), swap (/swap) and home (/home).
This is how our partitions will look in the end:
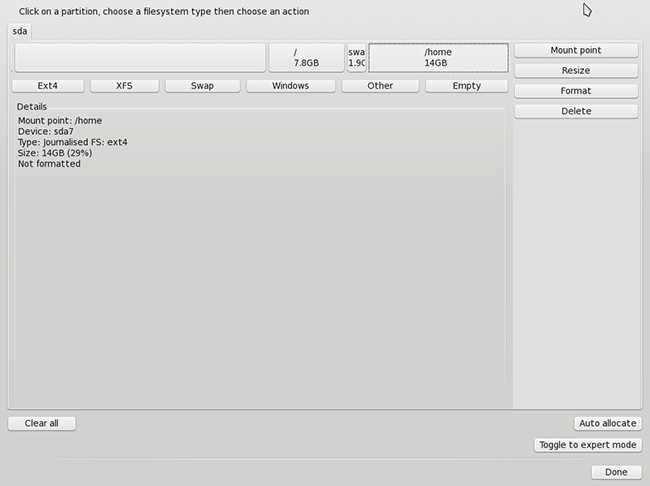
If you are not satisfied with the partitioning result, you can delete the partitions and create new ones or resize them according to your needs. Just remember to always select the partition you have created for this purpose and don’t make any changes to the Windows partitions.
When you are ready to proceed, click “Done”.
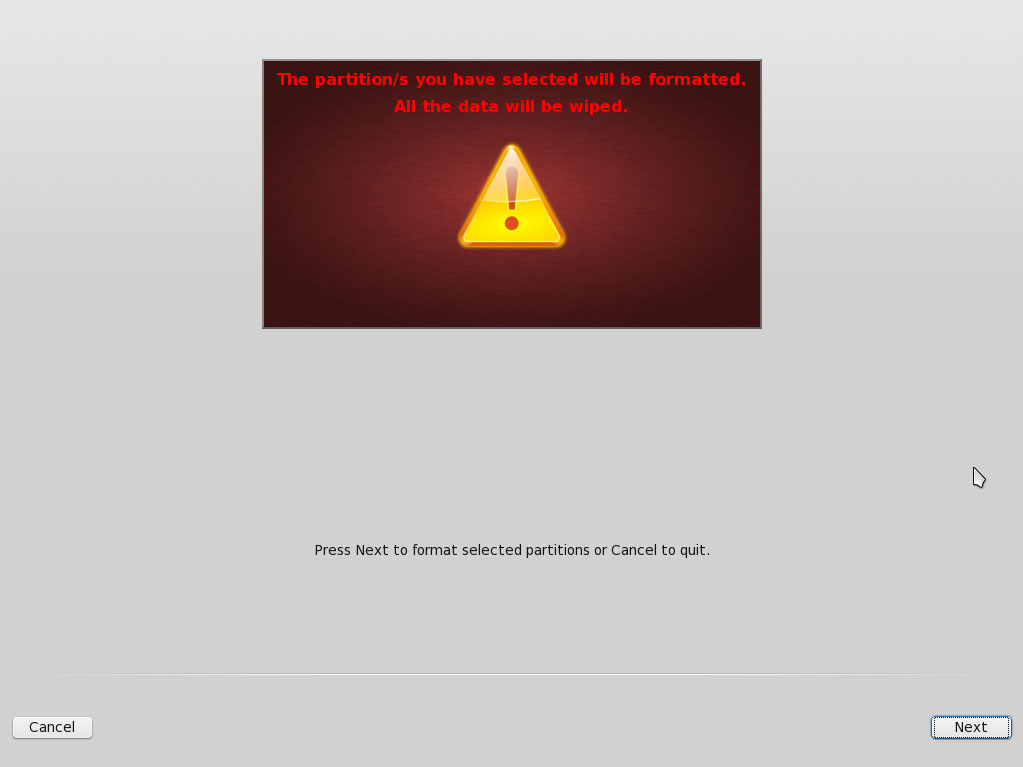
You will see a warning that the partitions are going to be formatted. Installation will begin when you click “Next”.
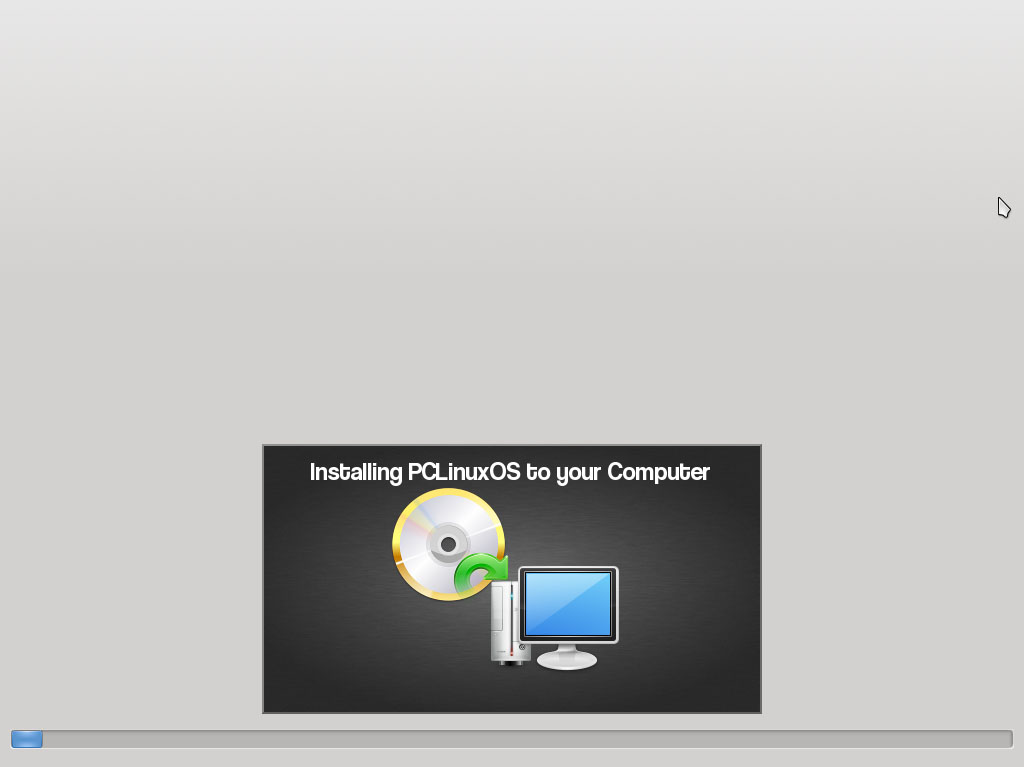
At this point, the installation wizard is copying files to your computer. When it finishes, you will be presented with the next screen:
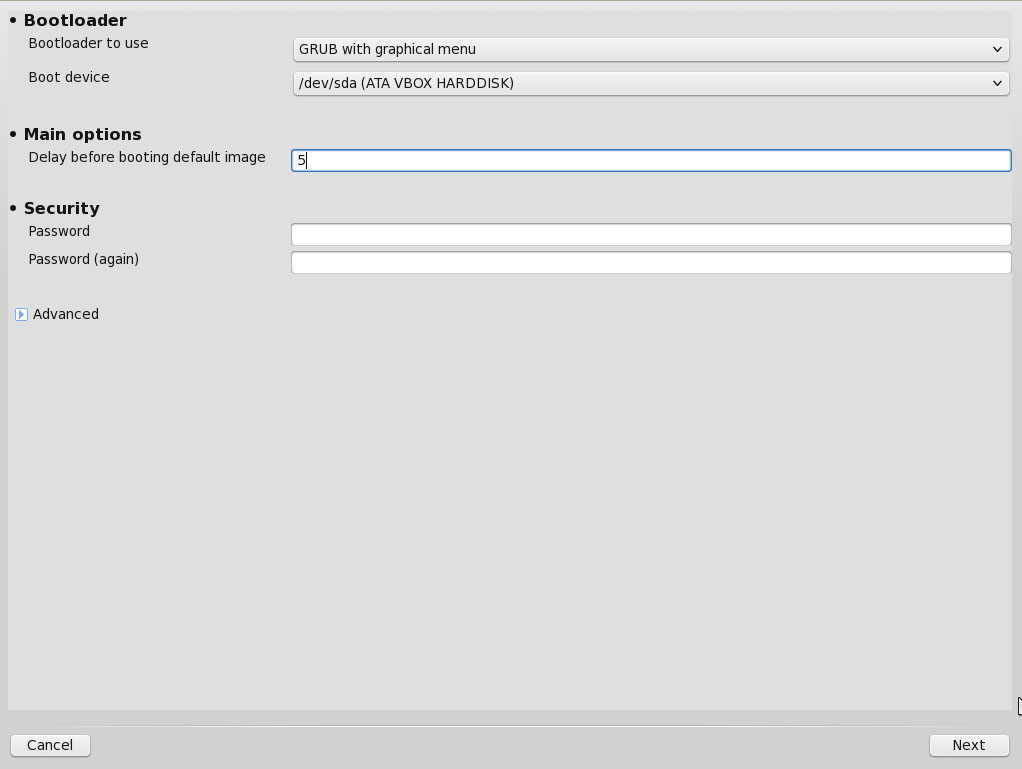
In this screen you can select the bootloader to use for your new installation, the device (partition) where is will be installed, the time it will show before booting the default option and whether or not you want to secure it with a password.
A bootloader is a piece of code that runs before the operating system(s), and gives you the ability to boot other operating systems too. The default bootloader for PCLinuxOS is GRUB and replaces the Windows bootloader in a dual-boot scenario (Windows bootloader doesn’t allow other operating systems to be booted from it). By default, GRUB is installed on the MBR (Master Boot Record) of the disk but if you have multiple installations on different partitions, you may need to modify this setting. You can also select to secure your bootloader with a password to prevent users from entering single user mode or changing settings at boot time.
I have used the default options in this installation. Only thing I have tweaked is the GRUB delay before booting the default image, from 10 to 5 (boot menu will appear for 5 seconds on the screen instead of 10).
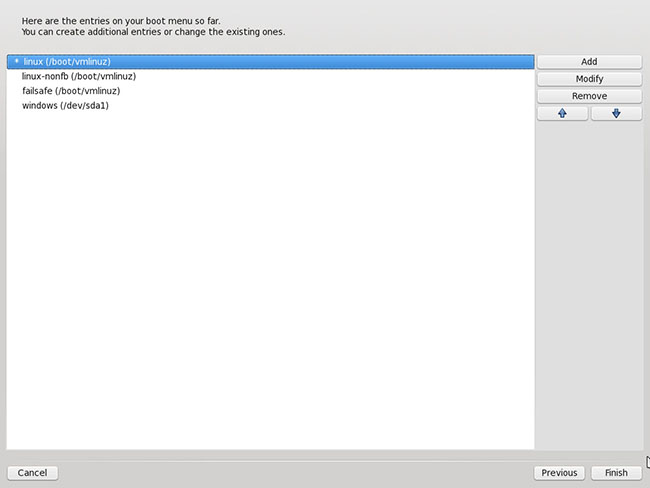
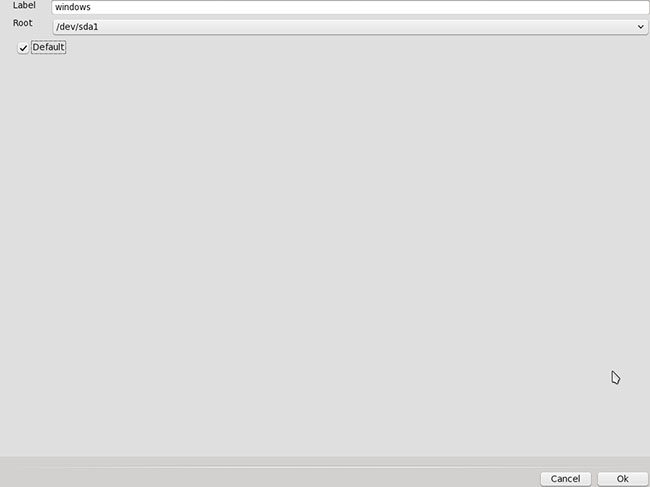
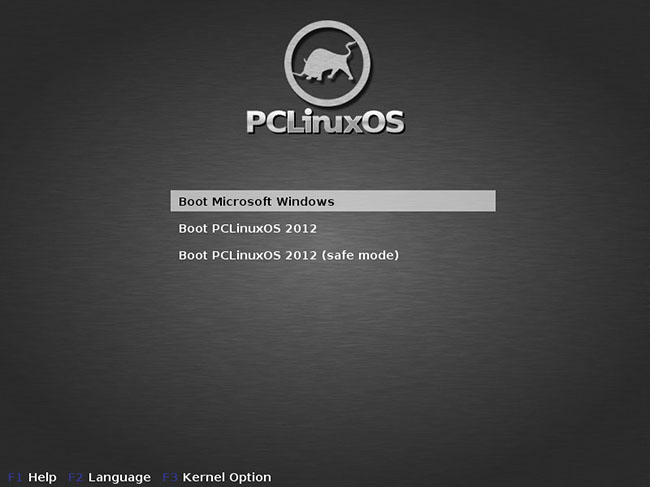
In the next screen you will review the entries of your boot menu so far. You can add, modify or remove any one of them. For example, you may want to use Windows as the default boot operating system. Select the entry named “windows” and click “Modify”. Check the box that reads “Default”.
You could also put Windows first in the boot menu if you want to. Again, select the entry and change its position with the up and down arrows.

The other three entries are standard in every installation of PCLinuxOS:
linux (/boot/vmlinuz)
This is the default boot option for PCLinuxOS. It will appear as “Boot PCLinuxOS”.
failsafe(/boot/vmlinuz)
This entry is similar to Windows Safe Mode (but much more powerful). It can be used in case an update or a configuration change causes an error which prevents your system from starting properly. It boots into a very minimal environment (only the shell, with no system services, external drivers or desktop loaded) and helps diagnose and repair the problem which is causing the problem. It will appear as “Boot PCLinuxOS (safe mode)”.
linux-nonfb(/boot/vmlinuz)
This entry is for booting the system without using the Framebuffer driver. Framebuffer mode utilizes the vesa capabilities of your video card for displaying graphics. This option is used for troubleshooting problems related to that mode. The Graphical Boot Menu (GRUB) is displayed in your screen using the Framebuffer driver. So, if you are seeing GRUB, there is no reason to worry! This entry won’t appear in your boot menu (you can hit Escape to go to "text" mode and see all 3 options).
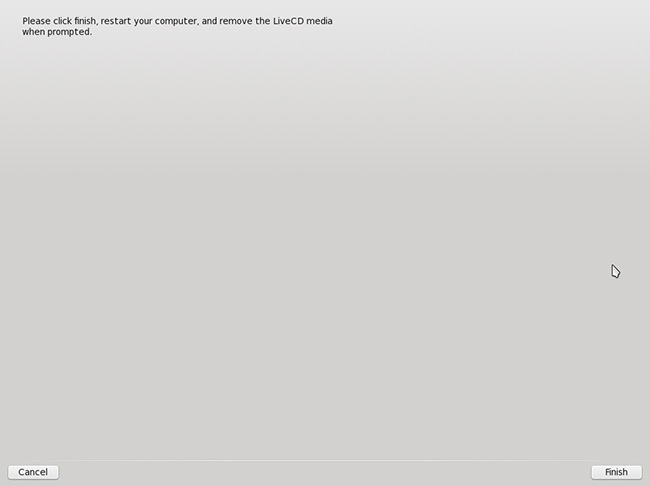
When you click “Finish”, the setup wizard will prompt you to remove the LiveCD media and reboot your computer.
Setup has practically finished. PCLinuxOS is installed on your computer. Just a few more configuration steps and we’re done.
When the computer reboots, you will see the boot menu we discussed previously. If you have modified the entry for Windows and have set it first and default, you will have a boot menu similar to the following:
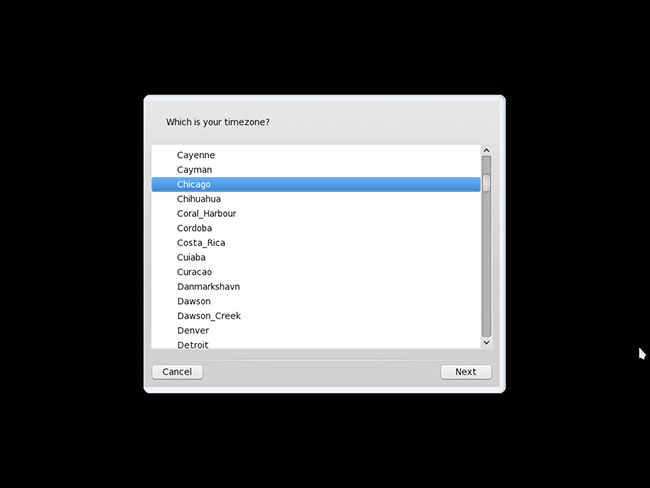
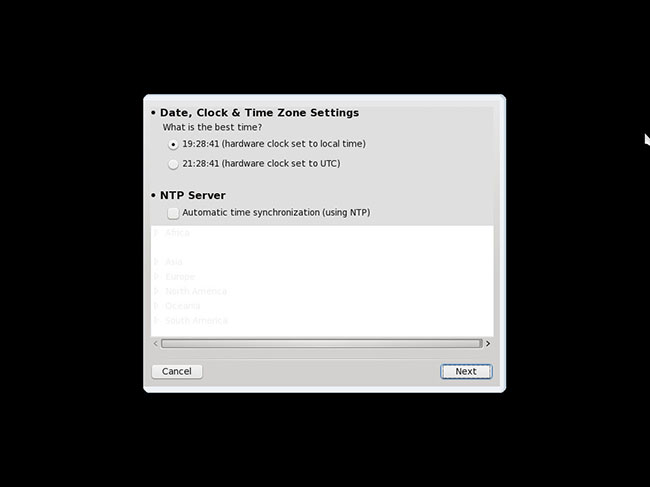
Select “Boot PCLinuxOS”. When the operating system finishes loading, you will be prompted to select your timezone and adjust your date, clock and timezone settings:
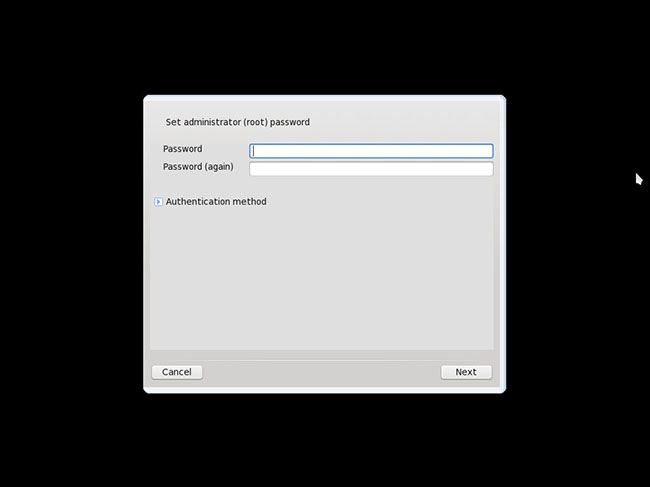
Next step is to create the root account and set a password for it. Root account is a special user account used for system administration (similar to Windows Administrator). Root (or superuser) is the user who has all rights or permissions (to all files and programs) in all modes (single- or multi-user). You will need root access in many occasions like when you install new software, update your system, modify system settings etc. It is recommended to have a unique password for your root account.
The final step is the user creation screen.
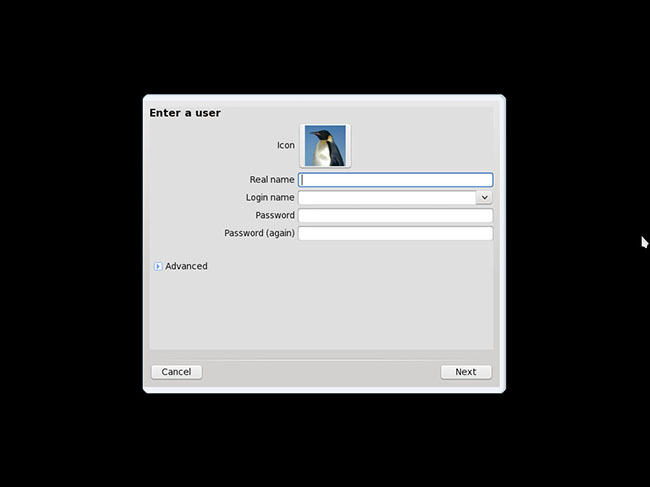
Fill in your details, set a strong password (it is recommended to have a different password from the root account) and continue to the login screen. You can add more users later by going to More Applications -> Configure Your Computer -> System -> Manage users on the system.
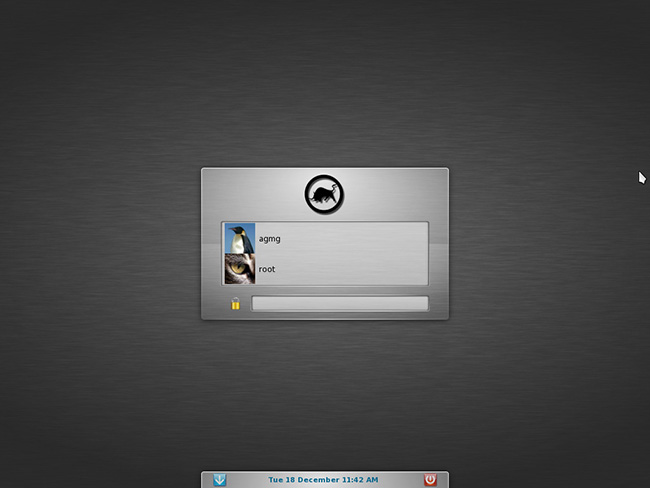
The first thing you must do after login is run a full system update (a reminder will appear the first time you login). Once you do that, you are free to explore the new and amazing world of PCLinuxOS! Welcome!