Alternate OS: NetBSD, Part 2
by Darrel Johnston (djohnston)
Thanks to kernowyon who alerted me of a problem with running NetBSD in VirtualBox. He said,
"Regarding your NetBSD item in the mag, it seems that installing NetBSD - at least in VirtualBox - has a problem for machines which do not have VT-x or AMD-V. You end up with an error and the setup halting before anything actually gets done.... There is a workaround as given here -
Despite the 'patm' entry apparently having an error, it worked for me! So I used -
VBoxSDL --nopatm --startvm NAMEOFMYBSDVM
and it worked. Of course, one has to create the VM first (as per your article). But when it comes time to start the VM, I had to use that command."
We set the root password by running /usr/bin/passwd. I added the user darrel and included him in the group wheel, so he can have su access. I then set darrel's password. Next, we run sysctl kern.rtc_offset to find the timezone in relation to GMT.
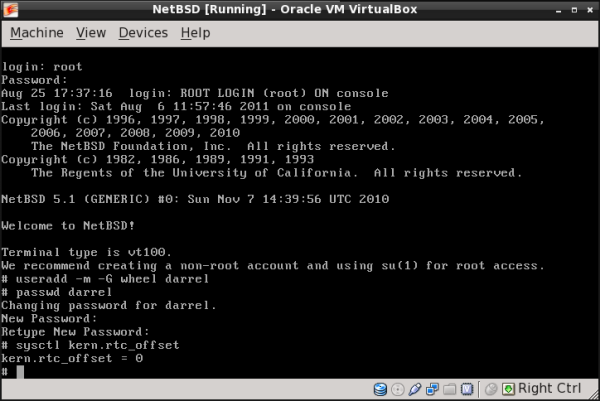
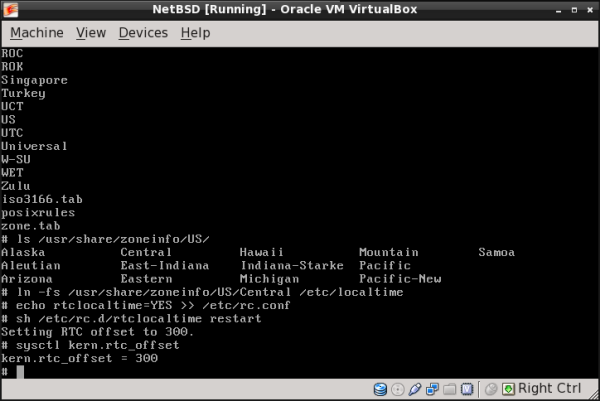
I set system time to US/Central, which is my timezone.
ln -fs /usr/share/zoneinfo/US/Central /etc/localtime
echo rtclocaltime=YES >> /etc/rc.conf
Next, we need to restart the clock.
sh /etc/rc.d/rtclocaltime restart
Then double-check the changes.
sysctl kern.rtc_offset
Yep. 300 seconds is 5 hours behind Greenwich Meridian Time.
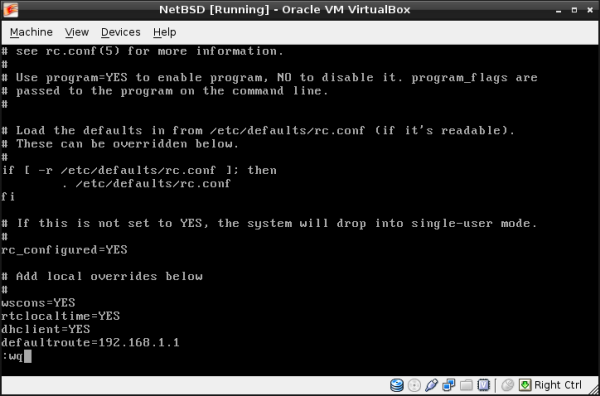
We need to make sure we have network access. Do this by editing the /etc/rc.conf file. NetBSD includes two editors out of the box, ed and vi. ed is a simple line editor and vi is the default editor.
vi /etc/rc.conf
Add the lines:
dhclient=YES
defaultroute=192.168.1.1
If we want to have a network address assigned by dhcp, we set it as shown above. Note that 192.168.1.1 is the address of the router my computer is connected to. Your setup may be different. After making above changes, we reboot to check our configuration.
To see if we have network access after the reboot, login as a user and do:
ping -c 5 google.com
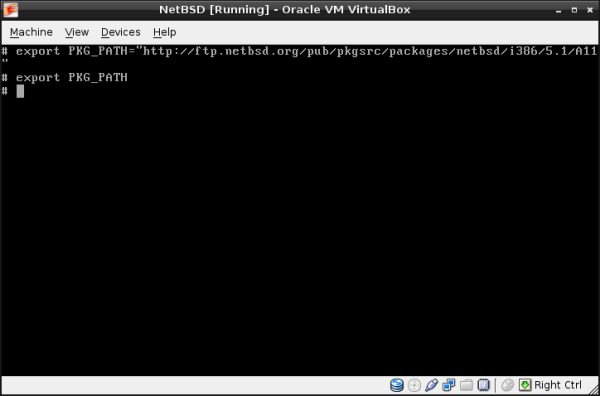
It would be nice to have a GUI. In order to get one, we need to install a window manager. But, first we must configure NetBSD’s package manager, pkgsrc.
As root, do:
export PKG_PATH="http://ftp.NetBSD.org/pub/pkgsrc/packages/NetBSD/<PORT>/<RELEASE-NUMBER>/All"
export PKG_PATH
Note that the first line, export PKG_PATH=”http:// ... /All” is all one line. Do not press [RETURN] or [ENTER] after the word “export”. <PORT> is the architecture of your PC, in this case, i386. <RELEASE-NUMBER> is the installed NetBSD version number. The installed version is 5.1, which is the current version. So, in this case, the command entered would be:
export PKG_PATH="http://ftp.NetBSD.org/pub/pkgsrc/packages/NetBSD/i386/5.1/All"
To make the PKG_PATH permanent, put the above in the /root/.profile file, because it's root that must install packages.
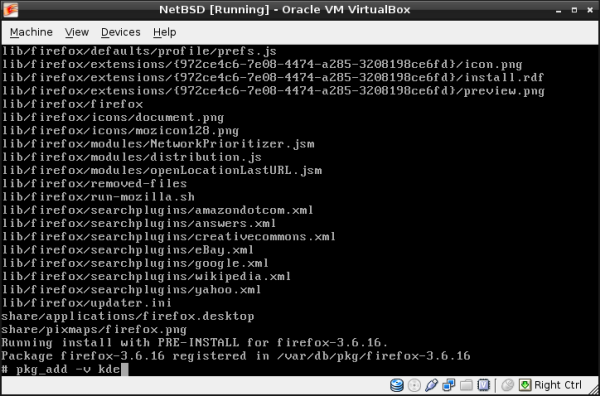
Now that pkgsrc has been configured and the repository defined, we can begin adding packages. We can add precompiled packages with the pkg_add command. All packages will be checked for required dependencies. The dependencies will automatically be installed along with the packages specified. The full package list can be viewed in a web browser at http://ftp.netbsd.org/pub/NetBSD/packages/pkgsrc/README-all.html. I chose to add Firefox, then KDE. As root, do:
pkg_add -v firefox
pkg_add -v kde
Now that we have a window manager installed, we must configure the X server. By default, there is no /etc/X11/xorg.conf file supplied, even after the X server has been installed. Although the X server can be started and run without an xorg.conf file, I found the result to be a lot less than desired. To generate an xorg.conf file, as root do:
X -configure
X -configure will generate the file /root/xorg.conf.new.
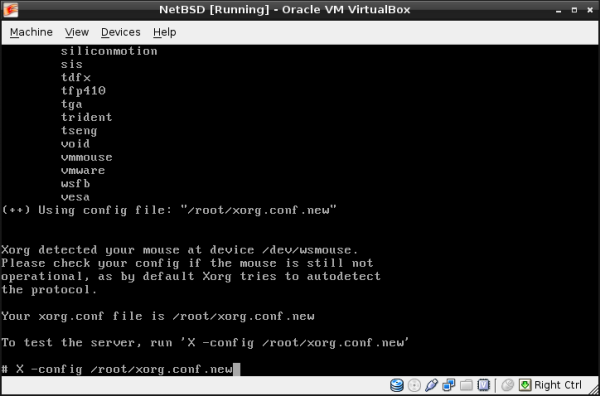
To test the configuration file, do:
X -config ~/xorg.conf.new
If the mouse is responding, copy the file /root/xorg.conf.new to the /etc/X11 directory as xorg.conf.
cp /root/xorg.conf.new /etc/X11/xorg.conf
To have KDE start up after logging in, we can issue the command startkde. To have KDE start automatically when the startx command is issued, logout of the root session by issuing the exit command. At the login prompt, login as the normal user. Create the file .xinitrc in your home directory. Add the following line to the file, then save the file:
exec startkde
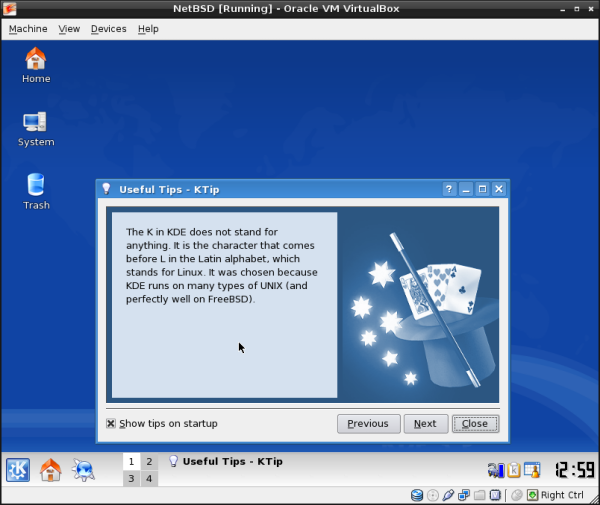
Once the startx command is issued, we see the KDE setup screen.
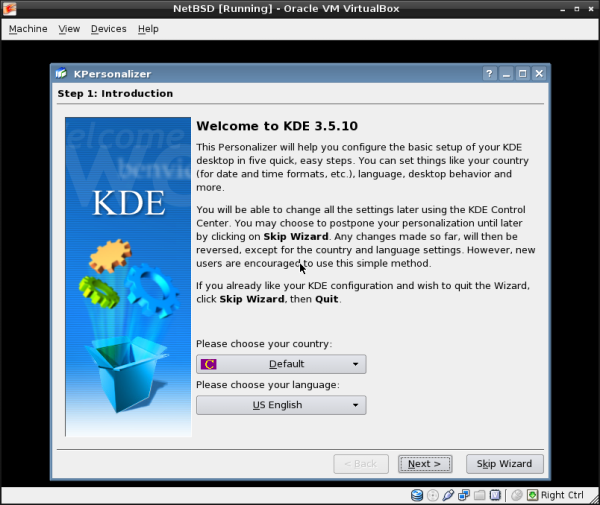
Yes, that’s KDE 3.5.10, to be sure. The “classic” KDE users will be pleased. After running the KDE setup, we are still left with an 800 x 600 screen as the largest option.
Screen space is a little tight. I wanted to increase the screen size to 1152 x 864, so I attached an iso which contains an example OpenBSD xorg.conf file to the virtual machine. New users are often surprised by the fact that although the installation program recognized and mounted their CD-ROM perfectly, the installed system seems to have “forgotten” how to use the CD-ROM. There is no special magic for using a CD-ROM. You can mount it like any other file system. All you need to know is the device name and some options to the mount command. You can find the device name with the dmesg command. As root, do:
dmesg | grep ^cd.
For example, if dmesg displays:
cd0 at atapibus0 drive 1: <ASUS CD-S400/A, , V2.1H> type 5 cdrom removable
the device name is cd0, and you can mount the CD-ROM with the following commands:
mkdir /cdrom
mount -t cd9660 -o ro /dev/cd0a /cdrom
To make things easier, you can add a line to the /etc/fstab file:
/dev/cd0a /cdrom cd9660 ro,noauto 0 0
Without the need to reboot, you can now mount the CD-ROM as root with:
mount /cdrom
When the CD-ROM is mounted you can’t eject it manually; you will have to unmount it as root before you can do that:
umount /cdrom
There is also a software command which can be run by root which unmounts the CD-ROM and ejects it:
eject /dev/cd0a
I mounted the iso and copied the xorg.conf file to my user’s home directory so it could be edited. By comparing it to NetBSD’s generated xorg.conf file, I added the following lines shown in bold.
Section "Monitor"
Identifier "Monitor0"
HorizSync 31-80
VertRefresh 30-100
VendorName "Monitor Vendor"
ModelName "Monitor Model"
EndSection
Section "Screen"
DefaultDepth 24
Identifier "Screen0"
Device "Card0"
Monitor "Monitor0"
SubSection "Display"
Viewport 0 0
Depth 24
Modes "1152x864"
EndSubSection
EndSection
After starting KDE again with the startx command, I have an 1152 x 864 screen. With a little further tweaking, I have configured the KDE desktop to my liking.
Firefox had to be added manually to the KDE menu. I also added a desktop shortcut for it. It would be nice to have KDM, the KDE Display Manager, start up at bootup. It can be easily configured by using the KDE Control Center, but there is a little trick you must do in order to make it work properly. You must do this because KDE Control Center saves the configuration file in one place and KDM looks in another. Do as user root:
rm /usr/pkg/share/kde/config/kdm/kdmrc
ln -sv /usr/pkg/etc/kdm/kdmrc /usr/pkg/share/kde/config/kdm/kdmrc
Also as user root, run startx and open the KDE Control Center. Go to System Administration > Login Manager. Open the Users tab and disable all the users and groups you don’t want shown at login. Click Apply. Next, click the Shutdown tab. In the Commands section, Halt: field, change /sbin/halt to /sbin/shutdown -p now. Click Apply. If you leave the field at default, the virtual machine will not power off when Turn Off Computer is selected from KDE’s logout menu.
For the last step, as user root, add the following line to the end of the /etc/rc.local file:
/usr/pkg/bin/kdm
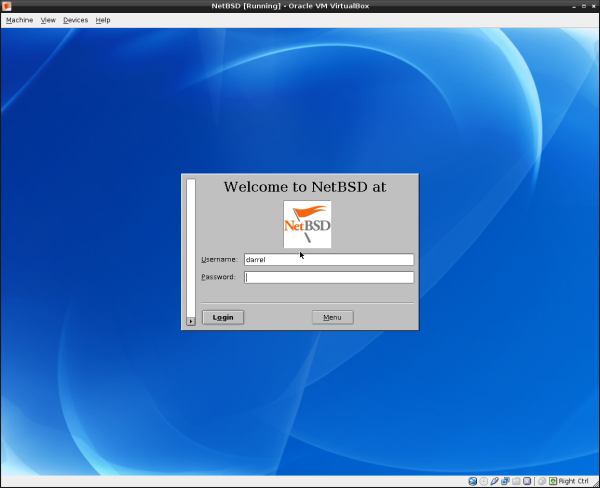
End the root session by logging out of the KDE session, then issuing the reboot command. On the next reboot, you will be greeted with the KDM login screen.
Installed packages can be updated by downloading source packages and compiling them.
Before you download any pkgsrc files, you should decide whether you want the current branch or the stable branch. The latter is forked on a quarterly basis from the current branch and only gets modified for security updates. The names of the stable branches are built from the year and the quarter, for example, 2011Q3, the current stable branch.
The second step is to decide how you want to download pkgsrc. You can get it as a tar file or via CVS. CVS is the recommended method. Both ways are described in Chapter 2 of NetBSD’s pkgsrc manual. It is available online or as a pdf file.
To download pkgsrc-current tarball, run as root:
ftp ftp://ftp.NetBSD.org/pub/pkgsrc/current/pkgsrc.tar.gz
Then, extract it with:
tar -xzf pkgsrc-20xxQy.tar.gz -C /usr
To fetch the pkgsrc current branch via CVS, run as root:
cd /usr && cvs -q -z3 -d anoncvs@anoncvs.NetBSD.org:/cvsroot checkout -P pkgsrc
CVS must be configured. The instructions are contained in Section 2.1.2 of NetBSD’s pkgsrc manual.
Compiling the downloaded source files are beyond the scope of this article. Two more excellent NetBSD instruction sources are the NetBSD guide, available online or as PostScript or pdf files, and the NetBSD Wiki. Note that although the wiki’s main page indicates it has not been updated since June 30th, 2010, the recommended new wiki is still under construction and has not been edited for the last 7 months.
Upgrading a NetBSD installation from one version to the next can be done from a bootable media such as CD-ROM or USB drive which contain at least the base and kernel distribution sets. Chapter 4 of the NetBSD guide contains the basic instructions. Since files already installed on the system are overwritten in place, you only need additional free space for files which weren’t previously installed or to account for growth of the sets between releases. Usually this is not more than a few megabytes. Since upgrading involves replacing the kernel, boot blocks, and most of the system binaries, it has the potential to cause data loss. Before beginning, you are strongly advised to back up any important data on the NetBSD partition or on any other partitions on your disk.
I have barely touched on all the configurations required to install NetBSD installation for a particular purpose or for personal choices. For example, all services are disabled by default in a fresh NetBSD installation. Desired system services must be added by the user. Please refer to the official NetBSD documentation and third-party online guides and tutorials.