Windowmaker on PCLinuxOS: Using a Keyboard & Mouse
by Patrick G Horneker (phorneker)
Most of us use a mouse and keyboard for our daily activities on our PCLinuxOS machines. WindowMaker is no exception. This article discusses configuration and usage of keyboards and mice for WindowMaker.
Mouse Buttons
What happens when you click on the mouse or use the mouse wheel depends on where the mouse pointer is when the event takes place. By default, the left mouse button simply focuses on whatever window the pointer happens to be on, unless it is on the Dock, the Clip, any Icon or the background of the Workspace. In this case, no default action takes place.
Clicking the middle button (or pressing down on the mouse wheel as the middle button) on the background opens a list of currently opened windows. Clicking on the Clip has no default action. Clicking the middle button on an open window sends that mouse event to the opened window that has the Focus. The action taken depends largely on the application that opened the window. On the Dock, the application associated with the Icon is launched.
Clicking the right button on the background opens the applications menu. Clicking the right button on the Dock opens a menu where you can choose from the following:
Keep on Top: Selecting this will keep the Dock and all attached Icons visible on the desktop.
Launch: If the Icon is associated with an application, that application will be launched.
Settings: This opens a dialog box where you can choose to have the associated application launched when WindowMaker starts. You can lock the icon to the desktop to prevent accidental removal (by dragging the Icon away from the Dock), select an icon file (in PNG, JPG, TIFF, XBM or XPM format) to associate with the Icon, and enter the command and options to execute.
Further discussion on Settings will be in a future article.
Clicking the right mouse button on the Dock opens a menu where you can choose from the following:
Clip Options -> Keep on Top: Like the Dock, this keeps the Dock visible on the desktop.
Clip Options -> Collapse: This causes all Icons attached to the Dock to hide inside the Clip.
Clip Options -> Autocollapse: Icons attached to the Dock will hide inside the Clip.
Clip Options -> Autoraise: Icons attached to the Dock will always be visible on the desktop.
Clip Options -> Autoattract Icons: This acts as a magnet for Icons that are not attached to the Dock.
Rename Workspace: By default, Workspaces (or desktops) are named I, II, III, and IV. Names given to Workspaces can be changed to anything you want (such as Bob, Chuck, Harvey and Nate).
Move Icon To: This moves the attached Icon to the Dock located at the Workspace you select from the secondary menu.
Attract Icons: This places all application Icons not on the Dock onto the Clip.
Settings: This shows the same settings dialog as with Icons on the Dock.
Configuring Mouse Settings
The Configuration Manager has some settings that can be used to configure the behavior of the mouse when used under WindowMaker.
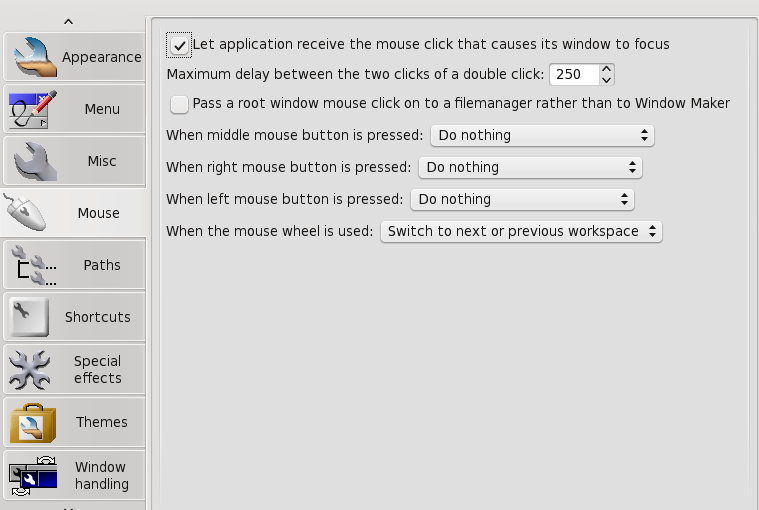
Give the Focus to the Application Where the Mouse Pointer Is.
The first setting, labelled Let Application Receive the Mouse Click... is the default action for the left mouse button on most window managers and desktop environments. Hence, this setting is selected by default.
How Fast is a Double Click?
Double clicking is the action of rapidly clicking twice on a mouse button. This is the setting that adjusts how fast (in milliseconds) you need to click the mouse button twice in order for WindowMaker to call the action double clicking. By default, the second click should come one quarter of a second after the first click, or 250 milliseconds. You may adjust this setting depending on how fast you can double click on the mouse.
A Rather Silly Option
WindowMaker has an option that allows you to Pass a root window mouse click to a filemanager. The root window refers to the background on your desktop. I see no reason why anyone should select this option.
Reprogram the Mouse Handling Defaults
The next three options have a menu where you can select what WindowMaker does when you click on the mouse buttons. By default, no default action is selected. For each button, you can select from:
- Select multiple windows
- Display a list of open windows for you to select from
- Open the Applications Menu
A Good Use for the Mouse Wheel
The last option here is configured so the mouse wheel is used to switch between Workspaces within WindowMaker. By default, this is enabled.
Mouse Actions on the Title Bar
On the left side of the title bar is the Minimize Box, and is present on every window which can be minimized. Clicking on that box will minimize the window.
On the right side of the title bar is the Close Box. This works the same as the close box (usually marked with an X) on most window managers and desktop environments.
Not all windows can be minimized or closed with these mechanisms. If these functions are not active for any given window, the icons will not appear on the title bar.
Pulling up the shades
If you double click on the title bar (outside the Close or Minimize Boxes), the window itself will roll up into the title bar, not unlike window shades that you can install in your home. Double clicking after that restores the contents of the window.
Keyboard Shortcuts
We all know that holding down the Alt key while pressing the Tab key cycles through the list of open windows. The Alt-Tab combination is an example of a keyboard shortcut, and can be a useful tool when it comes to getting things done efficiently on your computer.
WindowMaker comes with a number of keyboard shortcuts already configured for PCLinuxOS. These shortcuts can be reprogrammed using the Configuration Manager to any key combination you wish.
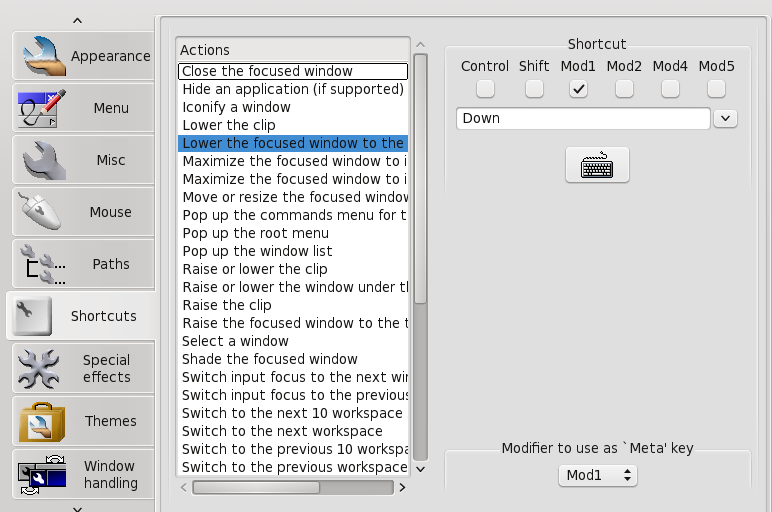
The easiest way to reprogram any shortcut is to first, click on the button with the picture of the keyboard on it, then press the requested keystroke combination to assign the keystroke to the shortcut.
For most PCLinuxOS installations:
- Mod 1 refers to the Alt key on your keyboard.
- Mod 4 refers to the Windows key on your keyboard.
- Menu refers to the Menu key on your keyboard.
Be careful when assigning keystroke combinations.
Pressing Control-Alt-F1 through Control-Alt-F7 will place your screen in text mode with a login prompt. These keystroke combinations are hard coded into the X.org display server. If you accidentally press one of these keystroke combinations, press Control-Alt-F8 to get back to the graphical display.
Also, Control-Alt-Delete will reboot your system, and Control-Alt-Backspace will exit you back to the login screen without prompting. Do not assign anything to these keystroke combinations.
Default Keyboard Shortcuts
You would expect Alt-F4 to close open applications as in KDE or GNOME. By default, both the Mod 1 and Mod 2 keystroke modifiers have been selected, hence disabling Alt-F4 from closing windows. Uncheck Mod 2 to enable Alt-F4 to close application windows.
The reason for this? At the time WindowMaker was first being developed, Control-Q was the standard keystroke combination for exiting applications in UNIX. But then, IBM preferred F3 as a standard keystroke for exiting out of most anything, be it an application running on a AS/400 mainframe, or OS/2 running on a PC.
Alt-H and Alt-M minimize application windows. The difference here is that not all applications running in WindowMaker support window hiding, i.e. when an application is placed in the background but not shown on the desktop; for example, the CUPS daemon waiting for the next print job to arrive. Alt-M works with all applications whether they support hiding or not.
Alt-PgDn lowers the current window with the Focus to the bottom of the visible window stack, basically sending the open window to the background, while still remaining visible.
Alt-PgUp raises the current window with the Focus to the top of the visible window stack in all its glory.
Control-Escape opens the current window’s popup control menu the same way it does for KDE, GNOME and Windows.
F12 opens the Applications Menu. This is a good candidate for reassigning to the Menu key on your keyboard.
F11 opens the list of open windows on your current desktop.
Just as Alt-Tab cycles through the list of open windows, Alt-Shift-Tab does the same thing except that Alt-Tab cycles forward, while Alt-Shift-Tab cycles backward through the list.
Control-Alt-Left Arrow and Control-Alt-Right Arrow switches between Workspaces on your desktop the same way you can switch Workspaces using the mouse wheel.
Desktop Note: On KDE and GNOME, these keystroke combinations work with the 3D effects active, and all the physical desktops showing while cycling through the desktop list using the keyboard.
WindowMaker allows only the first ten Workspaces to be assigned to keystrokes. Pressing Alt-1 will take you directly to the first Workspace, Alt-2 will take you directly to the second Workspace, and so forth through Alt-9, which will take you to the ninth Workspace. Alt-0 will take you to the tenth Workspace.
WindowMaker does allow you to create (theoretically) an infinite number of Workspaces. You can assign keystrokes to advance or go back ten workspaces at a time. There is no default keystroke assigned to this function.
Why anyone would want to have that many desktops active is beyond comprehension, unless you actually have a good reason to do so, such as opening terminal windows for access to many machines, such as that in a cluster of servers (for cloud computing).
There are other functions that have not been assigned keystrokes. For purposes of this article, we should not worry about these for everyday use of WindowMaker.