Openbox - Add a Quick Launch Bar
by Paul
Arnote (parnote)
Since Openbox doesn’t have a panel of its own (borrowing lxpanel from LXDE or using Tint2 instead), it almost begs for us to use one of the quick launch bars that are out there. Plus, if you are using Tint2 as your panel, it does not currently allow launchers to be used.
Fortunately, there are choices under PCLinuxOS for a launch bar for your Openbox desktop. All are relatively lightweight, and give your desktop some flash and panache. All mimic (to varying degrees) the Mac OS-X actions of “zooming” when you mouse over the individual icons.
What are they called? Well, they are adeskbar, wbar and Cairo-Dock. Of the three, adeskbar is the lightest weight launch bar, weighing in at only 472 KB, while wbar fills in the middle, weighing in at 842 KB. Cairo-Dock, on the other hand, weighs in at 7.2 MB, with another 8.5 MB for the required plug-ins, and taking up another 14.1 MB for the optional themes. As you might imagine, Cairo-Dock offers the flashiest effects on your desktop. Your choice will be somewhat dictated by how fancy you want your launch bar to be, how fast your computer is, how much RAM you have, and how much hard drive space you have. Obviously, if neither of those are of any concern to you, then the choice falls strictly in the arena of aesthetics and personal preference.
Cairo-Dock
The “flashiest” of the three, by far, is Cairo-Dock. Just looking at it, you get the impression that there is more to it. With the default installation of Cairo-Dock from Synaptic, you get reflections of the icons on the bar beneath them. When you put it “into motion,” by moving your mouse over the individual icons, the icons “zoom,” but can just as easily be made to rotate and do other “tricks.” Being the largest download of the three launch bars, Cairo-Dock is also the most capable.
On my IBM Thinkpad T23 with Openbox installed (Pentium III, 512 MB RAM, 8 MB video RAM with no OpenGL capabilities), Cairo-Dock consumes very few resources, despite being the largest in file size. Even while activated by moving my mouse over the launch bar, Cairo-Dock consumed no more than 9% of the CPU and no more than 8% of my RAM.

My customized Cairo-Dock without a mouse-over

My customized Cairo-Dock with the mouse hovering over one of the icons
Cairo-Dock is divided up into sections. The left-most section contains your launchers. The middle section (between the dotted lines) contains the icons of your minimized applications. The right-most section contains the icons of your Cairo-Dock plug-ins.
Arranging your icons on Cairo-Dock is as simple as dragging and dropping the icons to where you want them, with one caveat: plug-ins cannot co-mingle with launchers, and launchers cannot co-mingle with plug-ins.
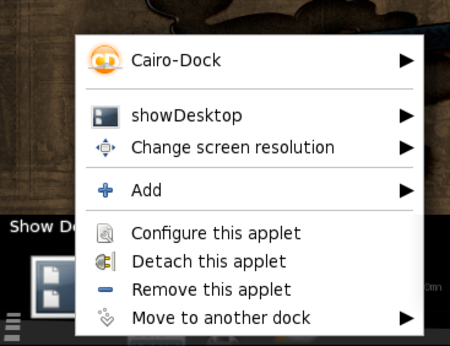
When I first installed Cairo-Dock from Synaptic, it contained a host of Gnome-specific applications that I do not run on Openbox. Fortunately, it’s as easy as right clicking on the icon you do not want, and selecting “Remove this launcher” or “Remove this applet.”
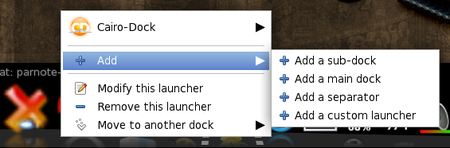
Similarly, it’s just as easy to add a launcher or applet. To add a launcher, right click on the left side of the Cairo-Dock, go to the “Add” menu, then select “Add a custom launcher” from the menu. A new icon will be placed in the launcher area.
Right click on the new icon, then “Modify this launcher.” You will then be able to give the new launcher a name, specify the command you want to run, along with the icon you want to use to represent your new launcher.
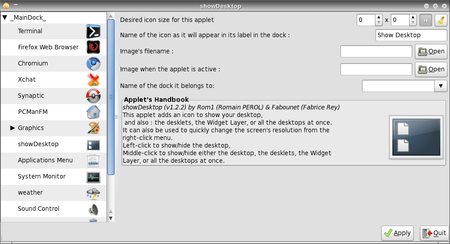
When it comes to adding applets to Cairo-Dock, it is almost as easy. Right click anywhere on your Cairo-Dock, select the Cairo-Dock menu item, then “Configure.” You will see the window above. Select the “Add-ons” tab, and select the applets you want to display on your Cairo-Dock.
Once you’ve added the applet, you can right click on it and select “Configure this applet.” When you do, the window shown two screenshots ago will be displayed. There, you can set display options for the selected applet.
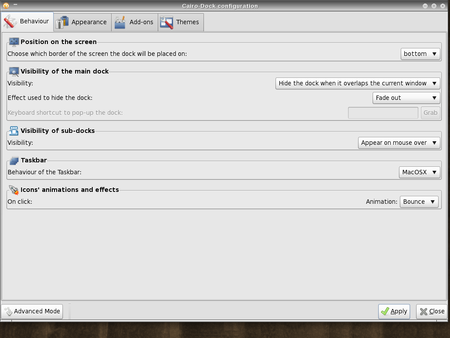
As you can see in the previous screen shot, there are lots of options for Cairo-Dock, divided into four tabs. Feel free to explore the options. After all, you can always change them back if you don’t like them. To make it easier to remember what you changed, it might be prudent to only change one thing at a time, just in case you don’t like that particular selection.
wbar
With wbar, you get a Mac OS-X like launch bar that occupies a minimum of space, while remaining relatively light on resources and disk space. While wbar does not have all the options that Cairo-Dock has, lacking additional plug-in applets that add some additional functionality, it’s still a quite capable launch bar. It does one thing, and does it well.

My customized wbar with the icons zooming from a mouse over
On my Thinkpad T23 running Openbox, wbar doesn’t even show up in the list of applications when I run the top command in a terminal window. When I mouse over wbar, it then shows up in the list of applications in the top command, consuming approximately 12% of the CPU and approximately 10% of the available memory, a bit more than Cairo-Dock, despite its smaller file size.
Like with Cairo-Dock, wbar came set up out of the box for some Gnome applications that I never use. Configuring wbar is relatively easy, and it comes with the configuration tool included on wbar. In fact, it’s the sixth icon from the right in the screen shot above.
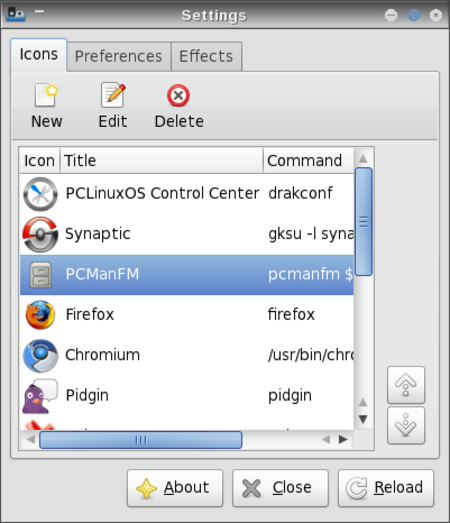
Clicking on the configuration icon will bring up the screen shot above. Notice the three tabs at the top of the dialog box.
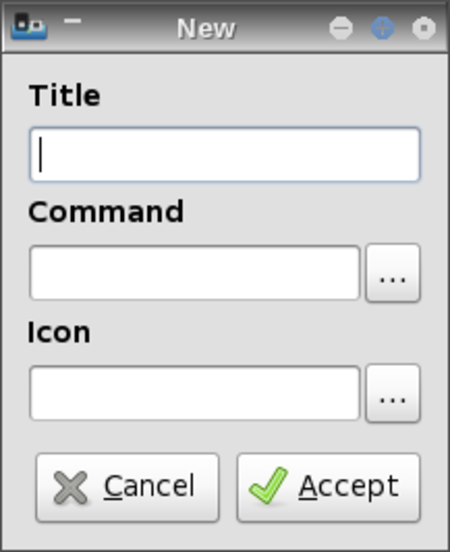
To add a new icon to your wbar, click on the “New” button. Provide a title for your new launcher, the command to execute, and the icon file to use to represent your new launcher. If you’re not sure where icon files are stored on your system, they are typically found in /usr/share/icons and /usr/share/pixmaps. There are even some that come with wbar, found in the /usr/share/pixmaps/wbar directory.
When you select the “Edit” button, the same dialog box is displayed, with the current information already filled into the fields. Simply make your changes and select the “Accept” button. Then, select the “Reload” button in the configuration dialog box to make your new (or edited) launcher visible.
You need to be aware, however, of one limitation of wbar when selecting your icons. Currently, wbar cannot display *.svg icon files. Rather, it can only display *.png icon files.
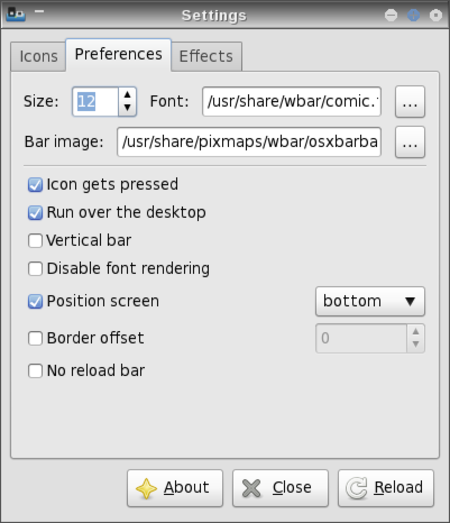
Under the “Preferences” tab, you can set the font and font size you want wbar to use when it displays the text of the icon when you mouse over, as well as the background image you want wbar to use. Among other things, you can also set wbar’s screen position.
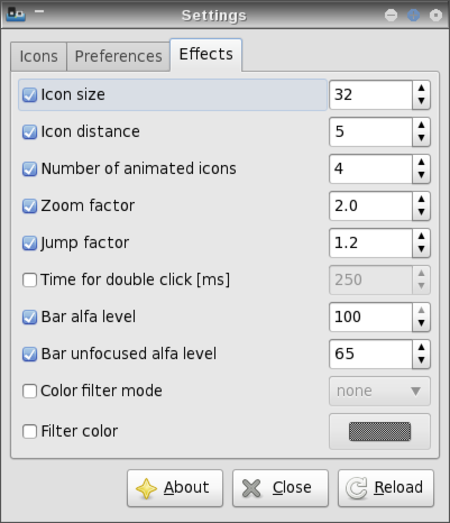
Under the “Effects” tab, you can set the icon size, the spacing between the icons, the zoom factor (2.0 is double size), the jump factor (the higher the number, the more “elevated” the icon is above the others when you mouse over the icon), and a number of other items.
Whenever you make any changes, be sure to hit the “Reload” button to make your changes take effect in wbar.
Adeskbar
Adeskbar not only has the smallest file size, but it’s also the lightest when it comes to using computer resources. Nothing I did could get adeskbar to show up in the list of applications when I ran the top command in a terminal. It didn’t show up when it was idling, and it did not show up when I moused over the icons, either.

Adeskbar running at the top of my screen.
To be perfectly honest, I originally wasn’t going to include adeskbar in this article. The first time I launched it from a terminal session, it was hidden behind Cairo-Dock, which I had forgotten to stop before launching adeskbar. So, I had mistakenly thought that it was not running. Mea culpa. It wasn’t until I moved my tint2 panel to the top of my screen and I was running wbar that I decided to give it another try. Imagine my surprise when adeskbar appeared!
When you first launch adeskbar, it looks a bit sparse. Only the menu, audio volume control, clock, a pair of separators and the session control objects are present. It is between the separators where you will want to place your launcher icons.
Configuring adeskbar is quite easy. Simply right click on the launch bar and select “Preferences.” You will see the screenshot above.
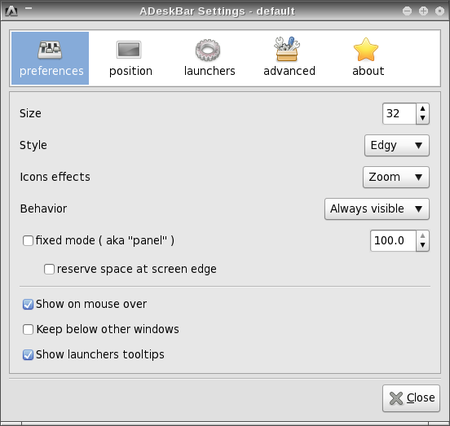
Under the first tab, “Preferences,” you can set the size of the launch bar, the “style” used to display adeskbar, what icon effects you want to use, whether it’s always visible or if it autohides, and a few other settings which should be fairly self-explanatory.
Under the “Position” tab, you can select where on your screen you want adeskbar to appear.
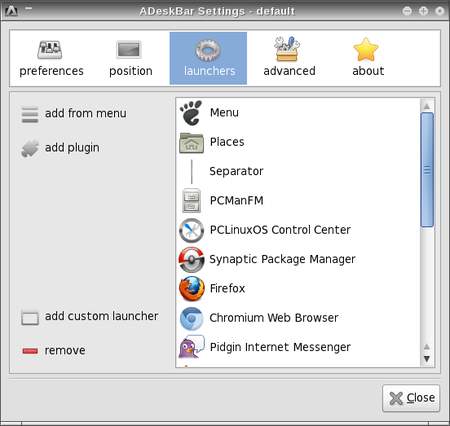
Under the “Launchers” tab, you can start to fill in the launchers you want to include on your launch bar. The easiest way to add applications to your launch bar to to select them from the “Add from menu” button. However, due to a problem that adeskbar has displaying some of the submenu entries on your system, everything you want to add to your launch bar may not be available.
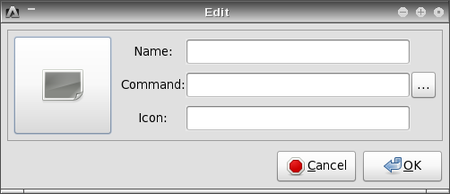
In that event, you will need to click on the “Add custom launcher” button, and fill in the fields in the dialog box shown above. The “PCLinuxOS Control Center” entry in the screen shot was added this way.
To select the icon you want to display, simply click on the large button on the left side of the dialog box, and travel to the location where your icon is stored. Unlike with wbar though, adeskbar appears to be perfectly capable of displaying either *.svg or *.png icon files.
Adding plug ins to adeskbar is even easier. Simply click on the “Add plug ins” button, and select the plug in that you want to add. I will caution you, however, that not all of the plug ins will work. Your “clue” that the selected plug in will not work will be that the plug in’s icon will not immediately appear in the adeskbar launch bar.
Under the “Advanced” tab, you can set some of the finer aspects of how adeskbar is displayed on your screen. Feel free to play with the settings (preferably one at a time) to customize adeskbar on your computer. One thing I noticed is that you cannot set the “zoom” level for the icons on your adeskbar to more than 1.30, or 130%, of the icon’s original size.
Also, you can change the menu icon by double clicking on the default Gnome “footprint” icon in the “Launchers” tab, and changing it to something you might like better in the dialog box that appears (Hint: click on the Gnome icon on the large button on the left and choose your new icon).
Summary
As you can see, there are three excellent choices in the PCLinuxOS repository for adding a launch bar to your Openbox installation. In fact, all three of these can be added to any desktop, regardless if it’s Gnome, KDE, Xfce, LXDE, or any of the other graphical desktops.
The adesktop launch bar is the obvious choice if you are concerned about computer resources and the amount of disk space consumed – and if you can tolerate its limitations. The wbar launch bar represents a good compromise between the low resource usage of adesktop and the relatively large hard drive space required by Cairo-Dock. The Cairo-Dock launch bar represents the pinnacle of “flash” for your launch bar, if you want the flashiest launch bar on your desktop.
All three can be set to start up automatically simply by adding their command to the Openbox autostart.sh file, as we covered in the July issue of The PCLinuxOS Magazine.
So what are you waiting for? Adding a launch bar to your desktop is fun, and it puts your most commonly used applications only a mouse click away. Plus, it’ll dazzle your friends when they see it in action.