Open Office 3.2, Part 5: OpenOffice Draw
by Meemaw
We can do word processing documents and spreadsheets now. We've even gotten proficient at presentations … well, at least I have, and I hope you have as well. The next part of OpenOffice to explore is Draw. OpenOffice.org's website says;
"Draw anything from a quick sketch to a complex plan. Draw gives you the tools to communicate with graphics and diagrams. Manipulate objects, rotate in two or three dimensions; use sophisticated rendering to create photorealistic images. Smart connectors make short work of flowcharts, organisation charts, network diagrams, etc."
As before, I'm no expert, but this summary can get you started.
Notice when you open Draw, the appearance is similar to Writer, and also to Impress because it has a pane at left showing your pages. You can right click in the pane to add pages, and even add a page between two existing pages, just as you can do with Impress. The top toolbar is similar to Writer, with Open, Save, Print and so on, being in the same places. The toolbar below it is different depending on what you are doing. The text formatting items are right there IF you have chosen to add text to your drawing. When you are adding graphics, the toolbar has Line and Fill so you can alter the border and color of your graphic. The toolbar that is at the bottom is where all your drawing tools are located. From there you can insert rectangles, circles, lines, arrows, speech boxes (called 'callouts') and various other shapes. With the tools there, you can do some interesting things.

Notice that to the right of many of these tools, you can see a down arrow … meaning there are many variations of that particular tool. If you click on it you get a pop-up showing all the designs included.
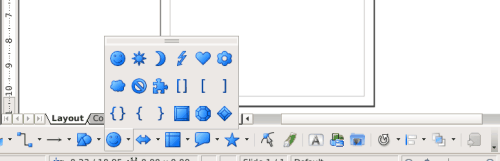
This set is called Symbol Shapes. You can put any shape from this box, or any other. The box on its left is Basic Shapes. The box to its right is Arrows of all sizes and designs, and then moving to the right, we have shapes for Flowcharts followed by Callouts and Stars.
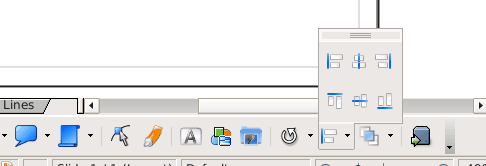
At the right end of the toolbar, you will see a few tools that help you manipulate your drawing. For example, you can use any of the tools from the Align box below to center your object or align two objects just the way you want them. To its left is the Effects tool, and at the right of the Align tool is the Arrange tool and the Extrusion tool.
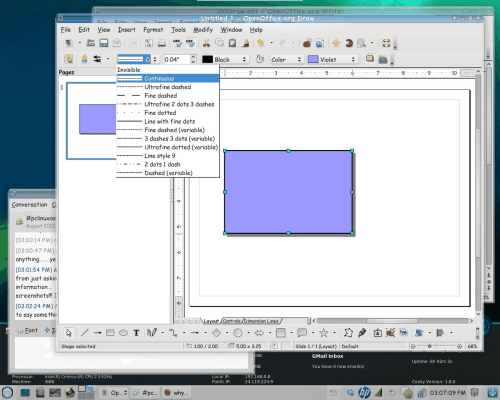
Opening a blank drawing, you can add a rectangle or anything else you desire. The default is to make the boundary of each item black and fill it with blue, but if you go to the second row of tools at the top of your window you can change the fill to another color and the boundary (line) to something else as well. You can also set the fill to 'none', which will take all the color out of your object and leave just the outline. You could leave the color and change the line to invisible, or make it thicker or dotted. The dropdown shown changes the style of the line and the one to the right of it sets the line thickness. My outline is black as you can see, but the next dropdown allows you to change the line color or make it invisible.
The dropdowns for fill are as follows:
The one that says Color (above) gives you the option to fill your object with Color, a Gradient, Hatching, a Bitmap, or for the fill to be invisible.
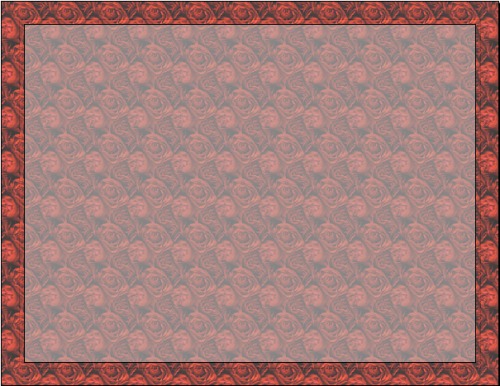
The one that says Violet (above) gives you the option different choices for the fill type you selected. In the examples below (left to right), the fill is the color violet, a blue to white gradient, blue crosshatches, and a rose bitmap.

| Color Violet |
Gradient Blue to White Gradient |
Hatching Blue Crossed 0 degrees |
Bitmap Roses |
Sometimes you want to use a certain effect on your object. I wanted to make sign that had a rose background and a rectangle in front that was partially transparent. The first rectangle I placed was filled with the rose bitmap, and the second one I added was filled with a light grey. Choosing one of the objects, then going to 'Format' > 'Area' gives you a window that contains several tabs (Area, Shadow, Transparency, Colors, Gradients, Hatching and Bitmaps.) Notice the last four are the same as in the dropdown we looked at earlier …. of course this is the alternate way to edit your object. It is an even more detailed editing box. The Transparency tab is what you use to set the fill from visible to almost completely transparent. I set the roses at 25% and the grey box at 45% (remember, the higher number makes it more transparent.). Now you can see the grey box (and I could put text on it), but you can see the roses through it.
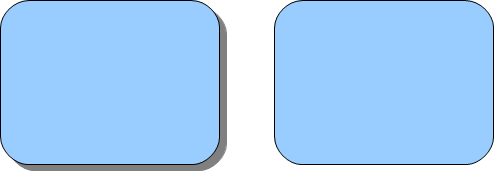
On most versions of OODraw, the tool next to the fill color is Shadow. You can put a drop shadow on most of your objects. On the screenshot below, you will see a shadow to the right and below the object on the left. In the Format > Area box you can select the Shadow tab and set the direction, color, transparency and extent of your shadow. In the example, the shadow is down and right, color is a shade of grey, no transparency, and it is about 0.10" from the original object.
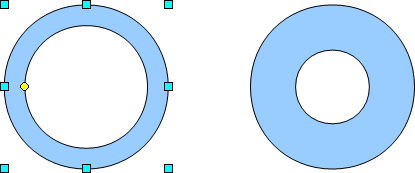
Notice the yellow dot on some of your shapes? They will allow you to make changes to those shapes. You can draw a rectangle with rounded corners and if you grab the dot and move it, you can change the amount of curve on the corners far enough to even have an ellipse instead of a rectangle!!! On the shot below, the shape is a ring, but the 'grabber' can make it thin or thick.
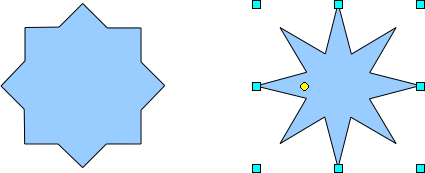
If you draw a star, the grabber will let you adjust the points on the star so they are shallow or deep. On the stars below I started with the 8-point star on the left. The star on the right was made by grabbing the yellow dot and moving it toward the center of the star, which pulls the 'inside corners' of the points inward.
I haven't covered some of the other tools: From extreme left to right on the bottom toolbar is the Selection Tool (you will do you resizing and moving with this), Line (only straight lines), Arrow (only the one arrow), Rectangle (rectangles with no variation), Ellipse (ellipses and circles with no variation) and the Text Tool, which you will use for all text. After that, the special groups of tools start with the Line Tool (straight lines and freehand lines are here), Connector Tool (for constructing flowcharts or connecting two gluepoints) and Arrow Tool (with an assortment of arrows including a dimension tool, which draws a double headed arrow and gives you a measurement as well.)
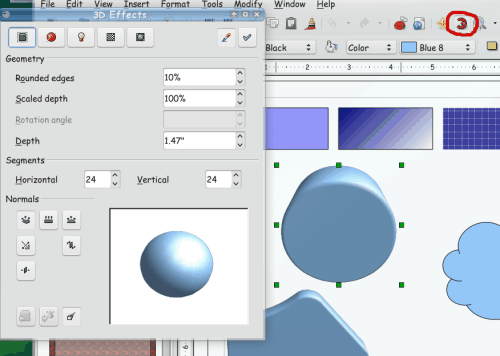
Another tool that I should mention is the 3D tool in the top toolbar (it may not show by default, but you can choose it by editing your toolbar.) In the screenshot I have circled the 3D tool. With a little messing around you can convert some of your two dimensional objects to 3D ones. The tools can change the depth of your object, how round you make the edges and even the direction of the light.
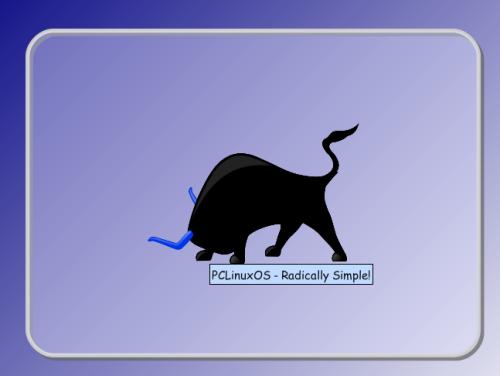
As with other drawing programs, you can layer objects to make other designs. I made a gradient background, with two rounded rectangles. The bottom rectangle was a border and shadow, and the the top one was a semi-transparent gray rectangle with no border. Then I added Dobie on top of the other layers:

I also experimented with another tool I found called an Image Map. From OpenOffice Draw's Help section:
An ImageMap is a reference-sensitive graphic or text frame. You can click on defined areas of the graphic or text frame to go to a target (URL), which is linked with the area. The reference areas, along with the linked URLs and corresponding text displayed when resting the mouse pointer on these areas, are defined in the ImageMap Editor. The Image Map Editor allows you to attach URLs to specific areas, called hotspots, on a graphic or a group of graphics. An image map is a group of one or more hotspots.
You can insert a graphic, then go to Edit> Image Map. You will get another window with your graphic in it. You can then draw a simple shape over your graphic (I used an ellipse), and assign a web address to it. You can even add text that will show when you pass your mouse over it, and when you click on it, you are taken to the assigned web address. Since my graphic was Dobie, you should know which website I used and my text shows below!!! Make sure you click the "Apply" checkmark before you close the editing window.
It can be saved in html format to be used on a website.
I haven't covered everything, but I hope you know more now than you did before. It was fun exploring OO Draw! With a little practice, I'm sure you can make something wonderful! Enjoy!
(I figured it out !)