Xfce 4.6.2: Customize Thunar's Context Menu
by Paul Arnote (parnote)
Many users of KDE and Gnome are accustomed to the rich context menus of the Dolphin, Konqueror, and Nautilus file managers. Xfce users aren't left out in the cold, however. Customizing the context (right click) menu of Thunar is actually quite easy, and can be nearly as "full featured" as those of the file managers for the bigger desktop environments.
Step One
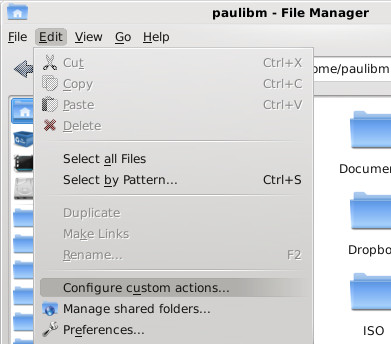
Once you have Thunar open, select "Configure custom actions..." from the Edit menu.
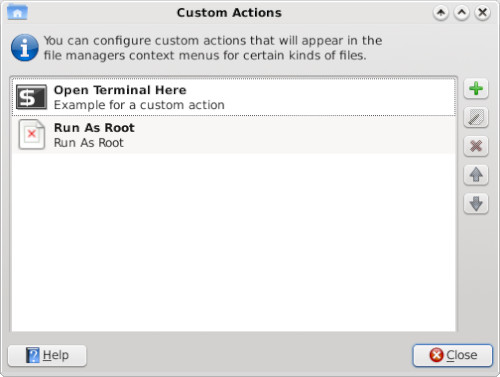
You will then see the dialog box pictured above. Click on the green "+" button to add a new custom action.
Step Two
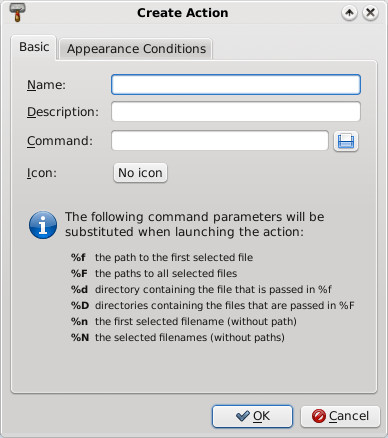
Once you've selected to add a custom action, you will then see the "Create Action" dialog box displayed on your screen. Under the "Basic" tab, there are four things for you to select or fill in. The first, the "Name" field, is the name that will be displayed on the context menu. The "Description" field holds the description of the context menu item, and is displayed if you hover your mouse over that menu item. The third field, "Command," is the command to execute when the menu action is selected. We'll talk more in-depth about the command field a bit later on. The last selection you have to make is whether or not to display an icon next to the context menu item. If you don't want an icon displayed, simply do nothing. If you want an icon displayed, click on the "No Icon" button, and select an icon from the icon selection window that opens up.
Notice at the bottom half of the window there are directions about command parameters. For the sake of clarity, here are the choices:
%f    The path to the first selected file
%F    The paths to all selected files
%d    Directory containing the file that is passed in %f
%D    Directories containing the files that are passed in %F
%n    The first selected filename (without path)
%N    The selected filenames (without paths)
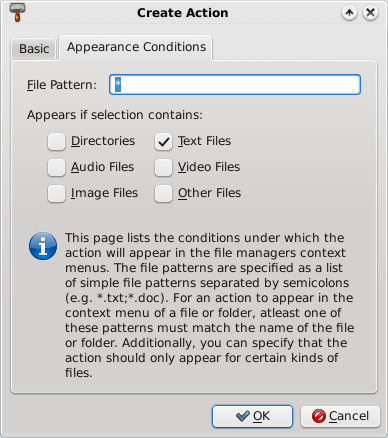
Under the second tab, "Appearance Conditions," you can select under which conditions the context menu is displayed. You can make the context menu displayed for all files and file types, or you can narrow it down to very specific conditions. The choice is yours. Be careful adding too many items that are displayed for all files and file types, as the Thunar context menu will become quite large. For me, I've found it much better to somewhat limit the conditions under which the new context menu item is displayed. We'll talk more in-depth about this a little later.
Step Three
Let's take this opportunity to actually add in a useful context menu item. For our exercise, we're going to add a context menu item that converts a JPG file into a PNG file, using the command line tools of ImageMagick.
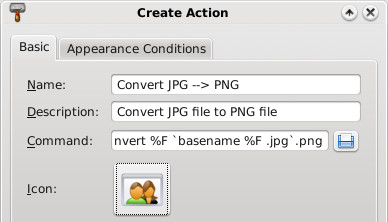
Under the "Name" field of the "Basic" tab in the "Create Action" dialog box, we're going to call our new menu item "Convert JPG --> PNG." The "Description" field contains a more general description that is displayed when the user hovers their mouse over the top of the menu item. Here, we've entered the description as "Convert JPG file to PNG file".
We've also entered the action to take when the menu item is selected, under the "Command" field. Here, we've entered the following:
convert %F `basename %F .jpg`.png
Please note that the command uses backticks, not the single quote character. The command converts multiple files (%F), using the "convert" command from ImageMagick, then uses the "basename" command to strip the .jpg file extension, and then add the .png file extension to the converted file.
I've elected to display an icon in the context menu, so I clicked on the "No Icon" button and chose an icon to display next to the context menu entry.
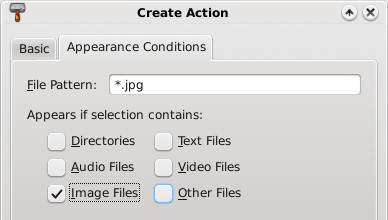
Under the "Appearance Conditions" tab, I've elected to display the context menu only when jpg files are highlighted, and only for image type of files. This way, if I highlight a .txt or .tar.gz file, the context menu isn't littering up Thunar's context menu. This is especially useful, since the command would have no effect upon those types of files anyway.
Here is what it looks like in the "Configure Custom Action" dialog box after you've finished defining the custom action:
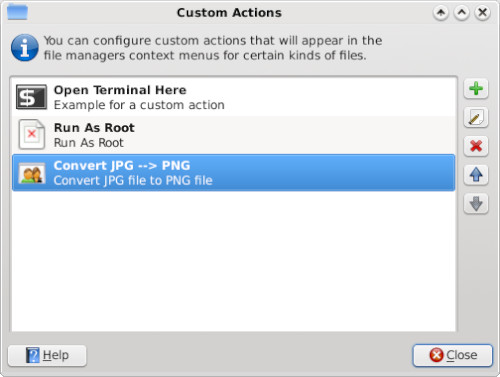
You can also edit a custom action by clicking on the icon with the pencil on it. Similarly, you can remove a custom action menu item by clicking on the red "X" button. The blue up and down buttons allow you to move the custom action menu item up or down in the list of menu items.
Advanced Topics
We can't just let the discussion stop here. There are other things to consider, when it comes to the "Command" field under the "Basic" tab of the "Create Action" dialog box, and when it comes to specifying the "File Pattern" field under the "Appearance Conditions" tab.
First, let me preface the discussion that follows with this: this is not going to be a full discussion or tutorial of the ImageMagick convert command. Entire books have been written on how to use ImageMagick and all of its tools. Just covering the convert command alone would take much more time and space than we have here. If you haven't yet explored and unleashed the power of ImageMagick, you may want to check out the ImageMagick command line tools page, or the ImageMagick Examples page. ImageMagick provides some very powerful tools for dealing with graphic files, and there is literally nothing that equals or comes close for dealing with graphic files from the command line.
We can keep the command very, very simple. The command
convert %F %F.png
will process the conversion, and simply append the .png file extension on the end of the full file name. So, if your input file is tiddlywinks.jpg, the output file will be named tiddlywinks.jpg.png. This isn't too much of a problem when you're dealing with only a few images, since you can easily manually rename the files. It becomes troublesome when you are converting a large number of images, and will require an additional step (or two) to rename the files.
The "File Pattern" field in the "Appearance Conditions" tab is case sensitive. So, if you want the context menu to appear for all JPG files, regardless of the case of the letters, you could place the following in the "File Pattern" field:
*.jpg;*.JPG;*.jpeg;*.JPEG
This will cause the context menu to display for any of the four combinations of file extensions, and only files ending with those file extensions. But there is a small problem: files with extensions not exactly matching the exact spelling and case of the file extension specified in the "Command" field of the "Basic" tab will simply have the .png file extension tacked onto the end of the existing file name and extension, as in the previous example using the very, very simple command.
If you want more precise control, where the file extension is properly stripped off and the .png file extension is appended, you could create a custom action for each of the four file extensions above: jpg, JPG, jpeg and JPEG. You would also have to alter the "basename" command to strip the respective file extension, in the "Command" field on the "Basic" tab.
Here are some other image manipulation commands, courtesy of ImageMagick, that you may be interested in turning into custom actions for Thunar's context menu. Use caution with the following commands, because they will overwrite the original image file, and your original image WILL be LOST! These commands are best used on a COPY of the original file.
To rotate an image (or group of images) 90 degrees:
convert %F -rotate 90 %F
To alter the compression level of an image to 50% quality:
convert %F -quality 50% %F
To resize an image to a width of 450 pixels:
convert %F -resize 450 %F
To resize a JPG image to a width of 450 pixels, convert it to PNG, strip the existing file extension, and rename the file to let the user know that the file has been resized to 450 pixels wide:
convert %F -resize 450 `basename %F .jpg`-resize450.png
(By the way, don't worry about having to specify both the width and the height of an image; ImageMagick will automatically preserve the aspect ratio if you specify only the width).
Conclusion
Of course, you can do more than just deal with image files from Thunar's context menu. You can specify commands that run scripts, compress files, play multimedia files, etc. You can do pretty much whatever you can imagine from Thunar's context menu, provided you can supply the proper command or commands. I'll leave you to explore the endless possibilities of custom actions you can set up.
If you are interested, you can read more about setting up custom actions for Thunar's context menu, at Thunar's web site. Let your imagination run wild.