Xfce 4.6.2: Customize Your Xfce Panels
by Paul Arnote (parnote)
Just as you are able to do with just about any other desktop environment, it's also easy to customize the appearance of the panels on Xfce 4.6.2. By default, the Xfce has panels at the top and bottom of the screen, much as you see in the screenshot below:
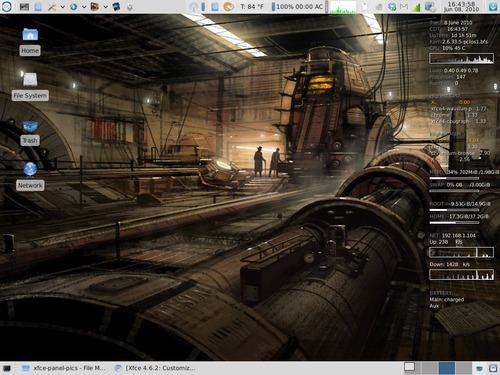
Granted, I have added panel plug ins to make my life easier under Xfce, but the above represents the default location of the default panels in Xfce. However, you don't have to live with things as they come with an "out of the box" Xfce installation. I installed the Xfce desktop on my netbook to take advantage of Xfce's lower memory usage and greater speed, using task-xfce from the PCLinuxOS repository. And, with the limited screen real estate on my netbook (8.9 inch screen, with 1024x600 screen resolution), I didn't feel as if I had room to display two full panels, full time. So it became necessary for me to "redefine" the appearance of the panels on my netbook.
Probably the easiest way would have been to simply set either the top or bottom panel to "autohide," or hide itself unless the mouse cursor hovered at the respective edge of the screen. But, for my tastes on my netbook, that still left vital information hidden from my view that I wanted access to. The discussion of the panel arrangement that follows is what's based on my likes, dislikes and the way I work with my netbook. By all means, let your imagination run with the possibilities and come up with an arrangement that works best for you.
To start with, I decided to completely do away with my top panel. But before completely deleting it, you can make your life infinitely easier by simply moving the panel plug ins that you want to keep to their new position on the bottom panel. So, with that in mind, I first moved the Xfce Menu button, the application launchers, clock, and logout/lock buttons to their new positions on the bottom panel. This is easily done by right clicking on the panel plug in, selecting "Move" from the menu, and clicking and dragging the item to its new location. In essence, my goal was to reproduce the main panel in KDE 3.5.10, with some minor alterations.

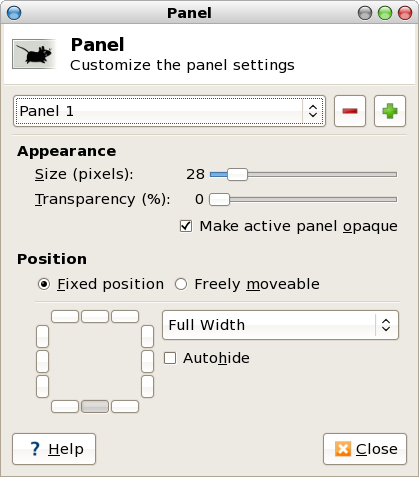
In doing this, I left the default bottom panel as it was. You can easily check that configuration by going to the Xfce Menu > Xfce Settings Manager > Panel applet. Here is the default configuration for the bottom panel in Xfce, which is noted as "Panel 1" in the following screen shot:
Next, I had to figure out a place to put additional launchers that I frequently use. I didn't feel as if I had enough screen real estate to include them in the bottom panel, so I created a second panel at the upper right corner of the screen, like this:

I set the panel to "autohide." This way, the panel is out of view and not consuming the valuable screen real estate when it's not needed. Here is the configuration for the extra launcher panel, defined in the following screen shot as "Panel 2," as seen in the Panel applet window:
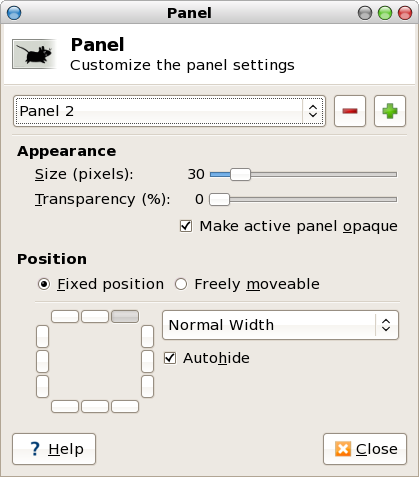
With the panel set to "Normal Width," it expands as needed to hold the items you decide to place there.
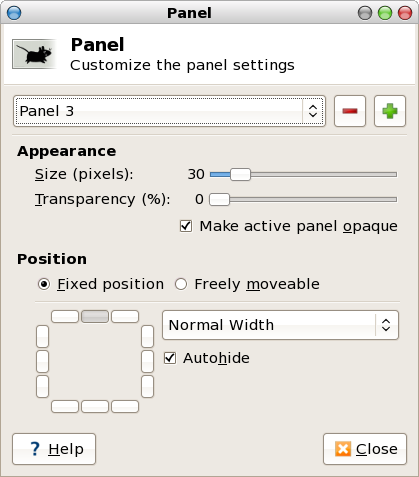
Finally, I needed to define a place to display my system notification area, since I didn't want it on the bottom panel. These are important things, like my wifi connection, my volume control, my battery charge indicator, and other things I like to reference from time to time. So I set up a third panel at the top center of my netbook's screen, like this:

Here is the configuration window for the top center panel, called "Panel 3." It is also set to "autohide," keeping it out of the way and preventing it from consuming the screen real estate until called by moving my mouse cursor to the top center of the screen.
Troubleshooting
From time to time, there have been reports of Xfce users not having any panels at all displayed on the screen when they boot their computer. Whatever you do, do not despair! Here's how to get your Xfce panels back. It's actually very easy.
- Step One: Right click on your Xfce desktop.
- Step Two: Select "Applications" from the context menu, then select the "Run Program..." menu entry.
- Step Three: Enter "xfce4-panel" into the entry box, and press "Enter."
Now, your panels should be back, in their full glory. For some reason, doing the same from the command line does not get your panels back, and only yields error messages.
Conclusion
As you can see, it's actually quite easy to customize the location of your Xfce panels. You can further customize the appearance of your panels by installing or selecting new Gtk+ 2.0 themes. Your Xfce panel colors are defined by the Gtk+ 2.0 theme you select. You can easily change your Gtk+ 2.0 theme by running the Gtk Theme Switch 2 program, under the Xfce Menu > More Applications > Configuration.
(Note: if you recently upgraded your Phoenix installation from Xfce 4.6.1 to 4.6.2, you may need to re-install the Gtk Theme Switch 2 program from Synaptic. The upgrade appears to have removed it from the Xfce menu, but it is re-added once you reinstall it from Synaptic.)
We won't be covering creating your own Gtk+ 2.0 themes, as they are often quite complex. Yet, if you want to find additional Gtk+ 2.0 themes, head on over to the Xfce Community's web page and download additional Gtk+ 2.0 themes. Additionally, there are resources available on the web about how to make your own Gtk+ 2.0 themes, should your interests take you there.