Xfce 4.6.1: Customize Your Xfce Menu
by Paul Arnote (parnote)
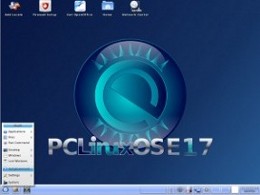
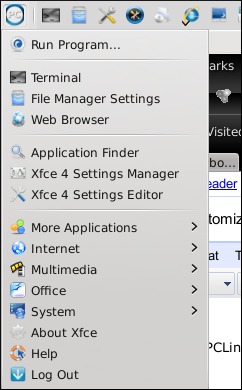
Clicking on the "PC" menu in PCLinuxOS Phoenix 2010, you get a menu that is very reminiscent of the menu used in PCLinuxOS 2009 KDE 3.5.10, and earlier. Here is what the default menu in Phoenix 2010 looks like:
When you start digging into Xfce, it may not be readily apparent how you change your menu. Certainly, a menu editor would make customizing your menu a lot easier. In fact, there was one in previous versions of Xfce. The Xfce developers are very hopeful that the menu editor will make a return in Xfce 4.8.
Fortunately, it's not as difficult as you might suspect. Also, as with many things related to Linux, there may be more than one way to modify the Xfce menu. Let me show you the easy way.
Adding Menu Items
There is a way to add items to the Xfce menu so that it shows up for all users.
First, we need to create a .desktop file. Xfce adheres to the freedesktop.org standards, just like KDE and Gnome. Part of those standards include the standardization of the .desktop file. These .desktop files are typically stored in /usr/share/applications, and from there, they are available to all users on the computer. You can read more about the freedesktop.org standards for .desktop files, if you are interested.
If you were to access (as the root user) these files in a text editor, such as Mousepad in Xfce, you might see something quite similar to the one below that was created for xfce-screenshooter.
[Desktop Entry]
Version=1.0
Name=Screenshooter
Name[bg]=Снимка на екрана
Name[ca]=Captura
Name[cs]=Snímek obrazovky
Name[da]=Skærmbillede
Name[de]=Bildschirmfoto
Name[el]=Στιγμιότυπο οθόνης
Name[en_GB]=Screenshot
Name[es]=Captura de pantalla
Name[et]=Ekraanipilt
Name[eu]=Pantaila-argazkia
Name[fi]=Kuvakaappaus
Name[fr]=Capture d'écran
Name[gl]=Captura de pantalla
Name[hu]=Képernyőkép
Name[id]=Cuplikan Layar
Name[it]=Istantanea
Name[ja]=スクリーンショット
Name[nb]=Skjermbildekopi
Name[nl]=Schermafdruk
Name[pl]=Zrzut ekranu
Name[pt]=Captura de ecrã
Name[pt_BR]= Captura de tela
Name[ro]=Captură de ecran
Name[ru]=Снимок экрана
Name[sv]=Skärmbild
Name[tr]=Ekran görüntüsü
Name[uk]=Знімок екрану
Name[ur]=سکرین شوٹ
Name[ur_PK]=سکرین شوٹ
Name[vi]=Ảnh chụp màn hình
Name[zh_CN]=屏幕截图
Comment=Take screenshots of the entire screen, of the active window or of a region
Comment[bg]=Направи снимка на целия екран, от активния прозорец или от района
Comment[ca]=Fes les captures de tota la pantalla, de la finestra activa o d'una regió
Comment[cs]=Pořizuje snímky celé obrazovky, aktivního okna nebo zvolené oblasti
Comment[da]=Tag skærmbillede af hele skærmen, af det aktive vindue eller af et område
Comment[de]=Bildschirmfoto des ganzen Bildschirms, des aktuellen Fensters oder eines Bereichs erstellen
Comment[el]=Λήψη στιγμιοτύπου οθόνης ολόκληρης της οθόνης, του ενεργού παραθύρου ή της περιοχής
Comment[en_GB]=Take screenshots of the entire screen, of the active window or of a region
Comment[es]=Realiza capturas de la pantalla completa, de la ventana activa o de una zona
Comment[et]=Tehke ekraanipildid tervest ekraanist, käsilolevast aknast või alast
Comment[eu]=Panataila osoaren, aktibo dagoen leihoaren edo panatailaren eremu baten  pantaila-argazki bat egin
Comment[fi]=Kaappaa kuvia koko näytöstä, aktiivisesta ikkunasta tai näytön alueesta
Comment[fr]=Prendre une capture d'écran de l'écran tout entier, de la fenêtre active ou d'une zone
Comment[gl]=Facer capturas de pantalla de toda a pantalla, da ventá activa ou dunha zona
Comment[hu]=Képernyőkép készítése a teljes képernyőről, egy ablakról vagy területről
Comment[id]=Ambil cuplikan layar dari seluruh layar, dari jendela yang aktif atau dari sebuah daerah
Comment[it]=Esegui l'istantanea dell'intero schermo, di una porzione o della finestra attiva.
Comment[ja]=画面全体、アクティブウィンドウまたは指定した領域のスクリーンショットを撮ります。
Comment[nb]=Ta en skjermbildekopi av hele skjermen, det aktive vinduet eller et område av skjermen
Comment[nl]=Schermafdruk maken van het gehele scherm, het actieve venster of van een deelgebied
Comment[pl]=Wykonuje zrzut całego ekranu, bieżącego okna lub wybranego obszaru
Comment[pt]=Capturar imagens de todo o ecrã, da janela activa ou de uma zona
Comment[pt_BR]=Obtem uma captura da tela inteira, da janela atual ou de uma região
Comment[ro]=Capturi ale întregului ecran, ferestrei active sau unei regiuni
Comment[ru]=Выполнить снимок всего экрана, активного окна или региона
Comment[sv]=Ta skärmbilder av hela skärmen, aktivt fönster eller ett område
Comment[tr]=Tüm ekranın, etkin pencerenin veya belirli bir alanın ekran görüntüsünü alır
Comment[uk]=Отримати знімки всього екрану, активного вікна або окремої області
Comment[ur]=پوری سکرین، فعال ونڈو یا مخصوص علاقے کی تصویر اتاریں
Comment[ur_PK]=پوری سکرین، فعال ونڈو یا مخصوص علاقے کی تصویر اتاریں
Comment[vi]=Chụp toàn bộ màn hình, hay cửa sổ đang kích hoạt hay một vùng màn hình
Comment[zh_CN]=截取全屏幕或当前活动窗口或某一指定区域图像
Icon=applets-screenshooter
Exec=xfce4-screenshooter
Type=Application
StartupNotify=true
Terminal=false
Categories=GTK;Utility;X-MandrivaLinux-Multimedia-Graphics
These .desktop files are typically created when you install a package from Synaptic, and the above is a typical example of one such .desktop file. You can also create a simpler, more abbreviated version, which is handy when you don't need all the language translations for the Comment portion of the file. A minimal .desktop file might look something similar to Leiche's SystemInfo program, as seen below:
[Desktop Entry]
Name=systeminfo
Type=Application
Comment=Show System Infos
Terminal=false
Exec=systeminfo %U
Icon=systeminfo.jpg
Categories=Infos;System;Monitor;
GenericName=Systeminfos
Encoding=UTF-8
In the minimalistic .desktop file above, it contains mostly only the required information. The "Name" parameter specifies the name of the program, as it will appear in the menu and is a required entry. There is also a "GenericName" entry, albeit an optional one. It is considered good form to include it. For example, "Name" could have said "Firefox," while "GenericName" could have stated "Web Browser."
"Type" specifies that the file we are making a menu entry to is an application, and is another required entry. The "Comment" field holds the information that is revealed in a small pop up window when you hover your mouse over the menu entry.
You will also notice that the "Terminal" entry is set to false. If we wanted the application to open in a terminal session, we can change this parameter to "true." While this entry is not required, it is considered good form to include it. It also makes it possible to include menu entries for any favorite command line utility that you may like to run.
The "Exec" parameter is a required one. This is the command to execute to launch the item. Since our item is an application, it's command we would use to launch the program. We can specify the graphic file to use as the entry's icon, with the "Icon" parameter. The "Categories" item tells us where to place the item in the menu heirarchy. Finally, the "Encoding" parameter specifies which character set is used to encode the .desktop file, so the system knows how to read or interpret it. It is an optional setting, but again, considered good form to include it. It is also recommended that it defaults to UTF-8 character encoding.
One setting we don't see in the SystemInfo .desktop file is the "URL" parameter. It is a required entry if the "Type" entry is link. In that case, we specify the URL (either a fully qualified Internet link, or a link to a local file). This means that, if you want to, you can create a .desktop file for one of your favorite Internet sites (possibly the PCLinuxOS Forum), or a file you frequently access on your computer.
Of course, you can create the .desktop file by hand, in a text editor. Fortunately, there is a GUI that helps create them.
GUI Creation of .desktop Files
First, open a terminal session, and change to the root user. Once you have root privileges, enter the following on the command line:
exo-desktop-item-edit --create-new /usr/share/applications
This will display a window, like this:
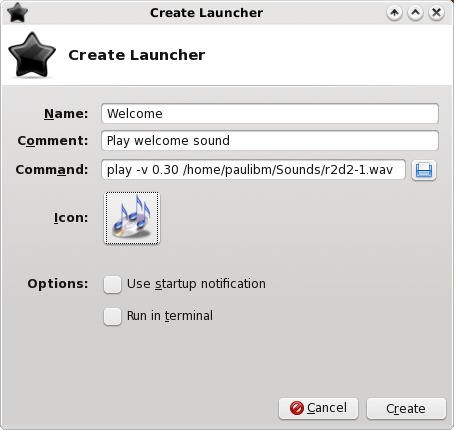
Now enter the requested information. On the "Name" line, enter what you want to display in your menu item. On the second line, Comment, enter the information you want displayed when you hover your mouse over the menu item. The "Command" line is, as you might guess, the command you want to execute when you select the menu item. Here, I'm playing a wave sound file, r2d2-1.wav, when the menu item is selected. Obviously, you may want your menu selection to do something more significant than listen to r2d2 beep about your computer. Next, click your mouse on the "No Icon" button, and choose an icon you want to use to represent your menu entry. Click on "Create" to have your new .desktop file created in /usr/share/applications.
(Tip: if you plan on doing much of this, you may want to make a menu entry using the command above, to make it easier create additional menu entries. If you do, you need to change your command line to read:
gksu -l 'exo-desktop-item-edit --create-new /usr/share/applications'
and when launched, it will properly ask for the root password. You must have root privileges in order to save the new .desktop file to /usr/share/applications.)
We're Almost There …
There's only one more thing we have to do, and that is to specify where to place the menu item within the menu hierarchy. Notice that we really haven't messed with the menu hierarchy. That is defined elsewhere on your system. You can take a look at it by going to /etc/xdg/menus/applications.menu. But whatever you do, do not change anything there, unless you REALLY know what you are doing. You've been warned. All we are doing here is adding menu items within that menu hierarchy.
With root privileges, go to /usr/share/applications, and open the .desktop file you just created. Look for the "Categories=" section. At the end of whatever is on that line, add the following:
X-MandrivaLinux-Multimedia-Sound
This tells Xfce to place a menu item in the Sound sub-menu of the Multimedia menu (we are still presuming that we are playing the sound file from our example earlier). If you followed the tip above about how to put the GUI for creating .desktop files, you may want to put a menu item under "System > Configuration". In that case, you would append the "Categories=" line with the following:
X-MandrivaLinux-System-Configuration
This will insert a menu item under "System > Configuration" with the name you specified and the icon specified. Trust me, it's a lot easier than it sounds.
Removing Menu Items
Lastly, if we can add menu items, we may also want a way to remove a menu item, as well. There are two ways to do this. First, we can simply delete the .desktop file from /usr/share/applications. But this method is destructive, and leaves you with no option to get the entry back should you later change your mind. You also lose all mime associations with that program, which may not be a good thing.
Fortunately, there's a much easier and less destructive way to remove a menu item. Simply add the following line to the .desktop file you want to remove from the menu:
NoDisplay=true
The .desktop file is preserved, as are all the mime associations with that program. And, should you change your mind and want the program represented by your .desktop file to appear in your menu once again, all you have to do is remove that line.
Conclusion
As you can see, it's relatively easy to add and remove items from your Xfce menus. Certainly, it would be a lot easier if there were a GUI menu editor, but then the Xfce developers are aiming to have that back in the mix in version 4.8.x of Xfce. Still, the process is not difficult, even if it is not readily apparent how to add or remove menu items.