Command Line Introduction:
Episode 5
by Peter Kelly (critter)
The Linux File System
The Linux file system is built like an upside down tree starting with the root directory /. Don't confuse this with the user name root. This is the root of the file system. From this root, grow branches, and from there grow other branches — ad infinitum. The first level of branches is mostly standard, although other distributions may add special directories, and you may also add some yourself. Where a file or directory is located within the file system is known as the path. The path of these first level directories is always /{directory name} e.g. /home. As you make your way through the file system, every time you reach a new branch, like a fork in the road, you add another / so that you would refer to a particular file as:
/home/jane/mydir/myfile1.
This file is three levels deep, and this way of referring to it is known as the absolute path. When jane is in her home directory /home/jane, she would refer to the same file as mydir/myfile1 this is known as the relative path, relative to where you are in the file system.
The standard PCLinuxOS file system looks like this:
/           The root of the file system
/bin        Commands for use by the users
/boot       Files used by the boot loader (grub)
/dev        Hardware is treated as files and here is where you can access them
/etc        Miscellaneous scripts and system configuration files
/home       Users home directories are in here
/home/jane  Jane's home directory
/home/john  John's home directory
/initrd     A special directory used by PCLinuxOS at boot time
/lib        Common libraries of routines used by various applications
/media      Where the system mounts external media (e.g. thumb drives)
/mnt        Other files systems are often mounted here
/opt        Additional 3rd party application software
/proc       Memory resident file system that tracks the system state
/root       The super users home folder
/sbin       System administration and privileged commands
/sys        A virtual file system akin to /proc storing dynamic kernel data
/tmp        Temporary system-wide storage area
/usr        Other installed applications, documentation and shared resources such as icons
/var        Various log files, mail and print spoolers etc.
Any distribution that you encounter will not deviate too much from this, although there may be some small changes.
All of this takes no account of which hard drive or storage device any of these files are actually on. That depends upon where on the tree the file system that is resident on the device is mounted. Note that /proc & /sys do not exist on any hard drive. They are memory resident only. Try du -sh /sys to display the disk usage of the /sys directory.
Mounting and unmounting file systems
When you boot the system, the device nominated as the root of the file system is given the path /. The installation process will have created the necessary folders at the first level, as shown above. If you elected to have a separate /home partition, then the /home directory will point to that partition. The partition is then said to be mounted at /home. You may add or remove additional devices as you see fit to anywhere on the file system. To mount a device on the file system, you need to provide certain information:
- The type of file system used by the device
- The mount point — where on the file system the device is to be mounted
- The device name or id
- Any options that control how the device is accessed and mounted
The type of the file system could be one of very many recognized by the system but the ones thet you are most likely to encounter are:
- ext2
- The second extended file system also known as the linux native file system. There was a first, ext, but it is no longer supported and shouldn't be used.
- ext3
- This is ext2 with the addition of a journal. I'll explain journals in a moment.
- ext4
- The next stage in the development of the ext file system. This is still in the testing stage but usable if you want to experiment. It should not however be used in 'mission critical' situations such as servers or for the boot partition of a system until your distribution approves it.
- reiserfs
- A popular journalling Linux file system
- iso9660
- Used on CDROM and DVD disks
- vfat
- Used to access Microsoft fat file systems.
- ntfs-3g
- The open source driver to access ntfs file systems used by Microsoft Windows.
- nfs
- Networking file system, not to be confused with ntfs.
- swap
- The linux swap file system type
The device name may be given in various ways.
- /dev/xxxx. This is the traditional way.
- LABEL={the partition label}. This can be used to simplify recognizing what is on a particular partition.
- UUID={Universally Unique Identifier} This is the system that is currently used by PCLinuxOS in /etc/fstab.
While UUID may be confusing to look at, it has advantages in multiple partitioned systems. If you are happy to let the system look after things, then this is best left alone. If you want to take control, then either of the other two methods might be a better bet.
The default options are usually ok but in certain cases you may need to specify others, the most usual ones being:
- auto or noauto to mount or not when the command mount -a (all) is issued or when the system is booting.
- user to allow an ordinary user to mount the file system, only that user or root may unmount the file system.
- users allow all users to mount or unmount the file system.
- ro or rw to mount the file system read only (e.g. a cdrom) or read write.
To use the mount command to manually mount devices, you usually need root permissions, and you would issue commands like these:
mount -t auto /dev/cdrom /media/cdrom -o ro
- -t specifies the file system type, here we are requesting that the system recognizes the file system type automatically. If this option is omitted then the mount command will attempt to guess the file system type.
- -o is the start of a list of options, separated by commas, that control the method of mounting the device.
- ro read only is the only option used in this example.
mount -t ntfs-3g /dev/sda1 /mnt/windows mounts an ntfs formatted windows partition.
To discover which file system devices are attached to your system use the command:
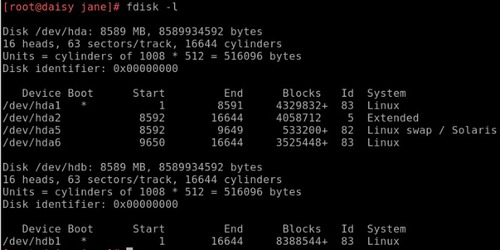
fdisk -l.
To then find the label, uuid and file system type of a device you wish to mount issue the command:
blkid {device name from fdisk -l command}.

If you need to use labels or uuid, then use:
-L {label} or -U {uuid}.

To create a label for an ext2, ext3 or ext4 file system use the command:
tune2fs -L {label}.
mount on its own gives a list of all mounted file systems and their types, Adding -l will also show the labels. This information is actually the contents of the file /etc/mtab, which is one of the places the system keeps a list of mounted file systems. The other is /proc/mounts. Try cat /proc/mounts.
mount -a mounts all devices listed in /etc/fstab, except those with the option noauto.
If a device is listed in /etc/fstab, then the mount command will take information from there and require you to supply only the device name or the mount point.
To remove a device from the file system, the command is umount. Notice the missing n.
umount /dev/cdrom
umount -a unmounts all file systems. A file system cannot be unmounted if a file or directory in it is being accessed. The root file system / of a running file system cannot be unmounted.
Why bother with unmounting a file system? Well, this is all to do with keeping things in sync. Linux is a multi-user, multi-tasking system, and as such, has to use system resources like memory and processor time wisely. Unless instructed to the contrary, data is written to file systems asynchronously, i.e. not when the command is issued, but when the system deems it prudent to do so. Even if you are the only user on the system, you may have several applications that periodically write to a file, like perhaps an autosave feature or a scheduled event like a backgrounded backup task. All of the data cannot be written at the same time, and so it is sidelined until it can be. Removing a floppy disk without first unmounting it, for example, might cause data loss and will confuse the device management system. The umount command synchronizes the file system before releasing it.
Journalled file systems were introduced to go some way towards protecting file systems against corruption when asynchronous data writing is used and the system suffers a catastrophic event, such as a power failure. Writing data is a multi-part operation, known as a transaction which involves the data, inodes,the directory entries and other metadata. If any part of this transaction is not completed when the system is brought down, then file system corruption occurs. On a large file system, it can take a while to rectify, walking through inode by inode, block by block. In a journalled file system, when a transaction is authorized, the processes involved in the transaction are recorded in a central area before any data writing is committed. If the transaction is incomplete when the crash occurs, then on reboot the journal is replayed, and the transaction is then completed. This makes recovery much quicker. An ext2 file system can be converted to ext3 without data loss by using the command tune2fs -j /dev/xxxx.
For a device like a CD drive, once the drive is unmounted, you can get the disk out with the following command:
eject -T (-T toggles the state of the drive tray between open and closed, repeat the command to close the tray.)
You could, of course, just push the eject button on the device. But if the PC is under the desk, you may it useful to put a shortcut on your desktop to this command. eject should automatically unmount the volume if you have not already unmounted the volume. If you have an external floppy drive or an iPod (such as a second generation Nano), you must issue the eject command before disconnecting the device, or removing the floppy from the external drive. eject ensures that any data left in the buffers is flushed to the device, preventing corruption of the data on the diskette or device.
For those devices that need to be mounted at boot time, or are required to be regularly mounted or umounted, the system keeps a look up table that provides this information. It is found in the /etc directory and is called fstab.
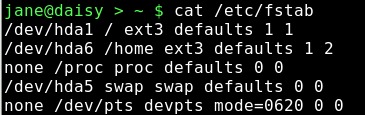
The above is a fairly standard fstab. Look at the first line. It tells the system that when mounting /dev/hda1, it should be mounted to /, it uses the ext3 file system and the default options should be used to mount it. The last two numbers aren't relative to mounting partitions, but for completeness. The first of the two numbers is known as the dump number. Dump is a back up program, and checks this number to decide whether or not to include this file system in a backup. Zero means no. The second of the two numbers is used to decide the order in which file systems should be checked using the fsck utilities. It is usual for the root file system to have a value of 1 here, and other file systems that are to be checked to have a value of 2. If a file system is to be skipped in a 'full' file system check, then it must have a value of 0 here.
Working with partitions and file systems
One thing that causes a lot of people problems is the management of partitions. Not that there is anything inherently wrong with partitions, or that they are difficult to understand. Just sometimes they, or the configuration files used to access them, get screwed up.
A hard drive can be divided up into smaller chunks to separate data, or to house different operating systems. Initially, when the partitioning system was proposed and hard drives were small (just a few Megabytes. My first hdd was 40 MB. Wow! All that space.), four partitions were deemed sufficient, but as hard drive sizes increased, a work around was found to allow more than four partitions The original partitions were designated primary partitions, and if one of those was sacrificed and created as an extended partition, then this could be used as a container to house logical partitions. There can be only one extended partition in the partition table.
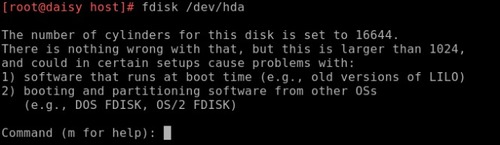
Linux has a lot of utilities for dealing with partitions, from small cli-only utilities, to full blown graphical applications. PCLinuxOS Control Center uses the excellent diskdrake to provide a 'radically simple' graphical utility suitable for even the newest to Linux. We are going to use a cli-only utility called fdisk.
There several reasons to use fdisk. Messing about with partitions can be very dangerous, and it is all too easy in a graphical environment to get 'click happy' and wipe out a full system (although if a new file system hasn't been written to the device, it is still possible to recover). In a console, things tend to be more focused on the task at hand. A small utility like fdisk has fewer commands, and here simple is good. You will always find fdisk or something similar on any distribution.
We've already used fdisk -l to get a list of devices but now we let's type:
fdisk {device}
Here, device is the device name without a partition number, as fdisk works with entire devices. So use /dev/hda, not /dev/hda1.
Typing m (enter) at any time will give us a list of available commands.
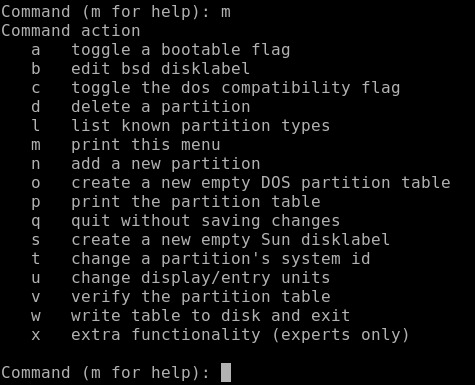
There are only sixteen commands available, including 'm' for the list of commands.
Linux uses DOS partition tables, so it is unlikely that you will ever need the 'b' and 's' commands, and for now I think that option 'x' should be avoided. That leaves us twelve commands with which we can destroy our system, but only one command will do that: the 'w' command. Until that command is issued, none of the changes that you have made are permanent. The 'q' command is our 'get out of jail free card.' Whenever we issue the 'q' command, we are returned to the system without committing any changes. Instantly and without fuss.
As for the remaining commands.
- a Some versions of the MSDOS/Windows boot loader would only expect to see one, and only one, primary partition marked as boot-able, usually the first partition on the disk. Linux boot loaders grub and lilo just ignore this if set. If you are dual booting Windows and Linux, it does no harm to leave this as is.
- c Normally this flag is not set under Linux and if set can cause problems with overlapping partitions — best left alone.
- d Delete a partition
- l Print a list of all partition types known by fdisk
- n Create a new partition
- o Create a new partition table replacing the existing one — this removes all partitions on the device. Use with care.
- p print the partition table to screen
- t Change the partition system id — this hexadecimal code tells the system what kind of file system to expect on the partition, e.g. 83 for ext2/ext3 file system
- u Switches the display units between cylinders and sectors
- v Verify the integrity of the partition table
You can experiment with these few commands until you feel comfortable, just don't use the 'w' command unless you mean it. 'q' will get you out.
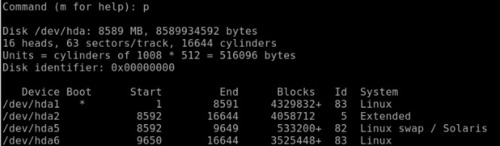
If you look at the output of the 'p' command in the screen-shot, we can get a picture of the layout of the entire device — IDE hard drive no 1 in this case. (NOTE: IDE is now called PATA (for Parallel ATA) to distinguish it from SATA, or Serial ATA. PATA and IDE are interchangable terms when referring to the technology.) The drive is organized into a total of 16644 cylinders, and so all of the partitions must be created on cylinders 1 to 16644. If this is not the case, then you have a problem. Partition numbers 1 to 4 are reserved for primary partitions, whether or not they exist. Logical partitions are numbered from 5 upwards.
Partition 1 occupies cylinders 1 to 8591 and is a primary partition.
Partition 2 is also a primary partition created as an extended partition and occupies the rest of the disk so there can be no more primary partitions. This partition runs from cylinder 8592, the next available cylinder, to cylinder 16644 which is the end of the disk.
Partition 5 also starts on cylinder 8592 running up to cylinder 9649. This is the first logical partition.
Partition 6 occupies the remaining cylinders and is the second logical partition.
This all works very nicely, using all of the available space on the disk. Er! well no, not really. Let's change the display units from cylinders to sectors with the 'u' command.
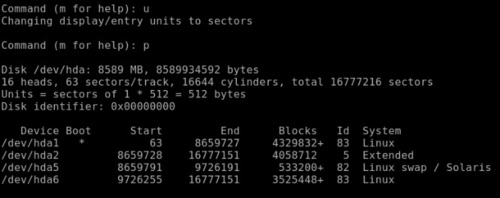
Then, we can see some ragged edges between starting and ending numbers. This is perfectly alright. Partitions must start on a cylinder boundary with the exception of partition 1.
Resizing partitions is a risky business. A partition is a container for a file system, so you could use fdisk to delete the partition from the partition table and then create a new partition. You would then need to resize the file system using a tool like resize2fs. Or, you could use a tool like gparted or diskdrake to do the job for you. In any event, it is a dangerous process, and not one one that I would be prepared to undertake without having a trusted, recent backup of all the data on that partition. If such a backup is available, then a better strategy would be to delete the partition, create a new partition, create a new file system on the new partition, and re-populate the partition from the backup. (NOTE: this latter method is also, typically, faster.)
Before a partition can be mounted it must contain a valid file system.
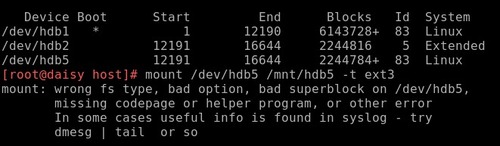
The partition has been created with an id of 83, which tells the system to expect a file system of type 'Linux Native,' so we need to create one. The command for this is mkfs, and initializes or formats the file system, laying out stuff like the directory tables and inode tables and setting up block sizes etc. Unlike partition table creation, this process overwrites existing data.
If you type mkfs into a terminal and then press tab you will see that there are many variations of the command. You can use the one that fits the file system type you want to create, or you can use the mkfs command with the -t option and supply a file system type.
WARNING! Just make sure that the target partition is correct, as you will get no warning and all data on the partition will be overwritten!
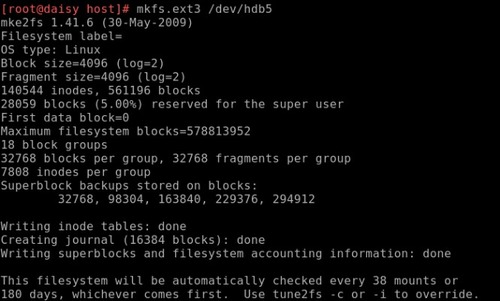
Of course, there are a multitude of options that you can pass to the command to control exactly how the file system is created, but in matters as fundamental as file systems, I prefer to accept the defaults. You can see from the output that automatic file system checking will take place at predetermined intervals, but if you want to do it yourself, then the drive should be unmounted. To check the root file system, it is easiest to reboot from a Live CD, and check the file system while running from the Live CD.
To check a file system, use the command fsck. Each file system has its own specific checking utility, and fsck is a 'front end' for the these utilities. If the file system type is known, then it can be specified with the -t option, or fsck will look in /etc/fstab for it. Of course if you know the name of the correct utility you can use that directly.
fsck -t ext3 /dev/hdb5 or fsck.ext3 /dev/hdb5
Whether or not a disk is to be automatically checked is determined by the value in the sixth column of /etc/fstab. The frequency of checking ext file systems is determined when the file system is initialized, but this can be overridden with the utility tune2fs -c to change the total number of mounts.
Use tune2fs -i to change the interval in days. Add w or m to the number for weeks or months.

Swapspace
This is a file system that always provokes a lot of discussion. It has its own set of tools, and is used by the system, not the users. One question that always crops up is "How much should I have?" The answer is always the same: "That depends."
Swap space was introduced in the days when memory was very expensive, and therefore very limited. When system load was high, it was possible to run extremely low on memory, which meant that the kernel had a busy time trying to juggle things around just keep the system running. This resulted in a slow and unresponsive system. With swap space, the system administrator could give the system some storage space to use as temporary memory. Because the data in memory had to be 'swapped' in and out of memory to the much slower hard drive space, it was always only a temporary solution, and if swap space was being frequently used, it was a sure sign that the installed memory was insufficient for the demands placed on the system.
Today, things have changed and modern systems have large amounts of memory. The rule of thumb used to be to have twice as much swap space as RAM. If you are limited to a small amount of memory, say 256MB, then 512MB of swap would be reasonable. If however your machine is fitted with 2GB or more, then twice that would be rather ridiculous, and could even slow down the machine. If you do a lot of memory intensive tasks, like video editing, then you may benefit from more swap space. If you use a laptop that utilizes hibernation, then you will need a little more swap than RAM, as all the contents of RAM are copied to swap space when hibernation is entered, and copied back to RAM on resume. The thing to do is to monitor memory usage, either with a graphical system monitor, or with the command free. You can always add more.
Swap space can be in the form of a partition or a file. Partitions are the preferred method, as they tend to be somewhat faster, but a swap file can be a great temporary measure if the system suddenly finds itself low on ram and swap. To create a swap partition, you can use fdisk and create a partition of type id 82 (Linux swap).
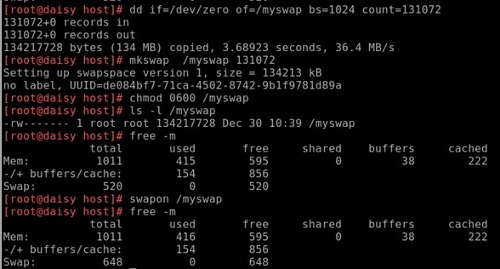
To create a swap file is slightly more involved. You will need to create a file of the desired size, and then write data to it. To create a swap file of 128Mb (131072 blocks of 1024 bytes) called myswap in the root directory, and to fill it with null characters, use the command:
dd if=/dev/zero of=/myswap bs=1024 count=131072.
It is advisable at this stage to make sure that the system has actually written all the data to the file. The command to do this is simply sync.
This file then needs to be formatted/initialized to the swap file system.
mkswap/myswap 131072
Now, the file permissions need to be changed so that only the system has read/write access.
chmod 0600 /myswap
The file is now ready to be used, and can be added or removed with the commands:
swapon /myswap and swapoff /myswap.
Do not delete the file without first removing it from swapspace with the swapoff command.
If you want to make it permanent, then add an entry to the /etc/fstab file.
/myswap swap swap defaults 0 0
There are a couple of system directories that need a little more explanation, /dev and /proc.
/dev
This is a strange directory, unlike most of the others that are full of files that are recognizable. Actually, this directory is full of files, device files. As already stated, Linux treats everything as a file, so device files are how we communicate with the systems hardware. They come in two distinct types: block devices that store data, and character devices that transfer data. A hard drive is a block device, and a keyboard is a character device.
In a long directory listing, ls -l, the first character of every line denotes the file type. - for a normal file, d for a directory and l for a link to another file. If we type ls -l /dev, we notice that apart from a few lines starting with d or l, the majority start with a b or c to denote a block or character device file. Every device on the system, and some that aren't, will be represented here, along with a few strange ones. We've already met /dev/null and /dev/zero.
If you look at the listing for the block and character devices, you'll notice something strange about the file size. It is given as two numbers, separated by a comma. This is not a file size, but the major and minor device numbers. The major number is specific to the type of device, and is used by the kernel to determine which driver to use to communicate with the device, while the minor number refers to a particular device. By example:
The first IDE/PATA channel on a PC can support up to 2 devices (master/slave), and is allocated block major 3. The first full device is then hda — block 3, 0. Partitions on the device are then numbered sequentially.
hda1    3, 1
hda2    3, 2
(and so forth).
The second device is:
hdb    block 3,64
hdb1   3,65
hdb2   3,66
etc. The second ide channel (hdc & hdd) get major number 22.
SCSI devices (including SATA drives and USB mass storage devices) start at major number 8, but partitions minor numbers repeat every 16, giving a maximum of 15 partitions per device.
Partitions on SCSI devices are numbered similar to the IDE/PATA devices, but are named as follows:
sda1    8, 1
sda2    8, 2
This will always be the case for systems equipped with SATA drives. In the case of USB mass storage drives, including external hard drives and memory card readers (SD/MMC, MemoryStick, CompactFlash, etc.), the device name will be sdx, where x is determined by the order in which the USB mass storage devices are detected. For example, if a laptop has a SATA drive and a built-in card reader that reads and writes SD/MMC and MemoryStick cards, then these are named sda for the hard drive, and sdb for the card reader. Plug in a external hard drive, and that hard drive is named sdc.
/proc
There is a wealth of information in here, and it reflects the entire state of the system. Unfortunately, it is not easy to find what you want, and when you do, you will probably be overwhelmed by the amount of detail. If you look inside this directory, you will see a lot of sub-directories with numbers for names. Each one of those contains all the details about a running process. The numbers are the process id, and the first one of these folders has the name 1, and contains information about process 1 - init, the first process to be run on boot up. If you poke about in these directories, you can find out things like the full command line that was used to invoke the process, it's current working directory and a whole bunch other stuff the the kernel finds really cool, but is of little use to mortals. Get past these numbered directories, and things start to make more sense. If you want to know all about your processor, try cat /proc/cpuinfo. Want a list of modules? Use cat /proc/modules. Most of the files in here are read only, but some of them, notably many in the /proc/sys directory, are writable. Even though the effects of any changes only last until the next reboot, you should be careful in here.
For example, to temporarily change the machines hostname you could type as root echo newhostname > /proc/sys/kernel/hostname. Start a new terminal to see the effect.