Command Line Intro - Part 2
by Peter Kelly (critter)
In last month's tutorial, I presumed that anybody reading it had no experience whatsoever of using the command line. If you worked through that, then you should be ready for a more in depth look. There is nothing too taxing in here, but you may find more text per sub-heading. If you find an area where you come to a brick wall, just walk around it and carry on. Maybe come back to revisit it, or maybe wait for that forehead slapping moment "Dohh!" or even "Eureka!" when enlightenment arrives.
If you followed along with last month's installment, you will now have a little experience of typing commands on a command line using the application konsole. So what? You could have done any of those things without having to do all that silly typing.
The application konsole is known as a terminal emulator. It allows you use the command line, without losing sight of your warm and cozy KDE GUI. But what happens if the X System, that is the windowing system that KDE runs on, crashed? Or some configuration file that the system depends upon got corrupted, and when you booted up, you were greeted only by some weird message and an almost blank screen?
A leap in the dark
Press and hold Ctrl + Alt and press F2.

Now that is a terminal.
Don't panic! Your precious GUI is still around.
Ctrl + Alt + F7 gets you back.
Actually, you could have pressed any of the function keys from F1 to F6 to get a raw, text only terminal.
I am currently logged into my KDE session as user jane, so if I now drop into a text terminal as before,
Ctrl + Alt + F2,
I am prompted to log in.
home login:
jane (enter)
password:
Yes, in Linux I can be in two places at the same time. I am logged in as jane in my KDE session, and I have now logged in again as jane in this terminal. I now have access to all janes files and can edit them, delete them, move them, rename them and create new ones. I could have logged in as any user that I knew the password of and had access to all of their files. If I had logged in as root then I could have had access to all files on the system and have inadvertently caused chaos. For that reason you should avoid logging in as root at all costs, there are other ways to do things. There are times when it is necessary to log in as root but it is very rare and should only be done if you are absolutely sure about what you are doing.
A change of direction
Type cd ~ to make sure that you are in your home directory and then create a new file by using the command,
touch newfile (enter), which creates a new, empty file called "newfile".
echo "this file was created in terminal 2 on " > newfile, puts some text into the file.
Remember that the > symbol catches the output from the command and puts it into the file (replacing what was there originally so be careful when using it).
Type date >> newfile
Using the symbol twice >> catches the command output and appends it to the file.
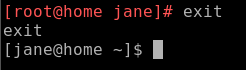
exit logs me out and
Ctrl + Alt + F7
puts me back into KDE. Or, more correctly, into the terminal that is running the X System and the KDE environment.
Let's have a look at the contents of the file that we just created.
cat newfile

What we are doing here is known as 'redirection' and is a very important concept for working on the command line. Most Linux commands are 'stream oriented'. This means that data flows into and out of the command rather like a sausage machine — meat in one end, turn the handle and get sausages from the other end. The data is processed by the command as it flows through the command.
Let me try to explain what happens when you sit down and start to type a command at a terminal running a shell program such as bash. As you press a key (or a combination of keys like Shift + a, then the shell program stores the value of that key press in a special area of memory known as a buffer and prints a copy of it to the screen (usually the screen anyway — see later) and then waits for another key-press to add that also to the buffer. When you press the enter key it signals the end of that batch of input and the entire contents of the 'keyboard buffer' are sent to be interpreted. This where bash works its' magic.
Bash takes all of the key presses that you have typed from the keyboard buffer, lays them out on the table into groups that you separated with spaces, looks for any group of characters that it recognizes as a command which it can execute, looks for certain special characters that have a special 'shell' meaning and then decides what to do with the rest of the groups on the table based upon what it has just found.
Usually this just means that when you enter a command line such as
ls /home/jane,
bash has two things on the table, ls and /home/jane.
Now bash recognizes ls as a command and so it looks for input information (how to use the command), any options that may modify the default way that this command performs its' function and for what to do with the results. (This a very simplified overview but is sufficient for our present needs).
Previously we defined the command format to be
{cmd} {options} {argument}
Now we know a little more about bash we can expand this to
{cmd} {options} {input argument} {output argument}
{cmd} is the name of the command to execute.
{options} such as -a or -al are ways of modifying the output or result of the command.
{input argument} is anything that you want to send to the command to work with.
{output argument} is where you want the results of the command to go.
Now that bash has found a command ls, it looks for a group of key presses on the table that qualifies as a suitable {input argument} for the command and finds /home/jane. If nothing qualifies then the programmer who wrote the command will hopefully have provided for a 'no input' default condition. ls with no input defaults to the value 'wherever I am now'. There are no options to tell the command to modify its' output therefore the output will be the default for the ls command — a simple listing.
With no {output argument}, most commands default to 'print it to the screen'. So this command prints a simple listing of the directory /home/jane to the screen.
These default values for where the input comes from and to where the output is directed can be changed by redirection. This is where you tell bash to temporarily change its habits and to take instructions from the command line.
The shells default input and output are known as stdin and stdout (the standard input device — usually the keyboard, and the standard output, device which is normally the screen). (There is a third data stream known as stderr 'standard error,' but let's learn to walk first, eh?)
You can however, redirect data from other sources, or to other destinations such as files. In the previous examples, we have redirected the output to a file, instead of displaying it on the screen by using the > operator. To redirect the input from somewhere other than stdin, we use the < symbol. Try this.
ls /etc > newfile2 lists the contents of the directory /etc to the file, newfile2.
sort -r < newfile2 sorts the contents of the file in reverse order.
Here, the ls command takes its input from stdin (/etc) which was typed into the keyboard buffer and the output is redirected to the file, newfile2, instead of being printed to the screen. In the next line, the sort command uses contents of the file, newfile2, as its input and, as we haven't specified otherwise, sends the output to stdout, the screen.
There is a better way to do this using a mechanism which you have seen before. It is called a pipe, and looks like this |.
ls /etc | sort -r gives the same result as the two lines above and cuts out the middleman, i.e newfile2. The output from the command, ls /etc, is pushed through a pipe, |,into the command sort -r.
So what's the difference between ls > sort and ls | sort? This is often a source of confusion. ls > sort takes the output from the command, ls, and redirects it to the file 'sort', which it creates if necessary, rather than to the screen (stdout). Probably not what was intended.
ls | sort takes the output and pipes it through the command sort which in turn sends its' output to the screen (stdout) as this output has not been redirected. In this manner fairly complex commands can be built up.
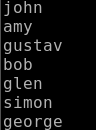
Create a small file with a random list of names using some of the bash editing features described last month.
touch contacts
echo john > contacts
Use the up-arrow to bring back the previous line then alt + b and the delete key to edit the line.
echo amy >> contacts
(don't forget to use the >> (append) operator here.)
echo gustav >> contacts
echo bob >> contacts
echo glenn >> contacts
echo simon >> contacts
echo george >> contacts
Look at the file contents. Type cat contacts.
cat contacts | sort | tr [a-z] [A-z] > contacts2
What did that do? Type cat contacts2.
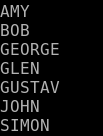
In the above compound command, the contents of the file contacts is piped to the sort command which, with no options supplied to modify the output, sorts the contents alphabetically from a to z, which is the commands default action. This in turn, is fed to the tr (translate) command which converts any character in the range [a-z] to its uppercase equivalent [A-Z]. Finally, the results from the translation are written to a file called contacts2, which will be created if necessary, or overwritten if it already exists. Don't worry if you don't understand how these new commands work. I just want you to get an idea of how we can 'flow' data from files, through commands and filters, and then write that data to a file or to the screen.
Editing on the command line
When we made the file contacts, we did it line by line, which is obviously unsatisfactory for all but the simplest files. What is really needed is a text editor. We could call up a graphical one that we are familiar with, such as kwrite, but not when we are in a text terminal, as we were when we typed Ctrl + Alt + F2. If, for example, the X windowing system won't start, then you may well find yourself in just that position.
The basic editor which you will find in almost every distribution is vi, which we will visit later, as it may well be that one day it is all you have at your disposal. It is however, very powerful editor, though difficult and not very intuitive to use for new users.
Fortunately, PCLinuxOS comes with a very nice, simple editor for command line work. Meet nano! Typing nano on the command line opens the editor with a blank page. If you specify a file-name after the command, nano, then it will open that file if it exists. If no file of that name exists then no file is created at this stage but you will be prompted to save your work with this file-name when you exit. Only then is the file created.
Typing nano contacts2 opens the editor with our sorted file, and the cursor is on the first character of the first line.
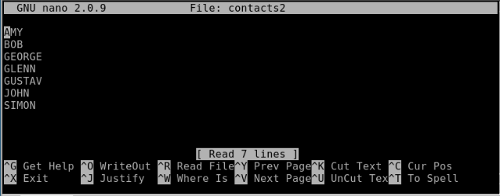
The screen is divided into four areas:
- The top line of the screen is known as the header bar. This shows the version of nano and the name of the current file being edited. If you didn't specify a file name, then this will read 'new buffer'. If the file has been modified since the last save, then 'Modified' will be shown on the right hand side of the header bar.
- The bottom two lines show a list of command shortcuts. Nano commands are defined by either the control key being held down while the shortcut key is pressed, or by the shortcut key being preceded by the escape key. The caret symbol, ^ represents the control key, so for example, Ctrl + x exits the program. The escape key is represented by M. These few commands are usually enough for most purposes. Esc - a marks text, and Esc - m enables/disables limited mouse support. If you want more then there is more, Ctrl + g will show you a brief introduction.
- The third line from the bottom, just above the list of the commands, is the status line which shows that nano read in 7 lines from the file contacts 2.
- The rest of the screen is the editing area.
With the file contacts2 loaded, use the arrow keys to position the cursor on the letter L of the name GLENN. Press esc + as to start marking text. Press the right arrow key 3 times to mark the 3 letters LEN and press ctrl + k. This removes the three letters and places them in the cut buffer, a temporary storage area. Press ctrl + u. This inserts the contents of the cut buffer at the current cursor position restoring the name GLENN. Use the arrow keys to position the cursor at the end of the file and press ctrl + u again to add the new contact LEN. This is cut & paste nano style.
ctrl + o prompts you to write out the file with name, contacts 2. Pressing enter saves the changes and puts you back in the editor. If you change the file name to save the file as you will be prompted to confirm this and returned to the editor with the new file. Add a few more names then press ctrl + x. Answer y and press enter to leave the editor saving your changes.
This type of simple editor is ideal for beginners to edit Linux configuration files as it produces only text with no fancy formatting that might be misinterpreted. If you want to write a novel use something else.
Sitting in the bosses chair
For some things you do need to have the special privileges of the root user and the safest way to do this is to use the command, su. This command allows you to 'switch user' identity to that of any user you know the password of.
su john will prompt you for the password of john. If there is a user account for john, and if the password is successfully entered then the shell will allow you full access to all of john's files and directories. This is why you should keep your password safe, because su is a very powerful command.
Typing su without a user name will assume that you want to have root access to all files and directories and will prompt you for the root password.

When you have root privileges you are able to make your system completely unusable!
Let's do some root stuff.
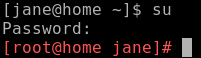
Notice that the prompt symbol has changed from $ to #? Maybe you didn't but I'm pretty sure that you noticed the prompt is now bright red. This is not always the case but the developers of PCLinuxOS believe that you really should be aware that you are now in a position to do some real damage and have modified the prompt to reflect that. Notice also that the prompt shows I am working now as root, not jane, but I am still in jane's home directory. Be aware that the commands, cd and cd ~, will now take you to the directory /root and not to jane's home directory /home/jane!
One thing that root can do that mere mortals cannot is to add and delete users on the system. To add a new user named john to the system the command, useradd john, creates the user account and sets up the user environment by copying the files that the system administrator or the distribution developers have placed in the /etc/skel directory. It does not add the user to any groups other than the users default group, this can be done here with the -G option followed by a list of groups or later with the command usermod. We'll cover groups later when we get to file permissions.
You should follow the account creation with
passwd john
to create an initial user password for the new john account and then pass this password to the user who, once he has logged in with it, may change it using the same command.
userdel john
deletes the user. If you specify the -r option here then the users home directory and any files it contains will be deleted. There is also a command called adduser which is similar to useradd.
Having done our work we should renounce our special root privileges with ctrl + d or the exit command.
Now check that the account has been successfully created.
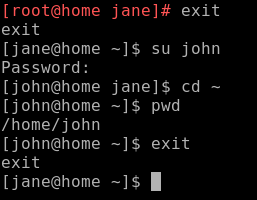
su john logs me in to john's account but the prompt tells me that I am still in jane's home directory. Type cd ~. As I am now logged in as john this takes me to john's home directory which I verify with the command
pwd
The exit command logs me out of john's account and puts me back into jane's account and also back into whatever directory jane was in when she issued the su command.
We'll return to the root terminal later when we have a few more commands to use.
Customizing our environment
After using the command line for a while you will find that many times you type in the same commands and options over and over. Surely somebody can think of a better way? They did. It is called an alias, and is a way of giving a command that you regularly use its' own name. You already have some aliases in PCLinuxOS, type the command alias to show them.
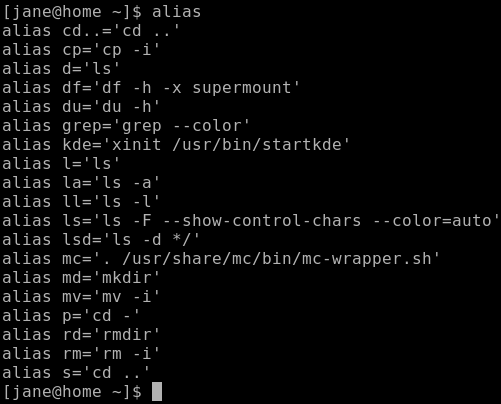
Look at one about halfway down the list, alias ll='ls -l'. If you type
ll
on the command line bash will interpret this as ls -l and execute it accordingly.
Let's make our own new alias. Suppose that I often want a hard copy of a directory listing with the contents sorted by file size and with these sizes in a format that is easily understood.
To print out files on the printer in Linux we use the command,
lpr
The command, lpr myfile1 will send the contents of the file, myfile1 to the default printer without the need for any redirection by the user but it is also common practice to pipe the input to lpr from another command. I want to create an alias that will print out my listing easily and I would like to use the name, lspr, but I don't want to conflict with any existing system command so enter ls and then press tab to show a list of all commands that start with the characters ls.

From this, I can see that there is no command named lspr that I have access to and so I am safe to choose this as the name of my alias.
Press ctrl + c to cancel the command.
To create the alias I use the command
alias lspr="ls -lhSr | lpr"
This tells bash "whenever I type the key combination, lspr, execute the command, ls -lhSr | lpr". This creates a long (option l) directory listing in human readable form (option h), sorted by file size (option S) in reverse order (option r) and pipes the output to the printer.
Make sure that your printer is switched on and connected then type
lspr enter
This way I don't have to remember how to format the command, just the alias lspr. Unfortunately, as soon as you end this session of bash by logging out or by closing the konsole window this new alias is lost. To make it permanent we need to edit one of those hidden files, the ones whose names begin with a period, in your home directory .bashrc. This is the bash resource configuration file and is read every time a new instance of bash is invoked.
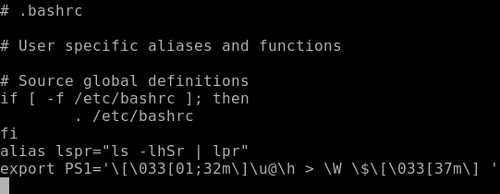
nano ~/.bashrc
will open the .bashrc file that is in your home (~) directory ready to be edited.

Press the down arrow until you reach the end of the file and then add the alias and press enter. While we are here copy and paste the following:
export PS1='\[\033[01;32m\]\u@\h > \W \$\[\033[37m\]'
Make sure that you include the final quote mark (') then press enter. Always press enter at the end of a system configuration file to make sure that it ends with a new blank line.
It should now look like this.
Press ctrl + x and answer y to the prompt then press enter to save the modified file. Close the konsole window to end the bash session and then restart it. This is necessary to enable the new instance of bash to read the modified configuration file.
If all went well you should be able to type lspr to get your printout and you should have a nice green prompt to identify you as "not root" If you don't like green then you can change it by altering the 01;32 part of this line
export PS1='\[\033[01;32m\]\u@\h > \W \$\[\033[37m\]'
Change 32 to a value between 30 and 37 to change the basic colour. Where have 01 we may put several different values:
00 for normal colours
01 for bright colours
04 for underlined text
05 for blinking text
07 for reverse video text
These can be combined e.g. 01;04;05 for bright, underlined, blinking text. Adding a value between 40 and 47 changes the background colour e.g. 1;34;47. To try out the colours on the command line use
echo -e '\033[01;37;44mPCLinuxOS - Radically Simple\033[0m'
and substitute 1;37;44 for the above values separated by a semicolon ;. The -e option added to the echo command tells it to interpret certain sequences of characters known as escape sequences rather than just blindly printing them on the screen which is why we don't see all that gobbledygook on the screen.

Experiment with different colour combinations. Maybe login or su to john's account and change his prompt to blue. As long as you stay away from the root account you can do no real harm. These are after all only dummy accounts.
Do you feel more at home now?