Movie Archiving With dvd::rip
by Malcolm Ripley (malc)
Why would you want to archive your movies? Well in my case, it was space and convenience. Far too many CD's and DVD's to have easily accessible on shelving, a room full! A 1TB USB disk drive costs under £70 ($100) and could easily accommodate all music, movies and photos. In addition it can be plugged into the PS3, which is itself plugged into an AV receiver, and from there into a hi-def TV. A perfect, simple solution. As an added bonus, a PSP can be used as a remote control for music so that the TV does not have to be switched on.
In the past I had compressed some movies for my kids to play on their PSP's, and I did this using a PC. Back then, I had ripped and converted the movies to about 200MB/hour prior to PSP conversion (it has it's own MP4 format!). The full size were just about watchable but dark areas were quite low quality. At 300MB/hour the movie is passable although dark areas are still “blocky” even on a TV at distance. At 400MB/hour the movie was indistinguishable from the original (on a TV). Not only that, but with the PS3 1080p upscaling, the quality was suprisingly very good. So there we have it -- 400MB/hour was the target.
Preparation
You need to download and install dvd::rip using Synaptic. The download will include the DVD decrypting library libdvdcss2, if you have not already done so.
You will need several GB of space to proceed, enough to accommodate a ripped and compressed movie. A ripped movie can, in theory, take up almost 8GB plus the compressed version of 1.5GB. So you need at least 10GB.
Take note that at present only movies without subtitles can be be encoded. This is under investigation.
Getting Started
When you first start dvd::rip you will be presented with, essentially, a blank screen. There is no need to set any preferences at this point since the defaults are OK. To get started, select File > New Project and the following screen will be displayed:
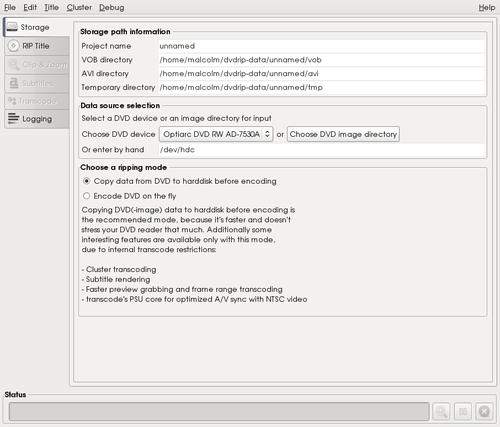
Enter the project name (default unnamed), which cannot include any spaces, and then press Create project. The screen will now look as above, and it should be showing the correct DVD device as the data source. If you do need to change the setting and enter by hand (/dev/hdc in the example), then you can identify this for your machine by putting in a DVD, select Properties for the desktop icon and click Meta Info. The device node is the value you want.
Ensure Copy data from DVD... option is selected and press the tab labelled Rip Title, which takes you to the following screen:
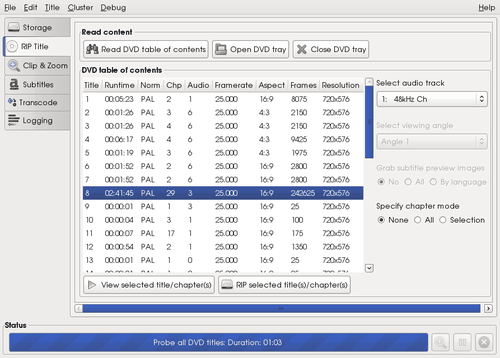
Initially the contents area will be blank. Click on the button Read DVD table of contents, the disk will be scanned with all the titles listed and the main one auto selected. Most DVD's have the first audio track in English. However, if you have any doubts, then perform a check as following:
- Click the Selection option under Specify Chapter Mode and select any chapter except the first or last (these almost always have the titles).
- Check each audio track to find the one you want by reviewing with View selected title/chapter and take a note for the transcode step.
- Re-select the None option.
Now you can rip the title to your hard drive by pressing the button RIP selected titles(s)/chapter(s). This will take a while. A 2 hour movie with my 1.8G dual core laptop takes 20 minutes. You can always flip to another desktop screen and do something else which will slow the ripping down a little. Once the title has been ripped, select the Clip & Zoom tab where you will be presented with the following:
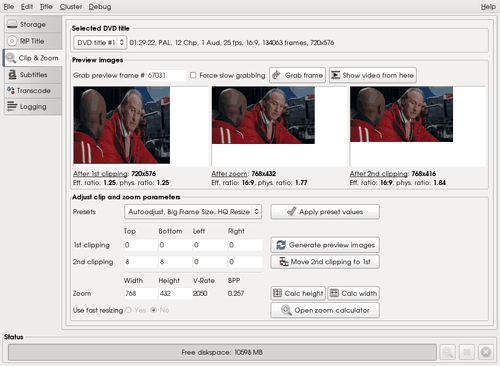
Use the preset value Autoadjust, Big Frame Size, HQ Resize and click the Apply preset values button. However, if the movie is full frame (ie TV format ) I suggest using the Fast resize version. This creates a smaller framed movie. A full frame is 50% larger (including the final file size) than a widescreen movie.
Now select the tab transcode and the following screen will be displayed:
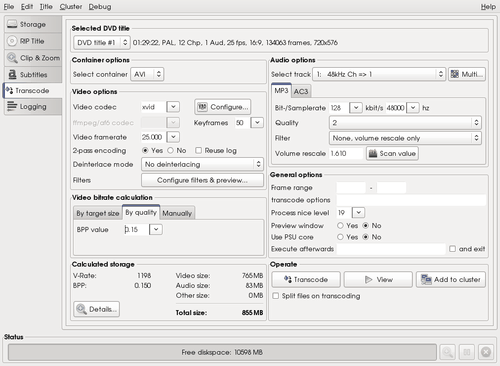
Don't panic! Almost all these setting are default values and don't need changing. The key values are Video codec : xvid, 2-pass encoding : yes, no deinterlacing. Ensure the audio track is the one you chose when ripping and that Bit-/Samplerate : 128k/s 48000hz, Quality : 2, Filter : None, volume rescale only.
Some movies do not compress properly and end up with an out of synch audio track. The way round this is to miss out the first few frames. This is not normally an issue since most movies start with a studio banner and then the opening titles so skipping the first 10 seconds is not a problem. To save time (a lot of time!) apply this fix to all movies by default. You can do this under General options and set the Frame range (start) to 250 (300 in North America, due to the NTSC/ATSC frame rate of 29.97 frames per second, as opposed to the PAL standard of 25 frames per second) and leave the end of the range blank. This will clip 10 seconds from the start and so far, for myself, all movies are now in synch.
Some movies can be a little over dark (Alien v Predator Requiem for example). You can, optionally, lighten it up by specifying a filter under Configure filters & Preview:
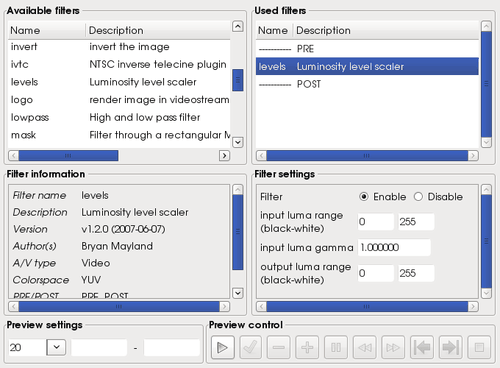
Double click the levels filter from the top left list. Click and drag it on the top right list so that it is between PRE and POST. Set the gamma value in the bottom right to something larger than 1. Typically 1.5 to 2 will suffice. You can preview the effect using the preview controls. You can only perform a preview with the original disk not from the ripped titles. Should you attempt to preview without the disk inserted, you will get an error and dvd::rip gets a little confused; the error won't go away, even when you put the disk in. You have to save the project, quit dvd::rip and reload. Once the filter is set, close the window to return to the transcode screen.
Finally the transcoding step, select Video Bitrate calculation > By Quality > 0.15 and then press Transcode. The transcode process takes hours. The second pass typically takes twice as long as the first.
You may be tempted to perform a single pass encoding to save time but you do so at the expense of quality. There is a distinct difference between single and two pass encoded movies. Single pass movies seem to shimmer around image edges such as the outlines of faces, buildings etc. There is nothing to stop you transcoding while you work though. I have even done photo editing while a movie is transcoding.
Note: If you transcode overnight then you can start two dvd::rip sessions in parallel.
Problems
When ripping a title it can sometimes hang before it reaches the end. The movie can still be compressed, but proceed as follows:
- With Konqueror, open up the folder <home>/dvdrip-data/<projectname>/vob/xxx/ and play the last vob file. Fast forward to the end if necessary to confirm that the end of the movie is there before proceeding with this workaround. So far this problem has only omitted the last small (often zero sized) vob file that contains only credits.
- Save the project, quit and re-open.
- On the Rip title screen, select the smallest chapter (except the first or last) and rip that.
- Go to the Clip & Zoom screen and set the clipping as described previously. Here you are using the ripped chapter to assess the size.
- Go back to the Rip title screen, set the chapter mode to None and
- Go to the Transcode screen and proceed as previously described.
Summary
Once you get into the swing of things, it is suprisingly easy. Since it is possible to transcode “off-screen,” then 3 to 6 movies can be transcoded per day without interfering with normal usage.
Subtitles are a problem yet to be resolved. There are plenty of descriptions of how to do it, but none are trivial tasks, to put it mildly. Should I discover a simple “point and click” method, I'll let you all know.