PCLOS, my new pocket OS
Author: pinoc
PCLOS everywhere: on my desktop, my workstation, my laptop, and several PCLOS Live-CDs to show off, work with and promote PCLOS to my friends. Yet, one option was missing in my PCLOS collection: a fully functional PCLOS installation on an external USB device; all my documents, bookmarks, programs, personalized settings, etc. working and running from a small USB device. You have your own PC in your pocket! Boot it from any standard PC, regardless of its operating system, just use its keyboard, mouse, and graphic display and you are right at home on your own PCLOS installation. I know that others managed to set this up and of course I already tested the option 'install to USB device' at the beginning of the MiniME Live-CD installation but until recently this never worked out. Finally I figured out why and this article summarizes the steps to get you up and running. The following USB-devices were used for this article (figure 1): OCZ ATV (32GB flash drive), Corsair Flash Voyager GT (16GB flash drive), LaCie Mobile Hard Drive II (250GB, 2.5 '' slim external hard drive).
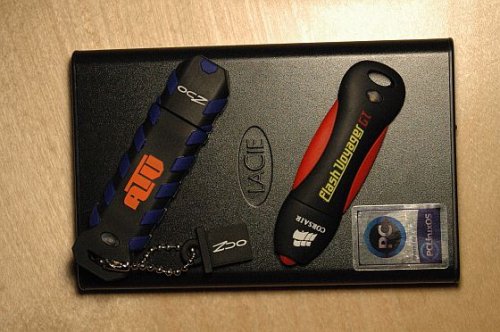
Figure 1: The testbed of external USB devices: 2 sturdy flash drives with fast write performance: OCZ ATV (32GB) and Corsair Flash Voyager GT (16GB) and the external slim LaCie Mobile Hard Drive II (250GB, 2.5'').
External USB hard disks are rather cheap now, providing ample disk space, and the USB2 port is fast enough to boot and perform with similar speed to a standard PCLOS installation on an internal hard disk. In this sense a PCLOS installation to an external USB hard drive is the cheapest and most minimalistic PC configuration you can think of. It is more portable, smaller, and cheaper than any netbook. Moreover, virtually all newer laptops and desktops come pre-installed with Windows Vista, a splendid operating system because it provides us the very latest hardware, tons of RAM, and fuels our desire to startup any different OS we can think of. So, go ahead, attach and boot your external USB hard disk and use all the great Vista compatible hardware of the 'slave' machine with a decent OS! Take your PCLOS hard disk to your friends and quickly show them how nice and especially fast their new Vista-PC could be. And of course we all love the idea to carry our own system on a USB stick!
But before we start, please realize that the steps described in this article should be considered as a feasibility study and should not be applied to any viable data you have! This article is based on experience with the described USB devices and my three PCs and it may or may not work for your hardware components. But if you have a spare USB-drive a non-critical PC to play with you may give it a try. All this was lot's of fun and I am using my external Linux hard drive for one week now without any issues. But of course I would not recommend putting all your data to an external hard disk and getting rid of your PC. Please make sure to have and to keep backups of all your data and software at any time!
Introduction
When working in a mixed Windows/Linux environment it makes sense to have one partition of the USB device in NTFS format. In this way you can still use your device as a storage disk and have easy access to it when connected to a Windows machine. In fact there is another reason why you should have a Windows partition on your flash drive: Installing PCLOS to a USB device implies that you will have more than one partition. When plugged into Windows, Windows Explorer will automatically assign a drive letter to the first partition of the device. If the device is a hard drive, Explorer will list it under 'Hard Disk Drives' and if it is a flash drive it is listed under 'Devices with Removable Storage'. The disk management in Windows XP does not permit partitioning a flash drive (However, it was possible to setup more than one partition on an external USB hard disk in Windows). If you partition a flash drive in Linux and the first partition is not of type FAT or NTFS, Windows does not recognize and consequently can not display the content of the first partition. Furthermore you can not access or read from any other partitions on the flash drive, even if they are formatted in NTFS or FAT. And to make things even worse, a double-click in Explorer on the first partition with a Linux file system on a flash drive will 'offer' you to reformat the entire flash drive. Figure 2 summarizes this situation for the
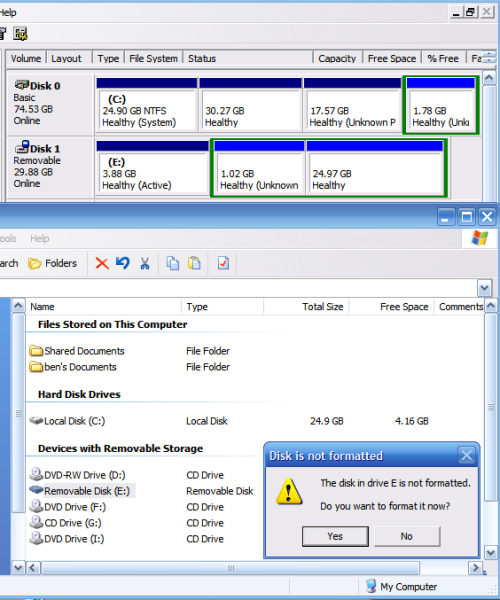
Figure 2: Windows XP disk management of a USB-mounted flash drive with a Linux file system as first partition.
-
32 GB USB-mounted flash drive (Disk 1) having a working PCLOS installation at the beginning of the disk: first partition: root ext3 3.88GB, second partition: swap 1.02GB, third partition: NTFS 24.97 GB. The purpose of the third partition (NTFS) was to act as a common data share between Linux and Windows but apparently this did not work as expected. Moreover, you can expect the same behavior in Windows XP for a USB-device having only Linux partitions. In order to first, avoid the common Windows user behavior quickly clicking OK, OK, OK, to destroy our flash drive Linux installation, and to second, maintain a common data partition for storage, we will setup the flash drive's first partition as NTFS. Alternatively you could use the inferior file system FAT32 but with ntfs-3g we now have safe write support in Linux for NTFS formatted file systems.
Installing PCLOS to a USB device
The installation of PCLOS to an external USB drive (flash drive or preferably to an external hard drive) is described in the following sections. Most of the instructions require root privileges and if applied in the wrong way they can damage your Linux installation on the PC or your USB device, or render it unbootable. The steps are described to the best of my knowledge but I can not accept any liability whatsoever for any error, or for any loss or damage arising from using the following instructions. Use them at your own risk!
Preparing the USB-device
First we need to prepare the USB drive for the installation of PCLOS. In the following steps I use the 16GB Corsair USB flash drive which comes pre-formatted with a single 15GB FAT32 partition: Attach the device to a running PCLOS system. PCLOS should show a new pop up window for the new drive with the option 'Open in New Window' pre-selected. We click on 'OK' to let PCLOS auto mount the device. Next, a new Konqueror window will open and display the contents of the newly attached device. The location bar of this new Konqueror window shows the mount point of the USB device. In my example this is sdc1, meaning the first partition of the disk sdc. Make sure to remember, or better, write down the disk device notation of the USB device, here sdc. Now close this Konqueror window, start the PCLinuxOS Control Center (PCC), goto the disk partitions menu, and ensure to select the tab of the external disk device (here sdc). In my example I click on the single existing partition of the 16GB Corsair flash drive which shows up as a FAT32 formatted mounted partition (figure 3 left). Now, to partition the device we first unmount the partition (click on 'Unmount'), then we click on 'Toggle to expert mode', and finally choose 'Delete' to have a completely unformatted empty device (figure 3 right).
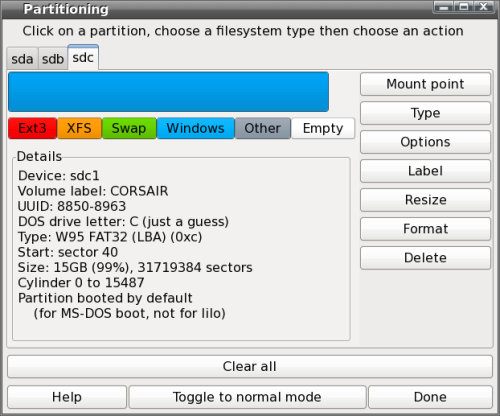
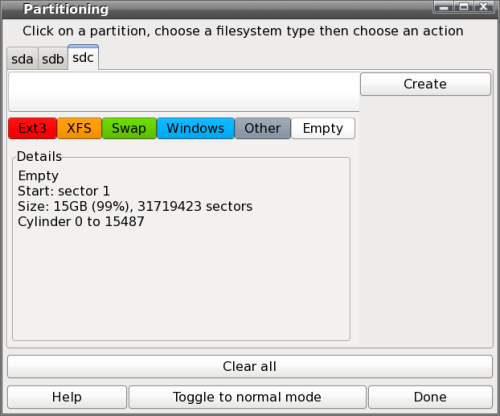
Figure 3: Diskdrake in PCC showing the 16GB Corsair flash drive in its original state (left: one FAT32 partition) and unpartitioned (right).
-
-
Next, we select 'Create' and define the first partition (sdc1) as NTFS (or if its already installed as NTFS-3G) without a mount point (figure4 left). In the same way we use the remaining free space on the device to setup the second partition (sdc5) as ext3 and the third partition (sdc6) as Linux Swap, none of the partitions should have a mount point specified. Now that we have specified the partitioning layout we need to select each partition and click on 'Format' to write this layout to the USB device. After that we click the 'Done' button to exit the partitioning tool. PCLOS will show up a new window asking to write the changes to /etc/fstab (figure 4 right). Here, we click 'No' since we will use the USB device on a different machine and we do not want to modify the existing fstab file of the running PCLOS system!
-
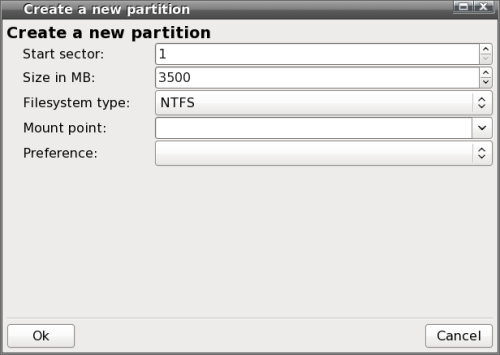
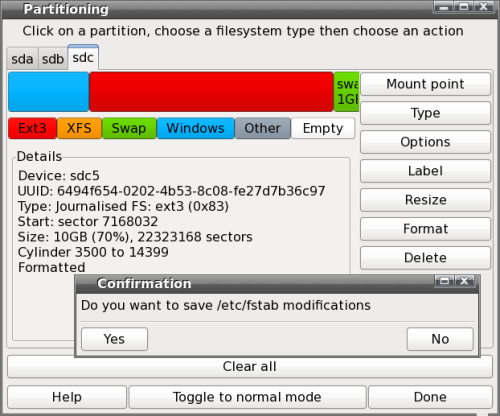
Figure 4: Partitioning the 16GB Corsair flash drive: first partition NTFS, second ext3, and third Swap. When done select 'No' to maintain the existing fstab file of the host machine.
-
-
The USB device is now prepared for the installation and we can detach it from the system. A quick test on a MS-Windows PC confirms that we can use the first partition perfectly fine as an external storage device with full read/write access.
-
-
Starting the Installation
Boot the MiniME Live-CD on any PC and login into the root account. Attach the newly formatted USB-device and in the following popup windows select 'Cancel' to avoid auto-mounting the USB device partitions. Click the 'Install PCLinuxOS' icon on the desktop, in the next window select 'USB Hard drive' as installation type and then 'Custom disk partitioning'. In the following window make sure to not select your existing hard drive(s) but to select the correct tab for the USB drive. It should be the right-most one and displaying your previously created partitioning scheme. Remember or better write down the disk device name, in my case the test machine (my laptop) has only one disk (sda) and consequently the attached USB-drive is listed as sdb. Select the second partition of the USB device, (our USB system root partition (/), ext3, sdb5), click on 'Mount point' and select the root directory '/' (figure 5). Don't do anything else, just click on 'Done' to finish the partitioning dialog, keep all the defaults in the next windows and simply click on 'Next' to let PCLOS format the root partition and perform the installation to the USB device.
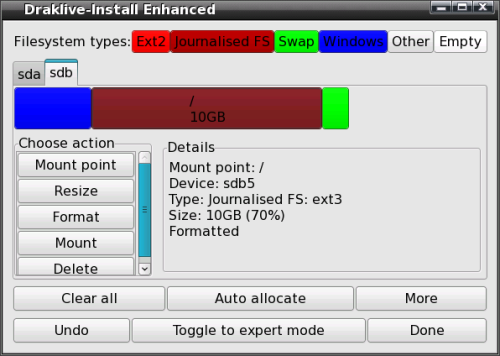

Figure 5: The 16GB Corsair flash drive (sdb) during the PCLOS MiniME Live-CD installation. The second partition (ext3) will become the Linux root partition and is assigned the mount point '/'. Click on 'Done' and in the next window (right) on 'Next' to start the installation.
-
-
Don't get in a hurry, and just click next, when the window with the bootloader installation appears. Here you must change the location for the bootloader from the default of the PC's own hard drive (usually sda) to point to the USB device instead. Open the dropdown menu next to 'Boot device' and select the USB device, not a partition of it, so in our example use sdb and not sdb5 or the like (figure 6 left).
-


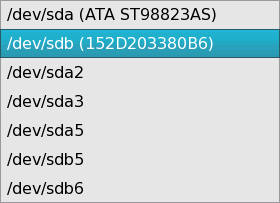
Figure 6: Left: Be sure to install the bootloader to the USB device (here sdb)! On the left image the dropdown menu of the 'Boot device' is overlaid and shows the correct bootloader location entry. Right: The final list of the boot menu which will be corrected later on.
-
-
In the following window (figure 6 right) only the first three Linux entries are relevant for our PCLOS USB-installation, leave everything else as is, we will correct the bootloader later on. Click on 'Finish' to install the bootloader to the USB device, and on 'Finish' again to quit the Live-CD installation wizard. Finally, shut down the Live-CD session and switch off the PC. Do not try to boot from the USB-device yet, you will only get a nice kernel panic during boot. Why is this? Well, the current configuration on the USB-device will try to boot from sdb because during the installation the first hard disk (sda) was the internal drive of the PC, and the bootloader was installed to sdb, the USB disk. When booting directly from the USB-device, the disk drive with the bootloader (previously sdb) is now the first disk (sda) and, logically, the bootloader can not be found, resulting in a kernel panic. Consequently, we have to change the location of the bootloader as well as the partition table to look into sda instead of sdb.
Making Grub work
Attach the USB device to a running PCLOS system and select 'OK' to have PCLOS auto mount the partitions of the device. The first Konqueror window shows the first partition of the USB-device (NTFS) and the second Konqueror window shows the second partition, the freshly installed Linux directory tree of the root partition (/) on the USB-device (sdb5, figure 7).
-
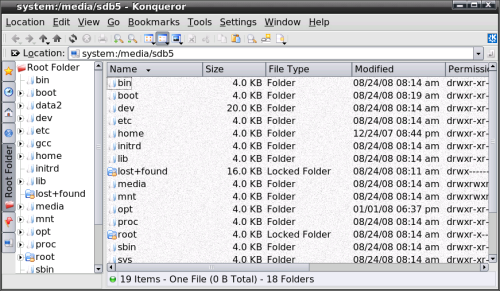
Figure 7: Konqueror showing the auto-mounted second partition of the USB device, the root partition '/'. The location system:/media/sdb5 is equivalent to the location /media/disk.
-
-
To correct the bootloader on the USB device (not the one from the host machine!), open a new Konqueror window and go to
/mediawhere you should find a directory nameddisk(could also bedisk-1), which is the second partition on the USB device with the identical content as shown in the Konqueror auto mount window in figure 7. Become root and use your preferred text editor to open the file:/media/disk/boot/grub/menu.lst. Keep only the first 3 entries (or only the first one is enough) and remove any other entry after the section 'title failsafe' (the Windows entries refer to the installation machine and the first partition on our USB-device, both are irrelevant for booting from the USB device). In all remaining entries you must now change the optionroot=/dev/sdb5toroot=/dev/sda5. In addition you may change other options, for example I remove the boot optionsplash=silentto have a verbose output during the boot process and change the title from the defaultlinuxtoPCLOSUSB. Figure 8 shows my boot menu.
-
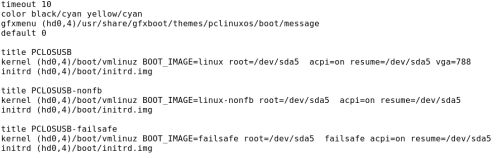
Figure 8: Boot menu file menu.lst of the USB device corrected to point to the USB boot device sda.
-
-
Finally, don't forget to save the file menu.lst located on the USB-device. In the last step, we must correct the file system table which right now still points to sdb instead of sda. As root, use your preferred text editor and open the fstab file on the USB-device:
/media/disk/etc/fstab.The last group of entries (in our case sdb) are the ones from the USB device during the installation and the entries of the previous group (in our case sda) are from the installation machine. We must remove all entries from the installation machine (sda) and rename all entries from the USB device from sdb to sda to make the corrected bootloader find the appropriate partitions in the corrected locations, namely on sda. In addition we also remove the entry to the first NTFS partition on the USB device which will be setup later in a different way. For now, we only keep the required corrected entries to allow booting the USB device. The final result should be similar to figure 9 below, note the commented original sdb entries which have changed to sda.
-
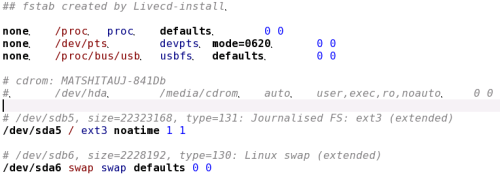
Figure 9: Partition table file fstab of the USB device corrected to point to the USB boot device sda.
-
-
Finally, don't forget to save the file, fstab, located on the USB-device. Quit all Konqueror windows, unmount or safely remove the USB-device, and detach it from the PC.
-
-
Finalizing the Installation
Attach the USB device to a PC where the BIOS is set to permit booting from an external USB-device, switch on this PC and you should now boot your PCLOS installation on the USB-device. Since this is the very first boot we need to finish the installation by providing a root password and setting up the user account. Login into your new USB system, setup your Internet connection (usually DHCP works almost everywhere), install/update your favorite programs with Synaptic/Smart, setup Firefox with your bookmarks, and may even put your documents/images/music on the USB flash drive or hard disk. To gain full access to the first NTFS partition on the USB device become root and create a new directory, for example using the command
mkdir /mnt/usb_ntfsNext, open Synaptic/Smart and install
ntfs-config. This will install all necessary tools to allow the NTFS-3G driver to provide you full read/write access to your NTFS partition on your USB device. As root, use your preferred text editor to open the fstab file on the USB-device:/etc/fstaband add the following line at the end of this file:/dev/sda1 /mnt/usb_ntfs ntfs-3g defaults,locale=en_US.UTF-8 0 0Save the file and after a final reboot you should be able to use this first NTFS partition on your USB device as a fully accessible data share directory from your USB Linux installation as well as a normal external storage device when plugged into a MS-Windows system. When logged in the user account, the NTFS and the system partition of your USB device can be accessed easily by clicking the respective USB drive desktop icon named 'Removable media'.
Advanced settings
How about 3D-acceleration?
The xorg.conf as generated on the PC used for the USB installation is specific to the hardware of that PC (i.e., my laptop) and may not work on other PC hardware. It is thus a good idea to keep a backup copy of this
xorg.confas for examplexorg.conf_mylaptopin your home directory.For 3D acceleration on a PC with an NVIDIA graphic card (i.e., my desktop), boot the USB device on such a PC, install and configure the proprietary drivers in the usual way, and once everything is working fine keep a backup copy of the new
xorg.confasxorg.conf_mydesktopin your home directory. Similarly, you can setup anxorg.conf_atifor a PC with an ATI graphic card. In this way you can build a collection of PC-specificxorg.conf_*files.For example, when changing the USB device from my laptop to the desktop PC, I copy/overwrite the
xorg.conf_mydesktopto/etc/X11/xorg.conf, restart the X-server, and have 3D acceleration on my desktop PC. This may seem a bit clumsy but it works. This process could probably be automated with a small script which detects the PC in use and then pre-selects the appropriatexorg.conf_*file before starting the X-server.If you go to a new PC you may have to reconfigure the X-server settings in the PCLinuxOS Control Center. In case you are unfortunate and X does not start at all, you can always go back to the console, become root, and issue the command,
videowhich will give you an ncurses driven interface to setup your graphical server. If this does not help, you can issue the commanddo-vesawhich creates a very basic but workablexorg.conffor virtually any hardware. Finally, enter the commandstartxin the console and the X-server should be back alive.Clone a customized PCLOS USB device installation.
This will save you time and effort to setup the same installation on a second device and instead will quickly provide a ready-to-use USB flash drive, a nice present for your friends to promote and use PCLOS. Attach both, the USB device with the installation and an empty or new USB device to a running PCLOS system. The cloning will be done with the command, dd and you must be very careful to specify the correct mount points for each drive. If you get them wrong you will simply overwrite the installed USB device (or even your own hard drive!!!) with plain nothing... If both USB devices are identical, for example two USB sticks of the same type, then you can clone to entire disk using the command:
dd if=/dev/sdb of=/dev/sdc conv=notrunc,noerrorHere the input file (
if) having the Linux installation is sdb and the output file (of) is the empty USB device, sdc. Again, please be extra sure to use the correct settings forifandof! Theddcommand is very powerful and should only be used if you are really sure what you are doing. Alternatively to cloning you could useddto create an iso-image of your USB-installation. This backup can then be stored on your PC and easily mounted, viewed, and edited, if needed. An extensive overview of the commandddincluding sample applications can be found here. Note that cloning an entire disk can take some time, especially when writing to flash drives, for example cloning the 16GB flash drive took about one hour.Add even more applications...
You need an application which is only available in MS-Windows? Try to install and run it with wine (available in Synaptic/Smart) or with its commercial variant Crossover. If this is still not enough you could install a virtualization software, for example VirtualBox (available in Synaptic/Smart) to your external USB hard drive and use it to setup a complete operating system and its applications. Note that for this to work the host PC should provide at least 2GB of RAM, the more the better, but we all love to hi-jack the great Vista compatible hardware, right?
Final remarks
In contrast to a USB2 connected external hard disk drive the performance of a flash drive is really slow. For example, the installation of a full update to MiniME today, took 10 minutes on the external hard disk but more than 2 hours on the flash drive. So, it's fun to show that it works from a flash drive but that's about it. The clear winner is the external hard disk, they work great, are fast and cheap. For less than $50.00 you can have a full-blown, portable PC in your pocket. A huge THANKS to Texstar & the Ripper Gang for providing us such an excellent Linux distribution and to Old-Polack for proofreading this article!
Now, have fun and enjoy PCLOS on your external hard disk!