Gnome User Guide 2008
Preface
This user guide is meant as an introductory guide for a user to use a modern personal computer (PC) running the Linux operating system. The main aim is to provide a self-learning guide on how to use a modern Linux desktop system. It assumes that the user has no prior knowledge of Linux or PC usage. After going through this guide the reader should be in a position to start using a Linux desktop for both personal and office use. In particular he/she should be able to:
- access the Internet and use the WWW and Internet email
- manipulate and manage files, folders and the file system
- produce and print simple documents and presentation materials
- advance to become a power user by further self-learning and exploring
Chapter 1 - Getting Started
I've updated this guide to reflect the desktop environment called Gnome. It will be very unfamiliar to anyone used to working in a Microsoft Windows environment. Once you have learned how Gnome works you will wonder why you ever used Windows (my opinion). I've taken the screenshots from my computer, which is a standard install of PCLOS Gnome 2008.1 (Gnome 2.21.2) with no modifications. You can find more information about this particular Linux distribution (distro) and download the LiveCD image (.iso file) at:
In order to start using your system you will usually have to perform what is known as a user login. This procedure is necessary to identify yourself to the system. The system allows multiple users to use it concurrently and so it has to be able to identify a user in order to grant them the necessary privileges and rights to use the system and applications. Each user, upon successful login, will be assigned to his home directory (folder).
Some systems may have been set up so that upon power-on, a default user is logged in automatically. If this is so, then you will not be presented with a login screen or prompt as described in the section below. You may skip on to the section entitled "Basic Navigation using the Mouse on the Desktop". I would however, recommend reading this section in case you ever have to log out and log back in.
Note: There is a special user called root or superuser (this user is usually created during the system installation) which has unlimited access and rights to all the system files and resources. You should never need to login as root as all system level administrative tasks can be carried out by granting yourself temporary root privileges from your (the user) desktop. This is to prevent you from accidentally damaging the system by deleting or modifying important system files. When you first power on your computer after you have installed PCLOS Gnome 2008.1 or if you are running the LiveCD for the first time you will be presented with a login screen that looks like the one below:
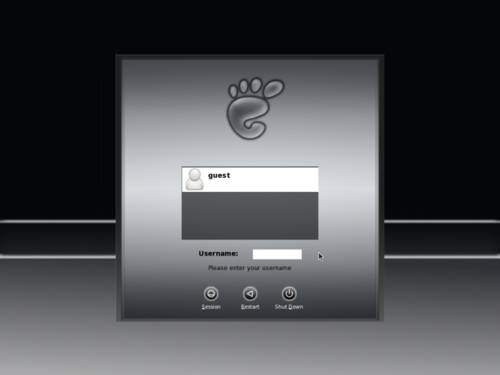
Fig.1 Gnome login screen
When you reach this screen, type in your user name, click on your user name or click on “guest" if using the LiveCD. You will now be asked to Enter (type) your password. Type in your password (guest if using the LiveCD) and press Enter (return). This will bring up a splash screen showing your desktop being loaded. When the splash screen finishes loading your desktop you will now see your Gnome desktop.
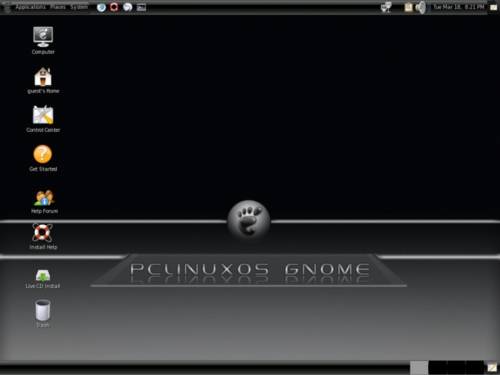
Fig.2 LiveCD desktop
Text Based Login Prompt
To login, Enter the user name followed by the Enter key and when the password prompt appears, Enter the password followed by the Enter key.
Starting the Graphical Desktop
If you have logged in from the graphical login screen, the graphical desktop will be started automatically for you. The graphical desktop presents a Graphical User Interface (GUI) for the user to interact with the system and run applications. If you have used the text-based screen login, you will have to start the graphical desktop manually by entering the command startx, followed by the Enter key.
Note: The graphical desktop that we will be using throughout most of this guide is called the Gnome Desktop. There is another desktop environment in popular use on Linux systems - the KDE Desktop. I have previously written a KDE User Guide based on PCLinuxOS 2007 which you can find at the PCLOS Mag website. For the rest of this user guide, when we refer to the graphical desktop or Desktop we shall be talking about the Gnome Desktop unless stated otherwise.
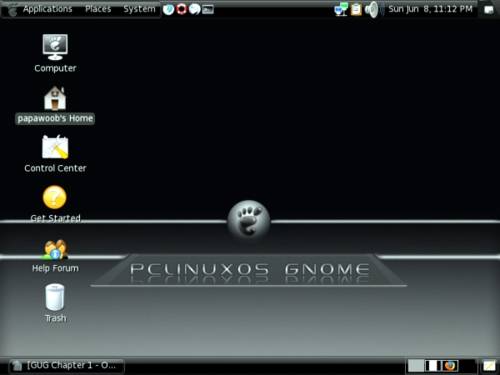
Fig.3 Desktop after installation
Using the Mouse on the Desktop
Proper usage of the mouse is essential in order to have a rewarding and productive experience on the graphical desktop. Most Linux graphical desktops are designed for use with a 3-button mouse. If you are using a 2-button mouse, during installation, it should have been configured to emulate the middle-button of a 3-button mouse by pressing both buttons simultaneously. To click on a file the left button is depressed. (A mouse configured for a left- handed user will will need to have it's right button depressed). The right (or left button for a left-handed mouse) and middle buttons are usually used to invoke special or specific features of the GUI and instructions to do so will be explicitly given.
The term "clicking" on the mouse means that you click on the mouse once. The term "double clicking" means that you click twice in succession on the mouse. To "select" an item means clicking it once with the mouse. The term "drag and drop" means that you will have to click on an item and while continuing to hold the mouse button down, drag the item to another place and on reaching its destination drop it by releasing the mouse button.
Exercises
Open the Home folder from the Desktop. Close the Home folder window by clicking on the close window button at the top right-hand corner. Right-click on the trash icon, view its properties and close it. Move the trash icon to another location on the desktop by using the mouse to drag it to the new location and releasing the mouse.
Main Components of the Desktop
There are 3 main components to a Gnome desktop. They are:
- The Control Center
- The Panel
- The Desktop Itself
The Control Center
The Control Center is a collection of applications that allows you to customize your GNOME environment. It is similar in function to the Kde Control Center. As you can see in the screenshot below you have an option to change virtually anything you desire.
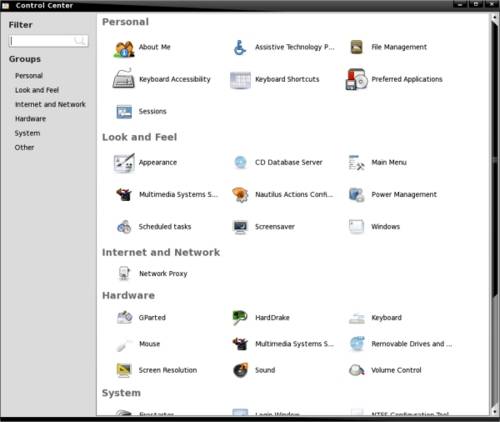
Fig4. Gnome Control Center
You can find the Control Center by opening the System menu at the top left of your desktop. Once you have opened the System menu navigate to Preferences which will show you most of the options available in the Control Center. You will find the Control Center located at the bottom of the Preferences sub-menu as seen below:
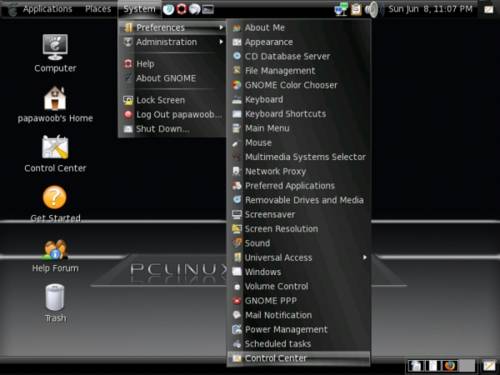
Since we have opened the System menu let us finish exploring the Gnome menu system. The Gnome menu system consists of three parts, Applications, Places, and System.
From the Applications menu you can start many of the applications installed on your Linux system. When you open the Applications menu you will find Accessories, Graphics, Internet, Office, Other, Programming, Sound & Video, and System Tools. Note that the Applications menu consists of a Main Menu panel and sub-menu panels. Each entry in the Applications menu has an arrow on its right which means that it is an entry point to a sub-menu, and there can be sub-menus within each sub-menu. In this way applications in the Menu System can be organized and categorized for easy reference and access. To access a sub-menu associated with a menu entry, move the mouse and rest it on the menu entry in question and a sub-menu panel will appear.
Clicking once on a menu entry will cause the application associated with it to be launched, or Executed. Right clicking a menu entry will give you the option to add a launch icon to either the Panel or to your desktop. The other options found there will be discussed in more detail when we discuss the Panel.
The second menu is the Places menu. Here you will find access to your Home folder, the Desktop, and all mounted partitions on your computer. You can also access bookmarked and local network connections, connect to a remote computer or shared disk, search for files or open recent documents.
The Panel
The long bar across the top of the desktop screen is called the Panel. The Panel contains the three menu items, application launcher icons, a notification area and applets. There is also a Panel at the bottom of your Desktop that displays any open windows and your Workspace switcher.
- Installed by default are several application launcher icons on the Panel. Clicking on one of these will run that particular application. Commonly accessed applications can be added to the Panel and those that are less frequently used can be taken off.
- The notification area holds alert icons so that the user can be alerted to critical messages.
- Applets are small applications that run on the Panel. These usually perform useful and informative tasks like setting the sound level of the sound card, time and date, etc.
The Workspace Switcher
The graphical desktop can be regarded as a workspace drawing an analogy with the working area on a real physical tabletop. Programs are run, documents displayed and files opened on the workspace. To cut down on workspace clutter and to enable the user to organize his/her workspace more efficiently, the graphical desktop environment allows the usage of multiple workspaces. Each workspace can be considered as a virtual desktop.
By default the user has 4 desktop workspace areas to work on. The workspace switcher represents each workspace as a small square and shows the applications running in each of them. To access a workspace click on the square with the mouse.
The Taskbar
The Taskbar applet is located next to the workspace switcher and shows the titles of all the running applications in a virtual desktop (a workspace).
The Desktop Space
The Desktop space refers to the rest of the screen. It contains icons which are graphical representations of short-cuts to application launchers, file folders, files and peripheral devices like floppy disks, CD-ROM drives and printers. Double- clicking on an icon representing an application will launch or execute the application. Commonly used applications and/or files/folders are usually placed on the desktop space.
To end this chapter, you can exit your session on the desktop by performing what is known as a logout. If you do not want to use the system any more, you can turn it off by performing a system shutdown.
Logout
When you have finished working on the system, you will need to logout. Logging out will inform the system that you are no longer using the system's resources. All the files opened and programs run by you will be closed and/or stopped unless you have specifically informed the system to keep them open or running for you. To logout, at the System Menu select: Log Out <your username>
Shutting Down the System
When you have finished using the computer and want to power it off, you will have to perform a system shutdown. To shutdown, at the System Menu, select Shutdown.
You will also have the option to "Restart Computer, Suspend, Hibernate, or Cancel".
Note: It is very important that a proper system shutdown is performed. You should not just turn off the power switch of the computer to shut it down. Failure to observe this may lead to system software and data corruption and failure.
