KDE on PCLinuxOS Guide
Published by the United Nations Development Programme's Asia-Pacific Development Information Programme (UNDP-APDIP)
Kuala Lumpur, Malaysia
Web: http://www.apdip.net
Email: info@apdip.net
© UNDP-APDIP 2004
The material in this guide may be reproduced, republished and incorporated into further works provided acknowledgment is given to UNDP-APDIP.
This work is licensed under the Creative Commons Attribution License. To view a copy of this license, visit http://creativecommons.org/licenses/by/2.0 or send a letter to Creative Commons, 559 Nathan Abbott Way, Stanford, California 94305, USA.
Chapter 5: Using the Printer and Scanner
This guide has been modified by Papawoob to reflect the Linux distribution of PCLinuxOS 2007.
While the holy grail of office computing may well be the paperless office, for many users, it is often desirable and indeed sometimes necessary to be able to put on hard copy the information available on the computer. The printer allows you to do that. The printer is essentially an output device with which you are able to output text and graphics onto paper from digital data stored on the computer. To complement this, the scanner is an input device with which you can transfer text and graphics from paper to the computer and store it in the form of digital data which can then be further manipulated by other software applications.
The Printer
Printer Setup and Configuration
If you have a printer attached to your system you will need to configure and set it up before you can use it properly.
Note: To enable the system to detect your printer properly, you should turn on the printer before trying to configure it.
When you want to install a new printer, click on the PCLinuxOS Control Center (PCC) button located in your Panel. You will then need to enter the root password since you are now attempting to set and change some system parameters and configuration files. Choose the Hardware tab and then select: Setup the printer(s), the print job queues,... This will bring up a window that looks like this:
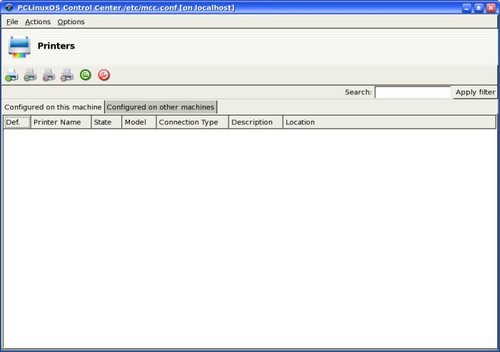
Fig. Printer Config Screen
If all goes well you will see your printer listed in this screen. If so, you will need to click once on your printer to highlight it and choose the Edit selected printer icon. Choose Make Default and click on Do It. You are now ready to print. If this does not happen then while at the printer configuration screen shown above click on the Add a new printer to the system icon to add and configure a new printer. A new window will be opened that looks like this:
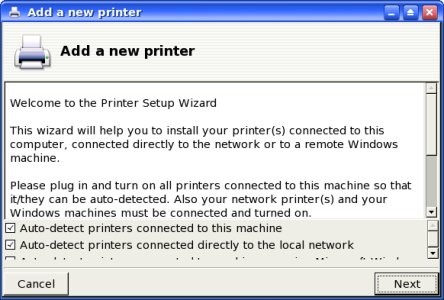
Fig. Add New Printer
This screen will explain your options for having the printer wizard auto detect any computers that are attached to your computer, or attached to another computer on your network. There is also an option to auto detect a printer attached to a computer running Microsoft Windows. Click on the Next button and the auto detection will be run. When it is finished you will be presented with a window that looks like this:
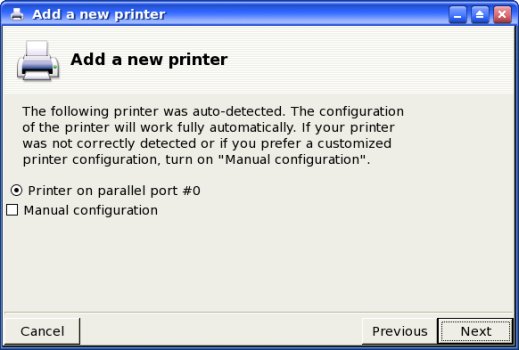
Fig. Detected Printers
By clicking Next, the detected printer will automatically be configured for you. You also have the option to configure your printer manually yourself, but this option should be used only if you know all the specifics necessary or if your printer was not found during the auto detection process.
If you choose manual configuration and click Next a new window will appear. Select the manufacturer of your printer, and then scroll down to find your specific printer. When you click Next, you will be taken to a screen that will show you the default settings for the selected printer. Clicking Next again will allow you to name your printer or you can go with the default name. Click Next one more time and you will be asked if you want to make this printer the default printer for your system. Choose Yes or No and click Next again.
You will now see a window where you can print either a text or photo test page. Go ahead and try one or the other or both and see if your printer is configured correctly. After your test page has printed and you are happy that your printer works correctly, click Next one last time. This will bring up a congratulation page that tells you that your printer is configured correctly. Click Finish and you are ready to print.
Managing Print Jobs
When you send something for printing from your application, the data to be printed is stored in the print spooler area and a print job is added to the print spooler queue. In this way many printing jobs can be carried out without waiting for the printer to finish printing a job first before accepting another printing job. The Print Manager is used for managing the print jobs associated with a given printer. The Print Manager can be found by going to Menu -> System -> Configuration -> KDE -> Peripherals -> Printers.
The Print Manager can be utilized to check on the status of the printing jobs that you have submitted to the printer and to cancel jobs still in the queue if you need to. To do this, launch the Print Manager and then click on the Jobs tab. A list of current print jobs in the queue is displayed. To cancel a print job, highlight the job in question and then left click on the Remove button on the menu bar on top.
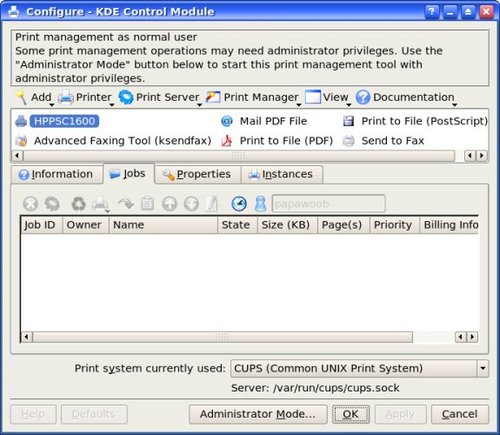
Fig. Print Jobs
Using the Printer
Normal usage of the printer from an application is straightforward. Select the printing function from your application and a print job is then automatically submitted to the printer queue.
The Scanner
The scanner is a device which allows you to convert analog graphics e.g. a photograph or a printed page into digital format where it can be stored on the computer and further manipulated by appropriate software. Flat-bed scanners for personal use are quite common nowadays.
Most scanners connect to the computer using the USB, SCSI or parallel ports. To use the scanner, suitable software to control and drive it is required. The SANE backend drivers may be used to drive the scanner hardware while the XSane GUI front-end acts as the end-user interface. To check whether the scanner you have can be used, the SANE website at http://www.sane-project.org should be consulted.
Using the Scanner
You can start the scanning software on the Desktop, from the Main Menu,
Main Menu -> Multimedia -> Graphics -> Kooka
This will invoke the Kooka program; the main window in Kooka consists of three frames. At the top, see both icon and menu panels. Use the mouse to enlarge or reduce the windows as needed.

Fig. Kooka Main Window
The navigation window consists of two tabs, which allow you to switch between the Preview and the integrated file browser called the Gallery. The working folder is displayed in the lower part of the window along with the folder where the scan will be saved.
Make your scanner-dependent settings, which are dependent on the scanner you have connected, in the lower left window. Usually, these are settings for resolution, brightness and contrast, scanning mode (e.g., color, gray, or binary), and for gamma values. Configure your settings here first.
Preview
Before the actual scanning of an image takes place, the preview operation is usually carried out to preview the scanned image. To perform the preview, place the image to be scanned into the scanner and initiate the preview scan with Preview. If the Preview tab in the upper window is selected, see the results there.
Select the various formats in the preview image itself to define the final dimensions. The User setting is recommended for this, so you select the area to scan in the preview display with the mouse.
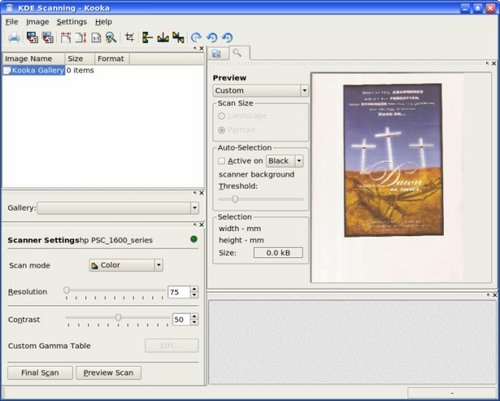
Fig. Preview Window
As the scanner will scan its entire scanner bed by default, if you are scanning an image which occupies only a part of the bed you will want to select only the area which holds the image to be scanned. This can be done from the Preview window in several ways. One way is to manually select the scan area frame by pressing and holding the left mouse button to define one edge, moving the mouse so that the area to scan is completely inside the frame (which is marked by a dashed white line) and then releasing the mouse button. Another way is to select the Autoraise button and then clicking on the image to be scanned. A frame is created to mark the scan area. The mouse may be used to adjust the scan area if it is not fully correct.
Scan
After the appropriate scan area has been chosen in the Preview window, the image can be adjusted and/or enhanced for color correction, contrast, and brightness. The gamma value, brightness and contrast can be adjusted manually in the scan window before performing the scan.
After a satisfactory image is seen in the preview window, perform the actual scan by clicking on the Final Scan button. The scan will be performed and the scanned image displayed in the Viewer window.
Save
The method for saving an image is somewhat different in Kooka than in many other applications. Click the Gallery tab to open a small file browser. This is the folder ~/.kde/share/apps/ScanImages/ In the lower portion of the window, your current subfolder in the gallery is shown. This is where all scanned images are first saved as files. When starting Kooka for the first time, you will only see the ScanImages. Create subfolders by right clicking this folder. The selected folder, highlighted in blue, is the first save location of the scanned images. The scans are labeled in ascending numerical order as in kscan_0001 and kscan_0002.
To save an image permanently, left click the name. Next, give a new name and the appropriate ending for the image format chosen when scanning. If you enter a different extension, you will get a message that it does not correspond to the scanned format. Although you can still save the image under this name, it will retain its original format. At present, on-the-fly conversion is not offered.
If you do not want to use this method of managing your images in ~/.kde/share/apps/ScanImages/, you can, of course, save them to another location. To do this, right click the image name and select Save. Choose any path here. In addition, close or permanently delete images here.
Help
More detailed information on how to use the scanner software as well as changing the default configuration can be obtained by clicking on the Main Menu and then on More Applications, Documentation, and then KDE Help Center. After the KDE Help Center opens choose KDE User Manual and scroll down to III. KDE Components -> 6. The Base KDE Applications -> Graphics and then scroll down to Kooka.
Exercises
- Perform a scan of an entire photograph containing several people or objects.
- Using the same photograph as for the previous exercise, this time perform the scan for only the image of one person or object.