KDE on PCLinuxOS
Published by the United Nations Development Programme's Asia-Pacific Development Information Programme (UNDP-APDIP)
Kuala Lumpur, Malaysia
Web: http://www.apdip.net
Email: info@apdip.net
© UNDP-APDIP 2004
The material in this guide may be reproduced, republished and incorporated into further works provided acknowledgment is given to UNDP-APDIP.
This work is licensed under the Creative Commons Attribution License. To view a copy of this license, visit http://creativecommons.org/licenses/by/2.0 or send a letter to Creative Commons, 559 Nathan Abbott Way, Stanford, California 94305, USA.
This guide has been modified by Papawoob to reflect the Linux distribution of PCLinuxOS 2007.
Chapter 2: Using the Desktop
Basic Desktop Customization
The desktop can be customized to your preferences and tastes in a variety of ways. Here we will explore some basic customizations. More details can be obtained by clicking on the Main Menu and then on More Applications, Documentation, and then KDE Help Center. After the KDE Help Center opens choose KDE User Manual and scroll down to "III. Kde Components."
Desktop Background
The background image displayed on the desktop can be changed by running the Background application. Just right-click on the desktop and select "Configure Desktop."
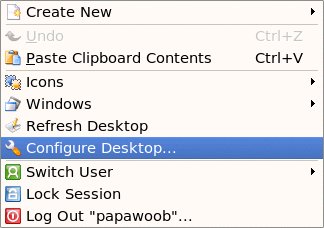
Fig. Right Click Menu
After clicking on "Configure Desktop" you will see a dialog box that looks like this:
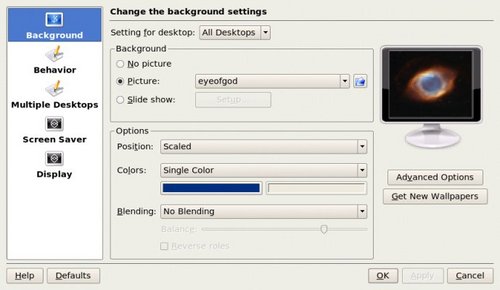
Fig. Configure-KDesktop
To change the background image, click on the Background tab on the left. Next, click on the "Picture" image selector dialog. Choose an image from the dialog. As you select each image, a thumbnail (small picture) will be displayed in the monitor to the right of your selection.
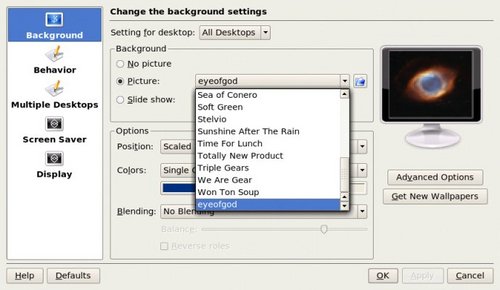
Fig. Selecting a New Background image
If you want to choose an image from another directory, click the Browse button. The Browse button is located to the right of the "Picture" image selector dialog and looks like a file folder. When you have chosen an image, click on "Apply" and then click "OK."
Desktop Behavior
Our next option in the Configure-KDesktop window is "Behavior". The "General" tab allows you to select whether or not to display icons on your desktop. The two tabs 'File Icons' and 'Device Icons' allow you to be specific about what icons are displayed (See figures below). The 'General' tab also allows you to setup what each of your mouse buttons do when they are clicked. You can also choose if you would like your Menu bar at the top of your screen and if so, what style.

Fig. Behavior Dialog
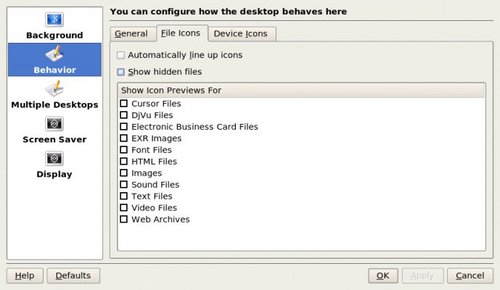
Fig. File Icons
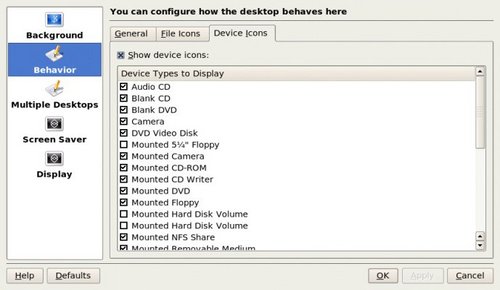
Fig. Device Icons
Multiple Desktops
The "Multiple Desktop" tab allows you to increase or decrease the number of virtual desktops that are available in your taskbar. To change the number of desktops, you can use either the "slider" or the up and down arrows located to the right of the slider. Each time the number increases (or decreases) you will add (or subtract) a virtual desktop.
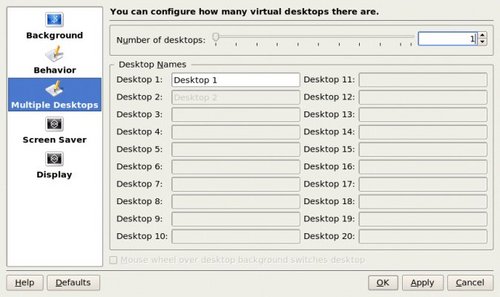
Fig. Multiple Desktops
Screen Savers
The next configuration option in the "Configure - Kdesktop" dialog window will let us setup our screen saver. Choose this option by clicking on the "Screen Saver" tab located on the left side of the dialog window and you will see a window that looks like this:
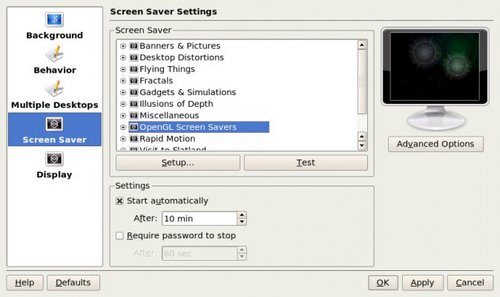
Fig. Screen Saver
The first thing you will notice will be a long list of different types of screen savers. If you click on the little "+" sign next to any of these it will show another list of that particular type of screen saver like this:
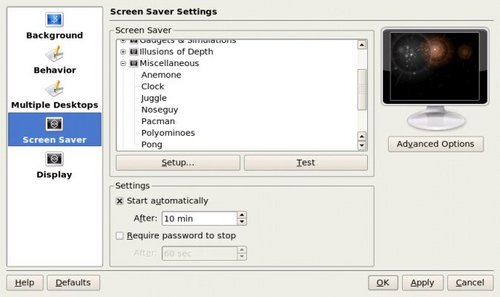
Fig. Screen Saver Types
There are far too many types to cover in this how-to so you will have to experiment and look at them until you find one that you like. This window works just like the background window did. Click on a screen saver and a thumbnail (small picture) will be displayed in the monitor to the right of your selection.
You will also notice a "Setup..." button and a "Test" button below the list of screen savers. Some screen savers accept extra information so that you can make them work exactly as you wish, which is what you would use the "Setup..." button for. The "Test" button will bring up the screen saver in full screen mode so that you can see what it will look like when it starts.
There are two other options in this window. The first is whether or not you want to have the screen saver start automatically, and if so, how long after there is no activity. Simply use the up and down arrows to set the number of minutes.
The second option allows the screen saver to effectively "lock" your desktop. To unlock the screen saver you will have to enter your password into the box that will pop up when you try to go back to your desktop.
There also is an "Advanced Options" button under the monitor where your thumbnails are displayed. It allows you to start your screen saver by moving your mouse into a particular corner and leaving it there. Your choices can be seen below:
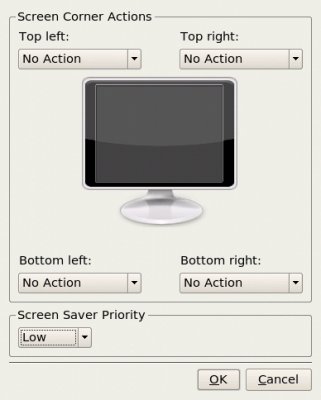
Fig. Advanced Options
For that figure to operate, you must set the screen saver to activate automatically, and must select a corner and the desired action. If you wish the action to be "lock screen" then you must also select "require password."
Display
The last item in the "Configure - Kdesktop" left pane is "Display". There are three tabs in this window: Size & Orientation, Monitor Gamma, and Power Control. We will only explore the "Size & Orientation" and "Power Control" tabs.
The only thing on this tab, that is of interest to this how-to, is "Screen size" (resolution). This adjusts the size of everything on your desktop including the icons, fonts, taskbar, etc....
The Kde desktop will default this setting to the largest resolution that your monitor can handle. In the screenshot below you will see that mine is set to 1280x1024. If you click on the arrow next to this setting you will see a list of resolutions that are available for your monitor. The smaller the number, the larger everything will appear. Choose one and then click "Apply." The desktop will go blank for a moment and then you will see your desktop in the new resolution with a dialog box asking whether or not you want to accept this new resolution. If you want to accept it then use your mouse to click on the accept button. (Note: Do not try this if you are running any 3D effects.)
If you would like to have this as your default resolution when you start Kde, then click on the box next to "Apply settings on Kde startup."
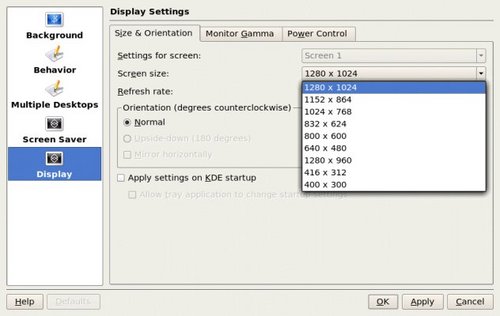
Fig. Display
Desktop Themes
The desktop theme specifies the visual appearance of the panels, applets, and windows by combining settings for the background, colors, window style, icons, fonts, and screen saver. The desktop theme may also specify the appearance of interface items in applications. For example, the theme affects the appearance of buttons, scrollbars, check boxes, and so on in the applications.
The theme used by the Desktop can be changed by running the Theme manager from the Menu.
Menu > System > Configuration > KDE > System Administration > Theme Manager
A theme selector dialog window is displayed. The screenshot below shows a sample of some of the themes which may be available. Note that the actual themes available can vary from system to system.
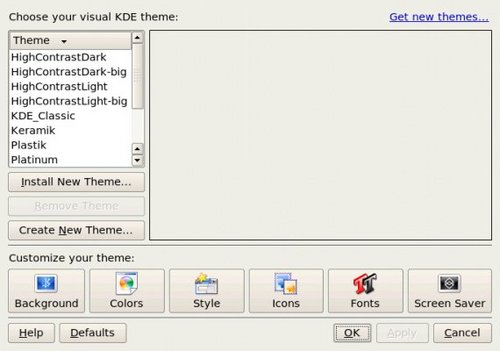
Fig. Theme Manager
As you can see in the Theme Manager screenshot, you will find a list of available themes in the upper left hand corner. To choose a theme just click on one and then click on the "Install New Theme" button. If the new theme does not suit your fancy then try another, and another, and another, until you find one that you like.
Now, it is possible that you do not find any of the default themes to your liking. Have no fear! The "Get new themes..." link in the upper right hand corner will transport you to http://www.kde-look.org/ where you will find literally hundreds of other themes. It will also be your source for just about any form of eyecandy that you will ever need for your Kde desktop.
Before we move on, make note of the six tabs that are located along the bottom of the Theme Manager window. We previously covered Backgrounds and Screen savers in Part 1. Clicking on either of these tabs will bring you to windows that you are familiar with already. The other four tabs (Fonts, style, Icons, and Colors) are what we will be covering in the following paragraphs.
It is also possible to set/change themes by going to the KDE Control Center.
Default Fonts
The default fonts used to display applications and the desktop background can be changed by running the Fonts application from the KDE Theme Manager or by using the menu.
Menu > System > Configuration > KDE > Fonts
A selector dialog for the application, window title, dialog and terminal fonts are displayed as seen below:
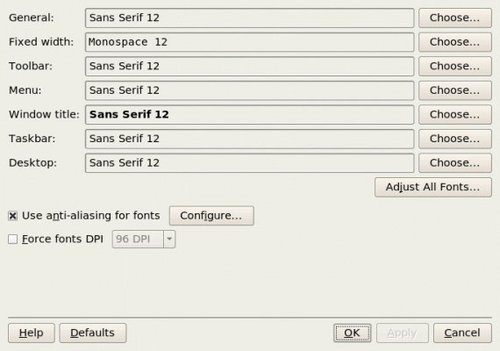
Fig. Fonts Window
To change the font for each category of usage, click on the "Choose" button to the right of each space listing the font. This will bring up a new dialog window where you will be able to choose different fonts and see what they will look like before deciding which one you want as you can see below:
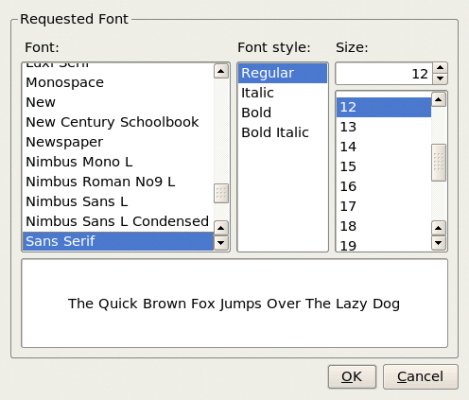
Fig. Selecting New Fonts
As you make your choices of Font, Font style, and size, You will see the effects of each of your choices in the box at the bottom of the window. Once you have found the right combination, click on the "OK" button.
style
The style tool is used to customize the appearance of menus, menubars, and toolbars. Again this can be run from the KDE Theme Manager or by using the menu.
Menu > System > Configuration > KDE > style
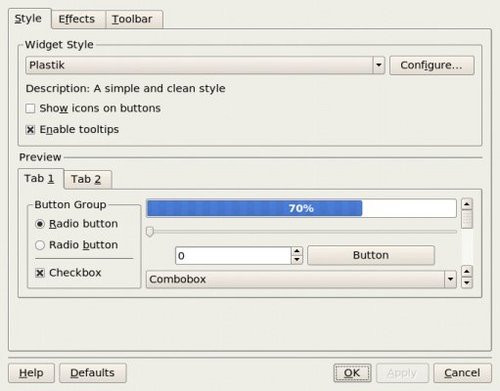
Fig. style Dialog Window
As you can see in the screenshot above, the style window gives you three tabs, style, Effects, and Toolbar. The greatest effect created by these three tabs will be with the "Widget style" part of this window. Experiment on each of the settings to find the ones you prefer.
Icons
The Icon theme window offers you many choices as you can see below:
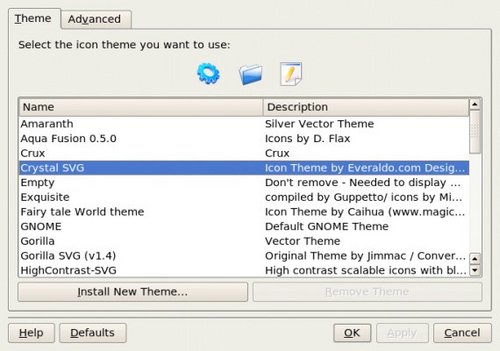
Fig. Icon Theme Window
Go ahead and choose an icon theme by clicking on any of the listed themes. Pay attention to the three icons located above your theme list. As you click on each theme you will notice these icons change to show you how they will look on your desktop. When you find one that you like, click on the "Install New Theme" button.
The "Advanced" tab offers you the ability to set effects for your Default, Active, and Disabled icons. You can also choose to animate your icons and change the pixel size. Now we can move onto Colors.
Colors
The Colors Dialog window gives you many choices of color themes to choose from.

Fig. Colors Dialog Window
As we saw with the Icon window above, you can again see the effects of your choices at the top of the window. When you find the one you want, click on the "Save Scheme..." button.
Exercises
Experiment with each of the following desktop preferences:
- Themes
- Fonts
- styles
- Icons
- Colors
Using the Desktop
The Desktop provides a useful metaphor for a modern office work environment. So on the Desktop we find that the applications that we want to run can easily be started or launched and the information and data that we need can easily be located.
Running Applications
Applications that we can run from the Desktop are to be found either from the Main Menu (and sub-menus therein), or as icons on the Panel and the Desktop itself.
To run an application from the Main Menu, open up the menu (or sub-menu) and click on the application listed in the menu bar.
To run an application from the Panel, click once on the icon representing the application.
To run an application from the Desktop itself, double-click on the icon representing the application.
Sometimes it is more handy to have an application as an icon on the Panel or Desktop where you can launch it more easily by just clicking on it, rather than in the Main Menu, especially if it is buried deep within several sub-menus. To achieve this, open the Main Menu and select the application item listed in it by clicking with the right mouse button. Click on the "Add Item to Main Panel" and a copy of the application icon will be placed on the Panel.
To make a link of the application on the Desktop, click with the right mouse button, and select "Add Item to Desktop" and the application icon will be placed on the the Desktop.
To delete an application icon from the Panel, right-click on it and select the "Remove <application> Button" option.
To delete an application icon from the Desktop, right-click on it and select the "Move to Trash" option.
The Panel
The Panel houses many useful utilities called applets. Applets are small applications that run on the Panel. As discussed in Chapter One, by default, the taskbar and the workspace switcher applets are placed and run on the Panel. Other useful applets that may be placed on the Panel include:
- clock
- dictionary
- volume control
- preferred applications
Placing an Applet on the Panel
To place an applet on the Panel, move the mouse over to an empty space on the Panel and right-click it. Select the item "Add Applet to Panel" and from the sub-menu select the applet to place on the Panel. For example, to place the "dictionary" applet on the Panel, select:
Add Applet to Panel --> Dictionary

Fig. Add Applet
To prevent accidental removal of an applet, you can lock the Panel by right-clicking on it and selecting "Lock Panels".
Removing an Applet from the Panel
To remove an applet, right-click on the applet icon and select the "Remove <application> Button" option. If the applet is locked, you will have to unlock it first by right-clicking on the icon and selecting "Unlock".
Configuring the Panel
To change the properties of the Panel, right-click on the Panel and select "Configure Panel".
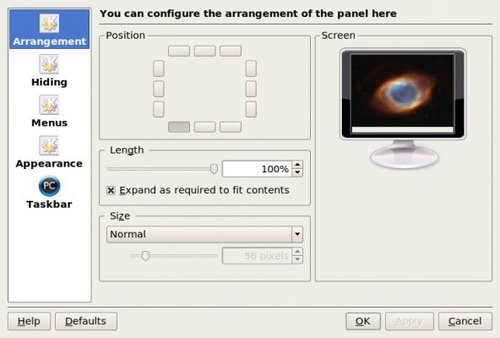
Fig. Configure Panel
- From the Arrangement properties tab, you can change the position, length, and size of the Panel.
- From the Hiding properties tab, you can hide and (un)hide the Panel, as well as change how other windows interact with it.
- From the Menus properties tab, you can change how the Main Menu displays its entries.
- From the Appearance properties tab, you can change the color of the Panel as well as its visual appearance.
- From the Taskbar properties tab, you can change how the taskbar displays running programs in the Panel.
Launchers
Launchers allow the user a quick way to access specific resources on the system. For example if a user needs to access a specific file in one of the folders often, he can create a launcher to run an application to open the file and this launcher can be placed on the Desktop. In this way the resource (the file) can be accessed very quickly by just double-clicking on it.
To create a launcher on the Desktop, right-click on an empty area on the Desktop and select the item "Create New." From the sub-menu, select "Link to Application". Enter the Name and the Command to run (in the box seen below) and if you want you can select an icon for it by clicking on the icon button.
You can find most of the commands you need by clicking on the "Browse..." button, use the "up" arrow to move up in the file structure to "/" and double-click on "/usr." Once that window opens you can double-click on either "/bin" or "/share" and choose the necessary command in most cases.
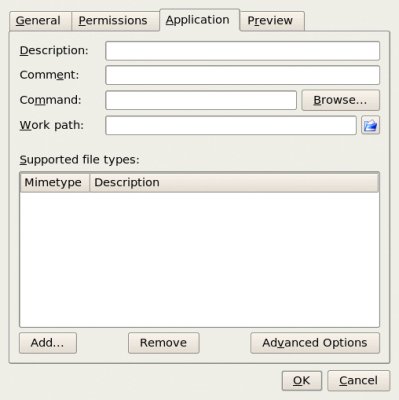
Fig. Creating a Launcher
Exercises
The Firefox web browser is a popular web browser application for Linux systems.
Locate the Firefox application in the Main Menu and place it on the Panel as well as the Desktop. Launch the Firefox application from:
- the Desktop
- the Main Menu
- the Panel
Configure the Panel so that it has the following properties:
- a background color of solid blue
- contains the Klipper and Storage Media (locked) applets
- Create a launcher to run the text editor command "kate" on the Desktop. Use an appropriate icon for the text editor.
Setting the Date and Time
It is important that the date and time are set correctly in your system. This will make it easier to manage the system resources and files, and also aid in troubleshooting any problems. To set the date and time, run the Date & Time application tool from the Menu:
Menu > System > Configuration > KDE > System Administration > Date & Time
Alternatively, you can right-click on the clock (time) applet display on the Panel and choose "Adjust Date & Time".
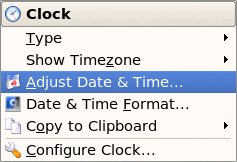
Fig. Right Click Clock Menu
A dialog box asking for the root password will appear if you are not logged in as root. This is because the system date and time are important system parameters and so only the system administrator, or root, is allowed to do it. After entering the correct root password, you can change the date using the displayed calender, and the time in the boxes provided. Select the Time Zone tab and check to see that the timezone selected is correct. If not, correct it by selecting the appropriate timezone region. Usually the system uses the local time, so do not select the "Set date and time automatically" check-box.
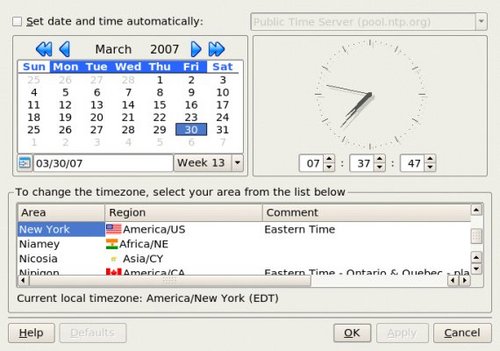
Fig. Setting the Date and Time
Click on the Apply button after all is done to enable the new date and time. You can check for the new date and time by resting your mouse over the clock (time) applet display on the Panel at the bottom of the screen. If the time is correct, click on the OK button.
You can also change the appearance of your clock by right-clicking on the clock (time) applet display on the Panel and choose "Type." This will give you four choices (Digital is the default), Plain, Analog, and Fuzzy.
Exercises
- Practice setting the date and time.
- Practice changing the appearance of the desktop clock
Once again we have reached the end of this installment. I hope you are looking forward to next months chapter in this ongoing how-to as we will be covering File System structure, permissions, and about everything you will ever need to do with files and folders. Y'all come back now, Y'hear!