KDE on PCLinuxOS
This guide has been modified by Papawoob to reflect the PCLinuxOS 2007 KDE environment.
Originally - Published by the United Nations Development Programme's Asia-Pacific Development Information Programme (UNDP-APDIP)
Kuala Lumpur, Malaysia
Web: http://www.apdip.net/
Email: info@apdip.net
© UNDP-APDIP 2004
The material in this guide may be reproduced, republished and incorporated into further works provided acknowledgment is given to UNDP-APDIP.
This work is licensed under the Creative Commons Attribution License. To view a copy of this license, visit http://creativecommons.org/licenses/by/2.0/ or send a letter to Creative Commons, 559 Nathan Abbott Way, Stanford, California 94305, USA.
Preface
This user guide is meant as an introductory guide for a user to use a modern personal computer (PC) running a Linux operating system. The main aim is to provide a self-learning guide on how to use a modern Linux desktop system. It assumes that the user has no prior knowledge of Linux or PC usage.
After going through the guide the reader should be in a position to start using a Linux desktop for both personal and office use. In particular the user should be able to:
- access the Internet and use the WWW and Internet email
- manage files and folders, manipulate the file system
- produce and print simple documents and presentation materials
- advance to become a power user by further self-learning and exploring
Chapter 1 - Getting Started
I've updated this guide to reflect the desktop environment called KDE. It "Windows" like with a few more bells and whistles. I've taken the screenshots from my computer, which won't be set up exactly the same as yours, but will be pretty close.
In order to start using your system you will usually have to perform what is known as a user login. This procedure is necessary to identify yourself to the system. The system allows multiple users to use it concurrently so, it has to be able to identify a user in order to grant them the necessary privileges and rights to use the system and applications. Each user, upon successful login, will be assigned to his home directory (folder).
Some systems may have been set up so that upon power-on, a default user is logged in automatically. If this is so, then you will not be presented with a login screen or prompt as described in the section below. You may skip on to the section entitled "Basic Navigation using the Mouse on the Desktop."
Note:
There is a special user called root, or superuser (this user is usually created during the system installation) which has unlimited access and rights to all the system files and resources. You only need to login as root if certain system level administrative tasks are to be carried out. Otherwise,there is usually no need for a normal user to login as root. This is to prevent accidentally damaging the system by deleting or modifying important system files.
Text Based Login Prompt
To login, enter the user name followed by the ENTER key and when the password prompt appears, enter the password followed by the ENTER key. You are now logged onto the system and may issue commands if you wish. For this exercise the only command you need here is startx, which starts the Graphical Interface.
Graphical Login Screen
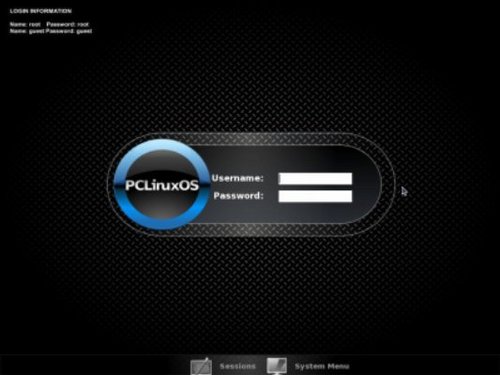
When you reach the screen above, type in your username and then type in your password and hit enter. This will bring up a splashscreen showing your desktop being loaded as seen below:
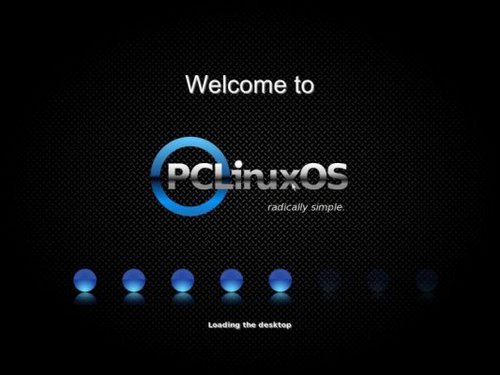
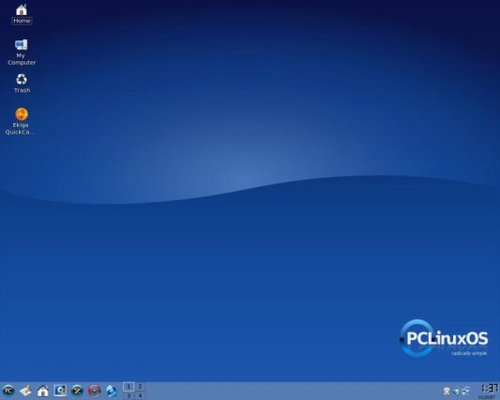
When the blue lights on the bottom finish lighting up the next thing you will see is your KDE desktop as seen below:
Starting The Graphical Desktop
If you have used the text-based screen login, you will have to start the graphical desktop manually by entering the command startx, followed by the ENTER key.
If you have logged in from the graphical login screen, the graphical desktop will be started automatically for you. The graphical desktop presents a Graphical User Interface (GUI) for the user to interact with the system and run applications.
Note:
The graphical desktop that we will be using throughout most of this guide is called the KDE Desktop. There is another desktop environment in popular use on Linux systems – the GNOME Desktop. There is some coverage of GNOME later, comparing the similarities and differences between GNOME and KDE although we will not be covering the GNOME desktop in detail. For the rest of this user guide, when we refer to the graphical desktop or Desktop we will be talking about the KDE Desktop unless stated otherwise.
Using The Mouse On The Graphical Desktop
Proper usage of the mouse is essential in order to have a rewarding and productive experience on the graphical desktop. Most Linux graphical desktops are designed for use with a 3-button mouse. If you are using a 2-button mouse, during installation, it should have been configured to emulate the middle-button of a 3-button mouse by pressing both buttons simultaneously.
To click on a mouse, the left button is depressed. (A mouse configured for a left-handed user will need to have its right button depressed.) The right (or left button for a left-handed mouse) and middle buttons are usually used to invoke special or specific features of the GUI and instructions to do so will be explicitly given.
The term "clicking on the mouse" means that you click on the mouse once.
The term "double clicking" means that you click twice in succession on the mouse.
To "select" an item means clicking it once with the mouse.
The term "drag and drop" means that you will have to click on an item and while continuing to hold the mouse button down, drag the item to another place and on reaching its destination, drop it by releasing the mouse button.
Exercises
- Open the home folder from the Desktop.
- Close the home folder window by clicking on the close window button at the top right-hand corner.
- Right-click on the trash icon, view its properties and then close it.
- Move the trash icon to another location on the desktop by using the mouse to drag it to the new location and then releasing the mouse.
Main Components Of The Desktop
There are 3 main components to a KDE desktop. They are:
- The Menu System
- The Panel
- The Desktop Itself
The Menu System
The main menu can be accessed by clicking on the Main Menu button located at the extreme lower left hand corner of the desktop. It looks like this:

Clicking on this will bring up the Menu System as shown in the figure below.
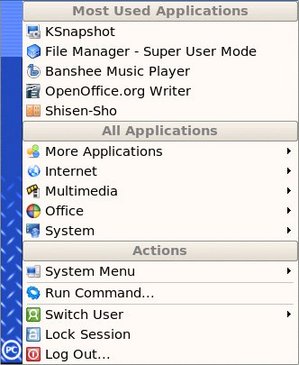
Fig. The Menu System
From the Menu System you can start many of the applications installed on your Linux system. Note that the Menu System consists of a Main Menu panel and sub-menu panels. Each entry in the Menu System which has an arrow on its right means that it is an entry point to a sub-menu, and there can be sub-menus within each sub-menu. In this way, applications in the Menu System can be organized and categorized for easy reference and access.
To access the sub-menu associated with a menu entry, move the mouse and rest it on the menu entry in question and a sub-menu panel will appear as seen below:
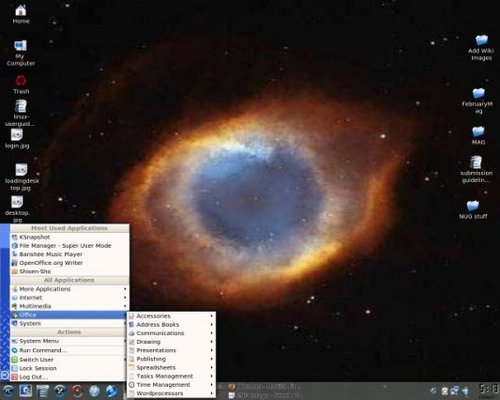
Fig. Main Menu and Sub-menu
Clicking once on a menu entry will cause an application associated with it to be launched, i.e., executed.
The Panel
The long bar across the bottom of the desktop screen is called the Panel. The Panel contains the Main Menu icon, the application launcher icons, a notification area and applets.

Fig. The Panel
Installed by default are several application launcher icons on the Panel. These are: Show Desktop, Home Folder (My Documents), PCLinuxOS Control Center (Control Panel), Synaptic Package Manager, and Mozilla Firefox (Web Browser). Clicking on one of these will run the application. Commonly accessed applications can be added to the Panel and those that are less frequently used can be removed.
The notification area holds alert icons so that the user can be alerted to critical messages.
Applets are small applications that run on the Panel. These usually perform useful and informative tasks like setting the sound level of the sound card, monitoring whether the system software needs an update, weather, etc.
The Workspace Switcher
The graphical desktop can be regarded as a workspace drawing an analogy with the working area on a real physical tabletop. Programs are run, documents displayed and files opened on the workspace. To cut down on workspace clutter and to enable the user to organize his workspace more efficiently, the graphical desktop environment allows the usage of multiple workspaces. Each workspace can be considered as a virtual desktop.

Fig. The Workspace Switcher
By default the user has 4 desktop workspace areas to work on. The workspace switcher represents each workspace as a small square and shows the applications running in each of them. To access a workspace, click on the square with the mouse.
The Taskbar
The Taskbar applet is located next to the workspace switcher and shows the titles of all the running applications in a virtual desktop (a workspace).

The Desktop Space
The Desktop space refers to the rest of the screen. It contains icons which are graphical representations of short-cuts to application launchers, file folders, files, and peripheral devices like floppy disks, CD-ROM drives, and printers. Double-clicking on an icon representing an application will launch or execute the application. Commonly used applications and/or files/folders are usually placed on the desktop space.
Using The Window Manager
An interactive application that is run on the graphical desktop is usually displayed inside a window. This window can be accessed and manipulated using the window manager.
Fig. An Application Window Frame
The Titlebar
When an application is started, an application window opens and a frame (see figure above) is placed around the window of the application. The top edge of the frame has a titlebar that contains the title of the application.
At the left hand corner of the titlebar is the Window Menu button. Clicking on this button will open up the Window Menu.
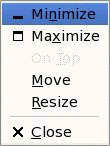
Fig. A Window Menu
You can perform operations such as minimize, maximize, move, resize and close the window from this menu. At the right edge of the titlebar there are three buttons which allow you to minimize, maximize, and close the window.
To perform an operation in the Window Menu, open the menu by clicking on the Window Menu button and then select the desired operation.
Manipulating The Window
Some basic instructions to manipulate the windowing system are given here. More details can be obtained by clicking on the Main Menu and then on More Applications, Documentation and then KDE Help Center. After the KDE Help Center opens choose KDE User Manual and scroll down to "Windows, How To Work Them."
Focus
In order for a window to recieve input from the mouse and the keyboard it has to be the window "in focus." Only one window can have focus at a time. Windows that are not in focus have their titlebars grayed-out. To focus on a window place the mouse on the titlebar and click on it. (You can actually click anywhere within the window, but it is safer to click on the titlebar since there is no possibility of accidentally clicking on some item selection or functionality of the application running within the window.) If the window is not visible, you can click on the taskbar on the Panel at the bottom of the Desktop to bring into focus the window you want.
Maximize and Minimize
Maximizing a window means that the window is expanded to cover the whole desktop, while minimizing it means that the window is taken off the desktop and it appears as an icon in the taskbar on the Panel.
You can maximize a window which has focus either from the Window Menu or by clicking on the maximize button on the titlebar. You can similarly minimize the window. If the window does not have focus, bring it into focus by clicking on the taskbar on the Panel.
Resize
You can resize a window, i.e., change its size, by placing the mouse at an edge of the window and then drag the window to the desired size.
Move
To move a window to another place on the desktop, place the mouse on the titlebar and drag the window to the desired location.
Close
You can close a window which has the focus either from the Window Menu or by clicking on the close window button on the titlebar. If the window does not have focus bring it into focus first by clicking on the taskbar on the Panel.
Note:
Closing the window may terminate your application.
'Blind'
You can reduce the window size to just the title bar (like a window-blind) by double clicking on the title bar.
Move to Workspaces
The Window Menu can be used to move the application currently opened to another workspace or to all the workspaces.
Exercises
Open your home folder from the Desktop. Perform the following operations on the opened window:
- maximize it
- minimize it
- resize it
- move it to another area of the desktop
- place it on workspace 3
- reduce it to just the title bar
- close it
Ending The Session
To end this chapter, you can exit your session on the desktop by performing what is known as a logout.
If you do not want to use the system any more, you can turn it off by performing a system shutdown.
Logout
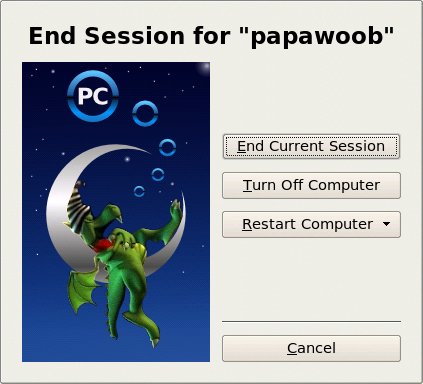
When you have finished working on the system, you will need to logout. Logging out will inform the system that you are no longer using the system's resources. All the files opened and programs run by you will be closed and/or stopped unless you have specifically informed the system to keep them open or running for you.
To logout, at the Main Menu select: Main Menu --> Log Out and at the dialog window select "End Current Session" and click OK.
Shutting Down The System
When you have finished using the computer and want to power it off, you will need to perform a system shutdown. To shutdown, at the Main Menu, select logout. Then, at the graphical logout screen select the "Turn Off Computer" option. You will also have the option to "Restart Computer."
Note:
It is very important that a proper system shutdown is performed. You should not just turn off the power switch of the computer to shut it down. Failure to observe this may lead to system software and data corruption and failure.
This ends the first chapter in an ongoing series of articles. By the time we are finished anyone that reads will feel very confident while moving around in the PCLinuxOS 2007 KDE desktop environment. See you next issue!